Return
About this chapter
This chapter covers the return chart — the chart for the moment a planet comes back to the position it held at birth. You can build returns for every body from the Sun to Pluto, starting with the solar return and the lunar return, and switch between three displays: single wheel, bi-wheel, and tri-wheel. Return charts are available on the Plus plan and above (returns of bodies other than the Sun, Moon, and Saturn require Pro and above).
For the basics of transits, see also Transits on the ARI official site (in Japanese).
Creating a return chart
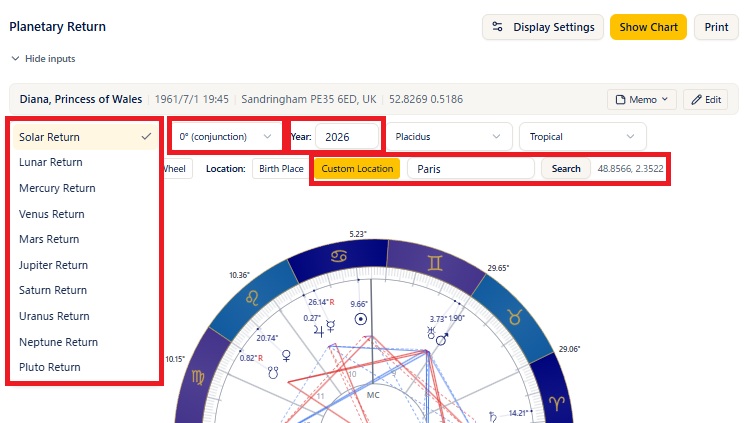
Steps
- Open Return from the menu. Choose the birth data in the header (Show Chart cannot be pressed while nothing is selected).
- To correct data on the spot, edit the values directly in the birth data form (press Show Chart to apply your edits).
- From the Return Type selector at the far left, choose Solar Return / Lunar Return / Mercury Return / Venus Return / Mars Return / Jupiter Return / Saturn Return / Uranus Return / Neptune Return / Pluto Return.
- From the phase selector next to it, choose 0° (conjunction) / 90° (square) / 180° (opposition) / 270° (square) (the default is 0°, the ordinary return).
- Enter the year you want to search in Year (the default is this year).
- Under Location, choose Birth Place or Custom Location (for how to use a custom location, see "Specifying the location" and "Using the solar return to choose a place" below).
- Choose a house system if you need to.
- Press Show Chart and the return chart appears.
Notes
- The chart is calculated for the moment the body you chose returns to the same ecliptic longitude it held at birth (a conjunction).
- Setting the phase to 90°, 180°, or 270° gives the moment the body has moved a quarter, a half, or three quarters of the way from its natal position. Use it when you want to find the periods that form a square or an opposition.
- Once calculated, the exact date and time of the return are shown below the chart.
- If there is no matching return within the Year you entered, No returns in this period is shown, and the Find previous return and Find next return buttons search the years before and after.
- Switching the house system recalculates automatically with the data already computed.
Plans
Return charts (solar, lunar, Saturn) = Plus plan and above. Returns of the other bodies (Mercury through Pluto) require the Pro plan and above.
Switching the display mode
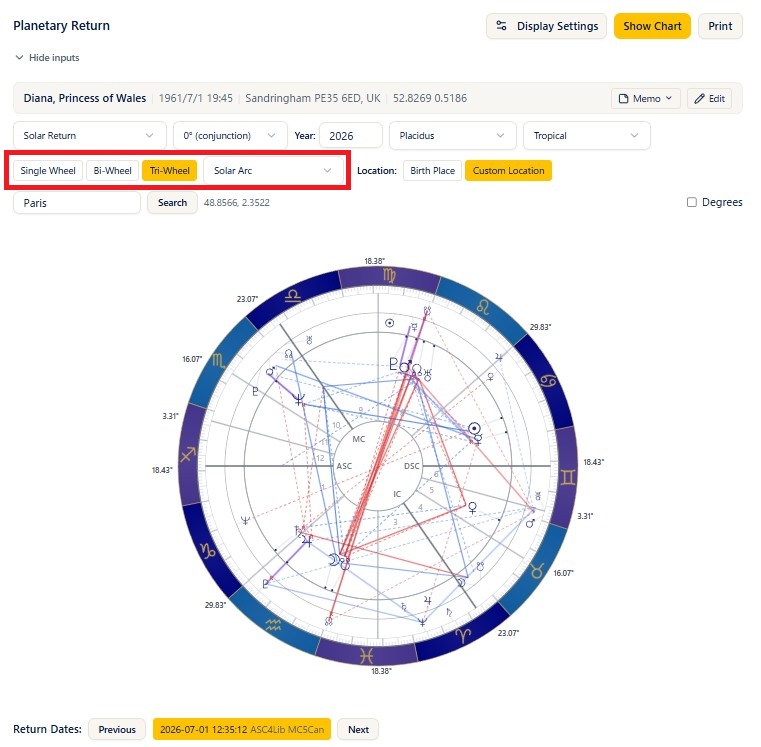
Steps
- Choose Single Wheel / Bi-Wheel / Tri-Wheel with the mode buttons (the default is the bi-wheel).
- When you choose the tri-wheel, you can also choose the progression method from the Solar Arc / Secondary selector.
- Switching the mode recalculates whatever data is needed, automatically.
Notes
- Single Wheel: shows only the return chart (R) as a single circle.
- Bi-Wheel: shows the natal chart (N) on the inner ring and the return (R) on the outer ring.
- Tri-Wheel: shows the natal chart (N) on the inner ring, the progressed chart (solar arc = D / secondary = P) on the middle ring, and the return (R) on the outer ring.
- The planets shown on each ring follow Display Settings (Planet Display).
The planets on the outer ring (the return chart) follow the transit settings
The planets shown for the return chart (R) on the outer ring of a bi-wheel or tri-wheel follow the T: Transit section of the settings (Planet Display). The transit settings often have the ASC, MC, Sun, and Moon unticked, so if you want them on the return chart, tick them under T in the settings (or in Display Settings). This is easy to forget.
Specifying the location
Steps
- Choose Birth Place or Custom Location with the Location switch (the default is the birth place).
- When you choose Custom Location, type a place name into the field (choose from the suggestions, or use the Search button = Basic and above).
- After changing the location, press Show Chart again and the return chart is computed for that place.
Notes
- Birth Place: calculates the return chart at the latitude and longitude of the birth data.
- Custom Location: calculates the return chart at the latitude and longitude of the place you entered (use this when you want to see it for where you are now, such as somewhere you have moved to). Once the latitude and longitude are resolved, the figures appear to the right of the field.
- Changing the location does not change the signs and degrees of the planets, but it does change the ASC, the MC, and the house placements.
Using the solar return to choose a place
A solar return chart is read for the place you are in at the exact moment of your birthday, so changing where you spend that period gives you a return chart with different ASC, MC, and house placements for the very same moment. You can use this to spend your birthday period somewhere that produces the placements you want.
Steps
- Choose Solar Return as the return type and specify the Year.
- Choose Custom Location under Location, type in a candidate place, and press Show Chart.
- Check the exact date and time of the return shown below the chart, along with the ASC, MC, and house placements.
- Recalculate with different candidate places, compare the placements, and consider where to go.
Notes
- Changing the location does not change the signs and degrees of the planets. What changes is the ASC, the MC, and the house placements.
- Which placements to aim for is a matter of astrological interpretation, so this manual does not cover it. Please judge on the basis of what you have learned in your courses.
Choosing a return date
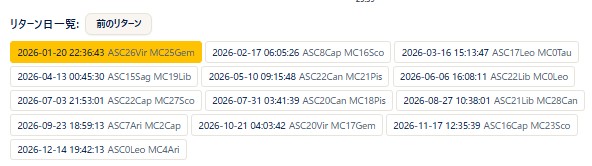
Steps
- The Return Dates list below the chart shows the return dates and times for that year. Pressing a date button switches to the return chart for that day.
- The Previous and Next buttons move to the return before or after.
- Once you reach the end of the list, those buttons switch to searching the previous or the following year.
Notes
- The return date currently on display is marked in yellow (highlighted). When you choose another date, the highlight follows the chart on display.
- Each date shows a red R for a return that is retrograde, together with the degrees of the ASC and MC for that chart.
- The solar return happens once a year, but for returns with many candidate dates, such as the lunar return, the list lets you pick the chart for the month you want.
Reading the right panel
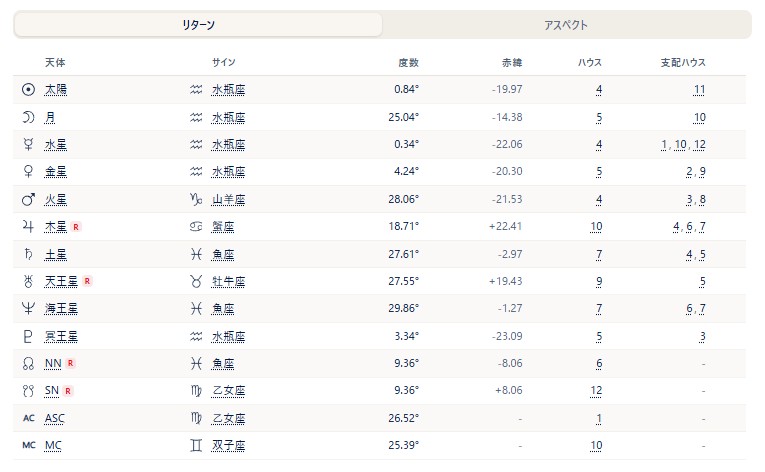
Notes
- The tabs change with the display mode: single wheel = Return (R) / Aspects, bi-wheel = Natal (N) / Return (R) / Aspects, tri-wheel = Natal (N) / Direction (D) / Return (R) / Aspects.
- Natal (N) / Direction (D) / Return (R) tabs: show the planet table for each ring (planet, sign, degree, declination, house, houses ruled). The planets listed in the right panel follow the N: Natal section of Display Settings (Planet Display) on all three tabs (unlike the outer ring of the wheel; see the warning under "Switching the display mode").
- Aspects tab: shows aspect grids divided into sections according to the display mode. The bi-wheel has the sections N-N / N-R / R-R, and the tri-wheel has N-N / N-D / N-R / D-D / D-R / R-R.
- Clicking a planet on the wheel pops up the list of aspects to it. Angles such as the ASC and MC can be clicked too.
- Returns are calculated as transits, so their relationship with the natal chart is shown as N-T (that is, N-R) aspects.
Display and printing
Steps
- On the bi-wheel and tri-wheel, ticking Degrees shows the degree of each planet on the wheel.
- The Display Settings button lets you adjust the planets and aspects shown on the spot (Plus plan and above).
- The Print button prints the return chart and the data (Basic plan and above, portrait).
- Clicking the wheel enlarges it, and from the enlarged view you can save the image with PNG (PNG saving is Basic plan and above).
Notes
- The file name for printing and PNG includes "Return" and the name from the birth data.
- Degree notation (decimal or degrees-minutes) follows the degree mode in the settings.
- If you print a chart drawn from unsaved edits, an Unsaved birth data note appears in the print header.
Plans
Return charts = Plus plan and above / place search = Basic and above / printing and PNG saving = Basic and above / Display Settings = Plus and above.