Election
About this chapter
This chapter covers Election (choosing an auspicious date and time). It narrows down candidate dates and times suited to your purpose from a period and category you specify.
The narrowing proceeds in three stages — year, then month, then day (time slot) — and the chart for the moment you finally choose is shown on the right. Election is available on the Max plan.
Entering the conditions
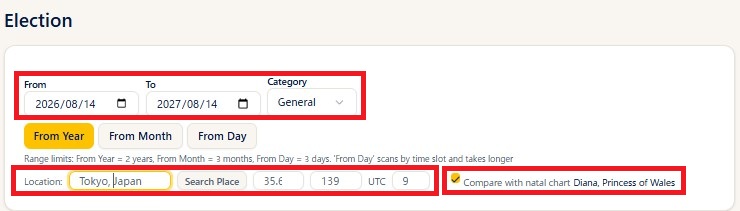
Steps
- Open Election from the menu.
- Specify the period you want to search with From and To.
- Choose a Category. The choices are General / Marriage / Business / Moving / Publishing / Trading / Litigation.
- On the lower row of the input fields, specify the Location (place name), the Lat/Lon, and the UTC offset. The default is "Tokyo, Japan (latitude 35.68 / longitude 139.65 / UTC 9)".
- Ticking Compare with natal chart narrows the results against the birth data selected in the header (while it is ticked, that person's name is shown on the right).
Notes
- The location, latitude, longitude, and UTC offset are used to calculate the houses for each date and time. Set them to the place where the election applies.
- Turning on "Compare with natal chart" makes the candidate chart a bi-wheel with the natal chart and adds a list of Natal Aspects (see "The chart for the chosen moment" below). The birth data is not used for the scores or the exclusions, which are calculated purely from the conditions of that date and time (turning the comparison on or off does not change the results).
- Select the birth data in advance, from the birth data picker in the header.
The three-stage narrowing (year, month, day)
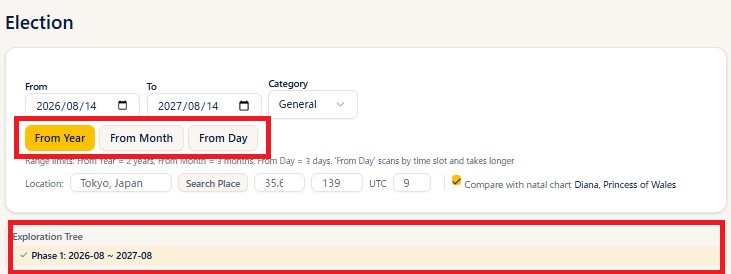
Steps
- Once the conditions are entered, start narrowing with one of the three buttons.
- From Year: when you want an overview of the whole period on a calendar first (up to 2 years).
- From Month: when the month is decided and you want to start from a day-by-day analysis of it (up to 3 months).
- From Day: when the day is decided and you want to start from the time-slot analysis (up to 3 days).
- While the analysis runs, a Cancel button is shown, which stops the process.
- When the analysis finishes, the path you took is stacked up in the Exploration Tree on the left, year to month to day.
Notes
- From Day scans time slot by time slot at 30-minute intervals, so it takes longer than the others.
- The button currently selected is highlighted (filled in).
- An error message appears if, with From Month, the end date is not after the start date, or if the range is too wide (month = up to 93 days, day = up to 3 days).
The exploration tree

Steps
- The exploration tree shows the candidates you have followed so far as a hierarchy: Phase 1 (year) to Phase 2 (month) to Phase 3 (day and time slot).
- Clicking a candidate displays its content.
- The x on each item deletes that exploration. Candidates that have not been analyzed yet have a play button, which runs their analysis (useful for running an analysis you cancelled earlier).
- Date candidates in Phase 3 (the time-slot analysis) can be marked Good (check) / Maybe / Bad. Pressing the same mark again clears it.
Notes
- The verdict marks are notes to yourself, useful for comparing several candidates later.
Phase 1: the calendar overview
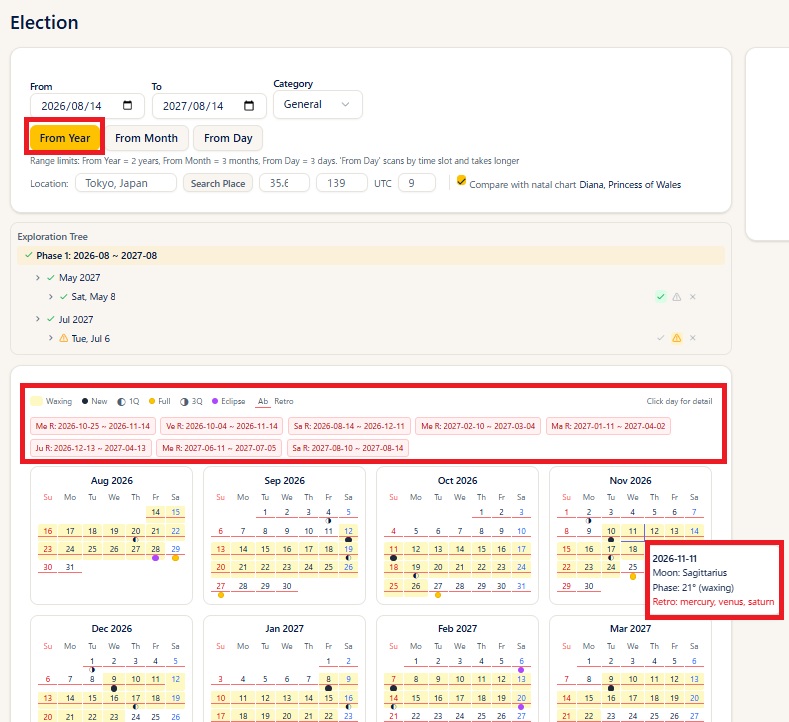
Steps
- Running From Year lays out a calendar for each month in the period.
- Each day carries marks for the moon phase and for events. Hovering over a day shows a tooltip with its moon sign, moon phase, retrogrades, eclipses, and so on.
- Clicking a day that interests you takes you to the daily analysis (Phase 2) for the month containing it (from the 1st to the last day).
Notes
- The calendar legend: waxing moon (pale yellow background) / new moon (black circle) / first quarter / full moon (yellow circle) / third quarter / eclipse (purple circle) / retrograde (a red underline below the date).
- Above the calendar, the retrograde periods of each body within the range (Mercury R, Venus R, and so on) are listed.
Phase 2: the daily analysis
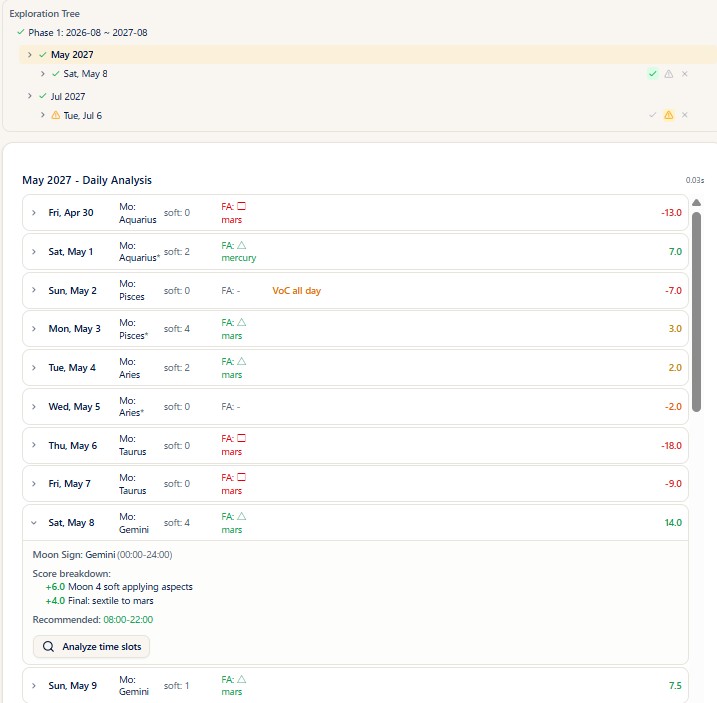
Steps
- Choosing a month on the calendar lists the days of that month. Each row shows the date, the moon sign, the number of soft aspects, the final aspect (FA), the score, and more.
- Clicking a row expands it and shows the details for that day.
- The Analyze time slots button inside the details takes you to the time-slot analysis (Phase 3).
Notes
- The expanded details show the moon sign (with its time span), VoC (void of course), Via Combusta, the score breakdown, exclusions, the recommended time slots, and so on (only the items that apply to that day).
- When the Moon changes sign during the day, an asterisk is added in the moon sign column.
- A day that is void of course all day is marked VoC all day.
Phase 3: candidates by time slot
Steps
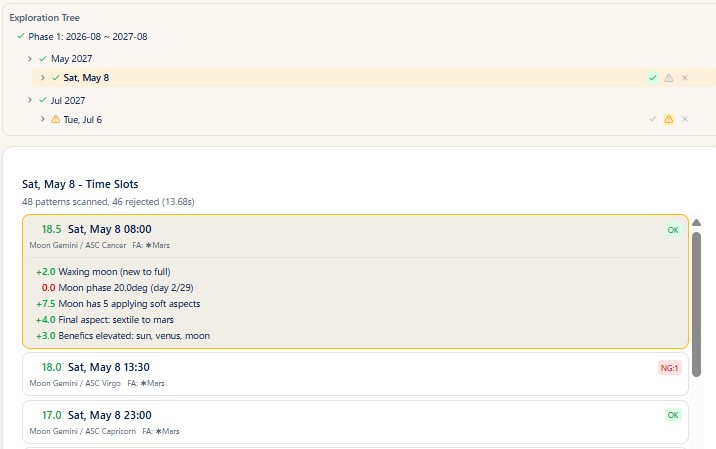
- Running "Analyze time slots" lists the candidates for that day, time slot by time slot, in descending order of score.
- Above the list, the number of patterns scanned, the number rejected, and the elapsed time are shown.
- Clicking a candidate expands it and shows the reasons for exclusion and the score breakdown. At the same time, the chart for that moment appears on the right.
Notes
- Each candidate shows its time, score (colored), moon sign, ASC sign, and final aspect (FA).
- Candidates that hit an exclusion get a red Bad badge, and those with no problems get a green Good badge.
- The POF (Part of Fortune) that appears among the score items is always calculated with the modern formula (ASC + Moon - Sun). The Part of Fortune formula you can choose under "Creating a preset" in the Settings chapter has no effect on the election judgments.
- If no candidate matches the conditions, a message says so. Try widening the period.
- Time slots are scanned at 30-minute intervals by default. To look more finely, use the step buttons under "The chart for the chosen moment" below.
The chart for the chosen moment
Steps
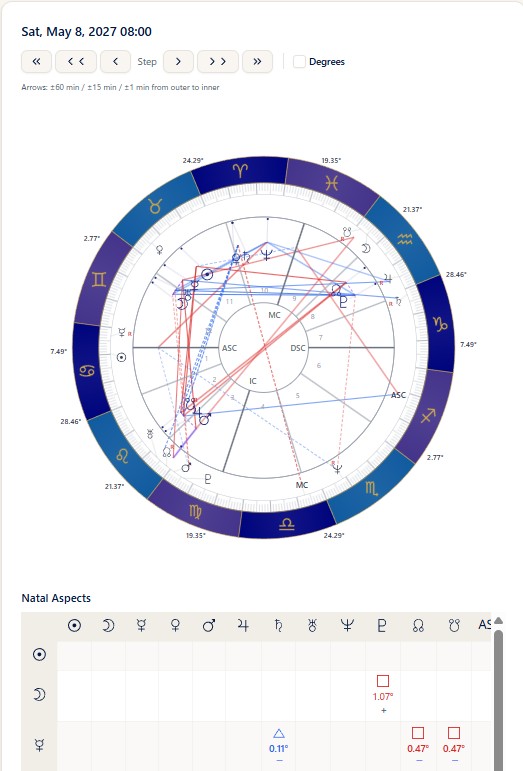
- Choosing a candidate in Phase 3 displays the chart for that moment on the right (with the date and time at the top of the panel).
- The step buttons move the time back and forth. From the left they are ±60 min / ±15 min / ±1 min.
- Ticking Degrees shows the degree of each planet on the wheel.
Notes
- While "Compare with natal chart" is on, the display is a bi-wheel with the election chart (E) on the inner ring and the natal chart (N) on the outer ring, and a Natal Aspects grid is shown below it. While it is off, the display is a single wheel for that moment alone.
- The planets shown on the chart, and on the natal chart overlaid on it, follow the natal settings of the preset in use. Note, however, that election excludes asteroids and special sensitive points, so they are not shown even when the preset includes them. To look at asteroids and sensitive points as well, use the double wheel.
- On the bi-wheel, the aspect lines among the outer ring (natal) planets are deliberately not drawn.
Plans
Election is available on the Max plan.