Settings
About this chapter
This chapter explains the general settings — presets, color theme, display name, default observation location, and hints. The settings screen is available on the Basic plan and above.
Creating a preset
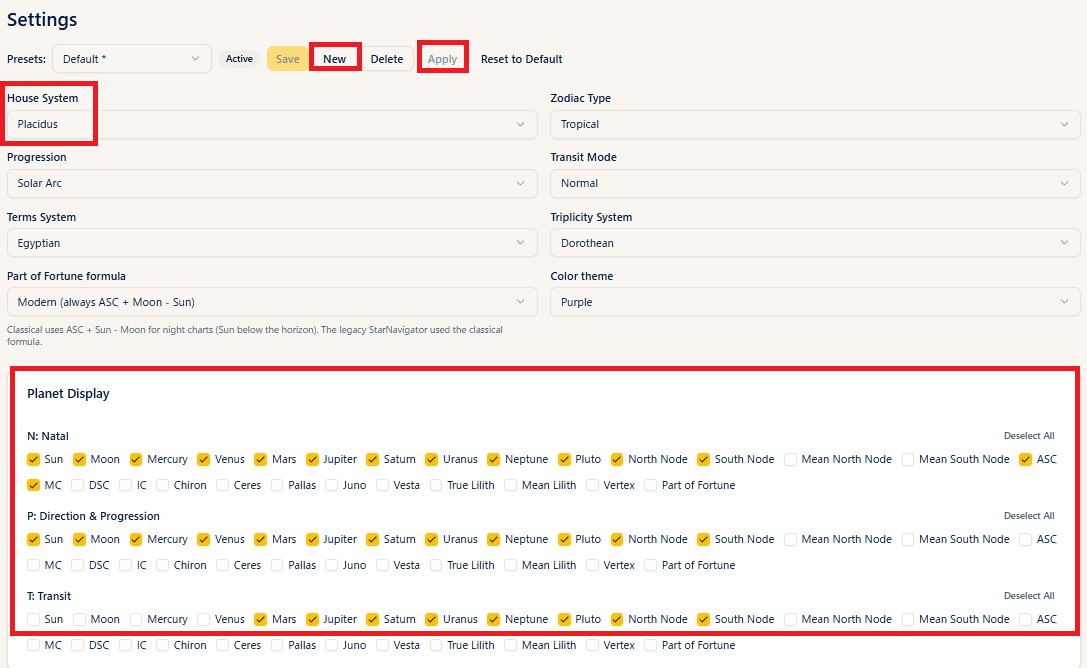
Steps
- Open the settings screen from Settings in the header.
- Under Planet Display, tick the planets to show on each ring in the N: Natal / P: Direction & Progression / T: Transit sections (P covers both solar arc and secondary progression — both use the setting here).
- Aspect Settings are arranged in tabs. For each of N-N / N-P / N-T / P-P / P-T / T-T / Synastry, tick the aspects you want shown and enter a Tight Orb and a Wide Orb (aspects within the tight orb are drawn as solid lines, those within the wide orb as dotted lines).
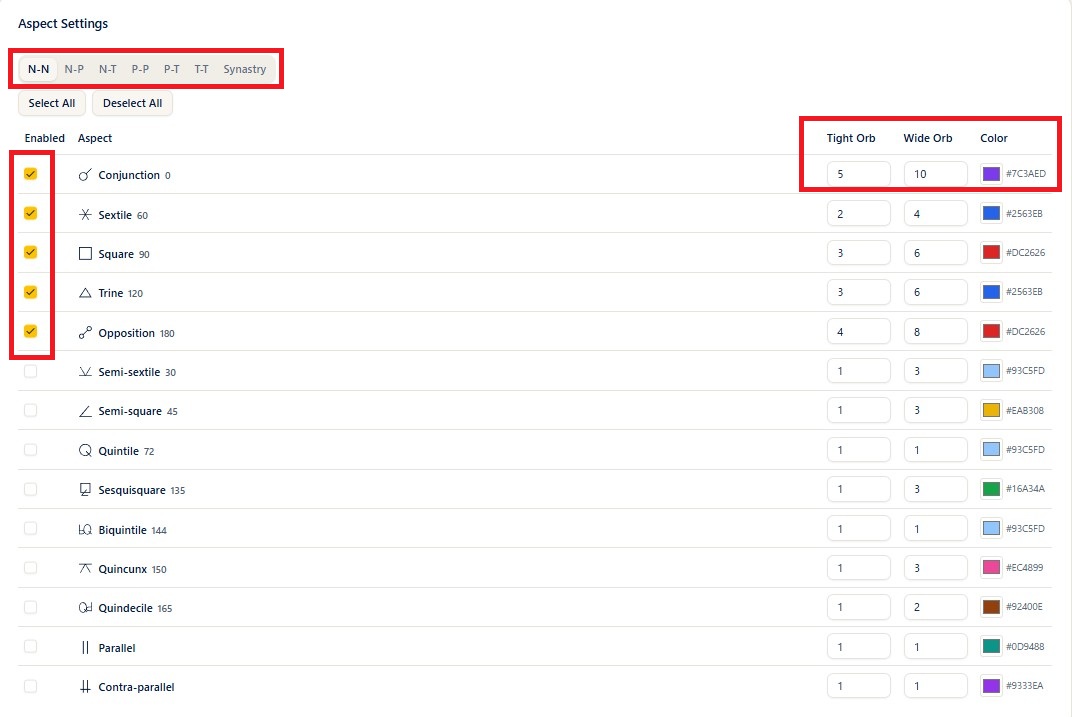
- The color of each aspect can be chosen freely from the color picker.
- Enter a preset name, then press New and Save.
- Pressing Apply puts an asterisk next to the preset name and reflects it in the preset picker in the header.
- Choosing a House System here as well makes it the default on every chart screen (you can still switch it per chart).
Notes
- Besides planets and aspects, a preset also contains the house system, zodiac, progression method (solar arc / secondary), transit mode, terms system, triplicity system, Part of Fortune formula, and color theme. You can save your favorite combinations as a set. Unless you have a particular reason, the zodiac, transit mode, terms system, triplicity system, and Part of Fortune formula work perfectly well left at their defaults.
- The Part of Fortune formula can be Modern (always ASC + Moon - Sun) or Classical (sect-reversed), which uses ASC + Sun - Moon for a night chart (the Sun below the horizon). The legacy StarNavigator used the classical formula.
- The preset picker in the header switches the preset used for the charts you are about to create. The preset selected there is applied to charts you open from then on.
- You can also select an existing preset, edit it, and then use Overwrite Preset to update it or Save As New to store it as a new preset.
- On a chart screen you can change planets, aspects, and orbs on the spot from the Display Settings panel (Plus plan and above). Those changes can be written back into a preset with either Overwrite or Save As New.
- Creating and saving presets themselves is available on the Basic plan and above.
- On the Max plan, a Traditional section appears near the bottom of this screen. It is where you switch on the lots (Arabic parts), antiscia, term and face rings, and the profection ring. See the Traditional (Profections and Lots) chapter for details.
Color theme (switching the color scheme)
Color theme
You can switch the chart color scheme (the color theme). In addition to the familiar Standard (pastel), you can choose Purple.
Steps
- Open the settings screen from Settings in the header.
- In the Color theme field at the top of the settings screen (alongside the house system and the rest), choose Standard or Purple.
- The scheme you chose is applied to the charts you open from then on.
Notes
- The color theme is saved as part of the preset. You can keep, for example, a Standard preset and a Purple preset and switch between them.
- The color switch button in the header also changes the scheme on the spot with a single tap (shared by every chart — Natal, Synastry, Progression, and the rest).

- The same switch is available from the button at the top right of the single wheel in Beginner.
Changing the display name (the name shown in the header)
Steps
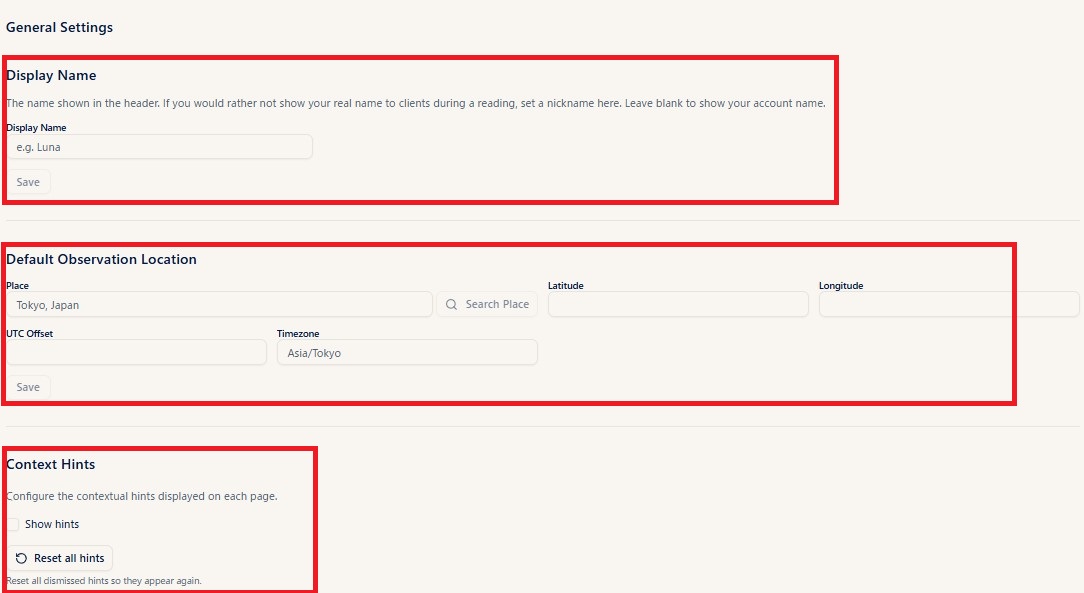
- Open the settings screen from Settings in the header and scroll down to General Settings.
- Enter the name you want in the header in the Display Name field.
- Press Save.
Notes
- The name you set here is shown in the StarNavigator header. If you would rather not show your legal name to clients during a reading, a nickname or a business name is a safe choice.
- If you save the field empty, the name registered on your account is shown.
Default observation location
Steps
- Open the Default Observation Location field under General Settings at the bottom of the settings screen (see the image above).
- Type a place name into the place field and press Search Place, then pick from the suggestions (latitude, longitude, UTC offset, and timezone are set automatically).
- Press Save.
Notes
- Once a default observation location is registered, it is used as the initial transit location when you build a transit chart (Progression) or a Forecast. You can still change it to another place on each chart screen.
- It is also filled in automatically when you choose a record with no location set from the Shared Data (astronomical events such as new and full moons) in the birth data picker (see "Shared data" in the Clients chapter).
Context hints (showing, hiding, and resetting the pop-up guidance)
Steps
- Open the Context Hints field under General Settings at the bottom of the settings screen (see the image above).
- Ticking Show hints displays the operating hints (pop-up guidance) on each page. Clearing it hides them all at once.
- Pressing the Reset all hints button resets even the hints you closed with the "x" so that they appear from the beginning again.
Notes
- Operating hints are pop-ups that explain how to use each screen on the spot. Once you are comfortable, you can turn them off for a cleaner screen and bring them back when you return to a feature you have not used for a while.
- Closing an individual hint with the "x" only suppresses that one hint. Use Reset all hints when you want them all back.