Clients
About this chapter
This chapter covers registering, managing, sorting, and nominating birth data, plus how to use the shared data (astronomical events).
Registering birth data
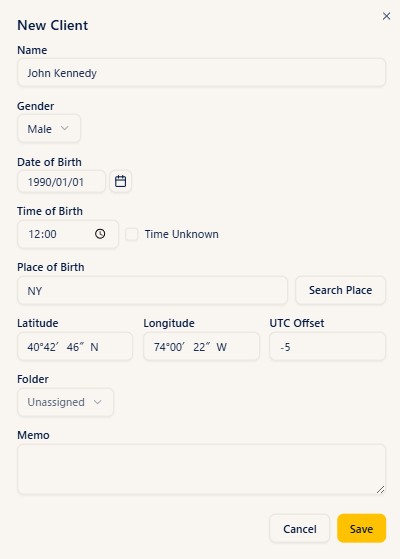
Steps
- Open Clients from the menu.
- Press the New Client button.
- Enter the Name (required), Gender (optional), Date of Birth, and Time of Birth.
- Enter the Place of Birth. As you start typing a place name suggestions appear — pick one, or press the Search Place button after typing, and the latitude, longitude, and UTC offset are filled in automatically.
- (Optional) Choose a Folder to decide where the record is filed (see Managing folders for how to create folders).
- (Optional) Use the Memo field for free-form notes (reading notes and the like).
- Press the Save button.
Notes
- If the time of birth is unknown, tick the Time Unknown checkbox. When it is ticked, the ASC (Ascendant) and MC are not shown on the chart, and the solar sign house system is used automatically. The Moon is calculated as of 12:00 (noon), but depending on the actual birth time it can be off by 6-7 degrees, so when the time is unknown the Moon's aspects are not displayed.
- For a place that Search Place cannot find (a small town abroad, for example), you can enter the latitude and longitude directly. In that case, enter the UTC offset by hand as well.
- Gender is for identification in your practice; leaving it blank has no effect on the chart calculation.
- Name is required, but it does not have to be a legal name — a nickname or initials are fine.
- To correct a record after saving, either click its name in the list to reopen it, or edit it in the birth data form on a chart screen and press Overwrite.
Deleting birth data
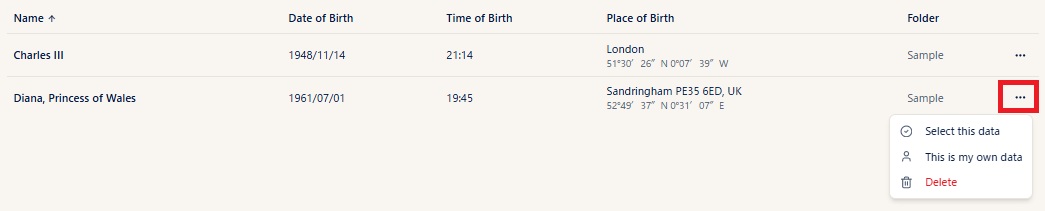
Steps
- In the birth data list, open the "..." (three-dot menu) on the row you want to delete.
- Choose Delete, the trash-can item at the bottom.
- Press Delete in the confirmation dialog and the birth data is deleted.
- Alternatively, open the birth data and press the delete button at the bottom of it.
Notes
Deletion cannot be undone
Deleted birth data cannot be restored. It disappears from the picker and from folders, and charts built from that record can no longer reference it.
- If you delete the record nominated as "This is my own data", the birth chart used for the "Today's Stellar Energy" splash is no longer referenced either. If you need it, nominate another record first (see Marking your own data).
Sorting the list
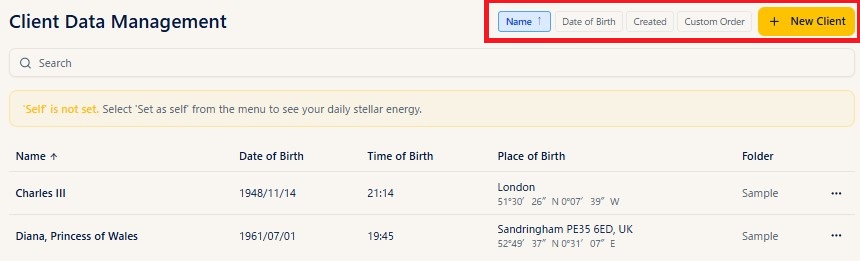
Steps
- Press one of the Name, Birth Date, or Created buttons at the top of the list screen to sort by that column.
- Pressing the same button again toggles between ascending and descending (an up or down arrow appears next to the button).
- Choosing Custom Order lets you drag rows into any order you like. The order is saved automatically.
- Typing part of a name into the search box at the top of the screen narrows the list to matching records.
Notes
- Use Custom Order when you want an order that suits you — the people you use most at the top, or related records grouped together.
- The birth data picker on the chart screens (Natal, Progression, and so on) does not reflect the order set on the list screen (including Custom Order); it always shows records in the order they were registered.
- In the picker, therefore, it is quicker to narrow down by folder or to type a name into the search box.
- The Custom Order arrangement is stored with the data, so it does not disappear when you close the screen (choose Custom Order again and your arrangement is there).
Managing folders
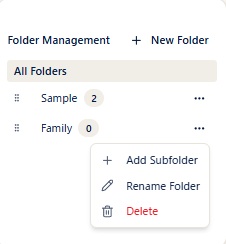
Steps
- Press New Folder on the birth data list screen to create a folder.
- Choosing Add Subfolder from the "..." (three-dot menu) on a folder row creates a child folder under it. You can nest up to three levels (folder, child folder, grandchild folder). The same menu also offers Rename Folder and Delete.
- Choosing a folder in the Folder field on the birth data creation or edit screen files that record in the folder.
- Clicking a folder name narrows the list to the records in that folder. Clicking All Folders clears the filter, and clicking Unassigned shows only the records that are not in any folder.
- You can also follow the folder hierarchy in the birth data picker to find records.
Notes
- Grouping folders by "Family", "Client company A", or an initial makes records easier to find in the picker.
- Dragging the handle at the left end of a folder row changes the order of the folders.
- Deleting a folder does not delete the birth data inside it. Subfolders move up to the parent folder, and the records directly in that folder move to Unassigned.
- To move a record to another folder, change the folder field on its edit screen and save.
- Birth data that is not in a folder is grouped under Unassigned in the picker.
- The search box on the list screen searches by name across folders. The birth data picker can search by name as well.
Marking your own data
Steps
- In the birth data list, open the "..." (three-dot menu) on the row holding your own birth data.
- Choose This is my own data.
- A gold person icon is added in the name column of the list. When you open the three-dot menu of a nominated record, an asterisk appears to the right of "This is my own data".
Notes
- When a record is nominated as your own data and you are on the Basic plan or above, the "Today's Stellar Energy" splash shown when you log in to StarNavigator is based on your own birth chart. On the free plan, and on Basic and above when no record has been nominated, the splash is an astro-dice display that shows a random planet, sign, and house.
- It is not used as the default birth data when creating charts. On each chart screen, choose the subject from the birth data picker as usual.
- To clear the nomination, choose This is my own data again in the same menu.
Shared data (astronomical events such as new and full moons)
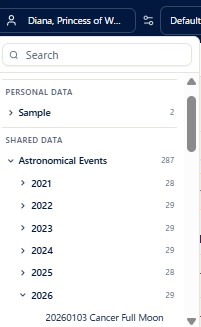
In addition to the birth data you register yourself, the birth data picker has a Shared Data section. It comes pre-loaded with the dates and times of astronomical events such as new and full moons.
Steps
- Open the birth data picker in the header.
- Open the Shared Data section below Personal Data.
- Follow the astronomical events folder down by year, or type an event name into the search box, and select the event you want.
- Calculating from there produces the horoscope for the moment of that event.
Notes
- Shared data is maintained by ARI. You cannot edit or delete it yourself. It is also not shown on the birth data list screen; it can only be selected from the picker.
- When you choose an astronomical event on the Natal or another chart, the new moon chart (or similar) is built for the default observation location registered under "Default observation location" in the Settings chapter. To use a different place, override the transit location within the chart itself. If your default observation location is abroad, the date and time of the event are converted automatically to local time at that location.
- Overlaying a natal chart and a new moon chart in the Synastry screen lets you read the influence of the new moon on the natal chart. Select the astronomical event for the outer ring.