Header and LISA Guide
About this chapter
This chapter covers, item by item, the header at the top of the screen (the birth data picker, preset, degree notation, announcements, and other icons) and the LISA guide at the bottom right (the LISA face icon). For how to register birth data see the Clients chapter, and for how to create and save presets see the Settings chapter.
The items in the header
The header appears at the top of every screen. The items are described from left to right.
Birth data picker

- Clicking the name field at the far left of the header opens the list of birth data. Choose from the list, or type a name into the search box at the top (the folder hierarchy is reflected as well — see "Managing folders" in the Clients chapter).
- Once selected, that birth data is used for every chart you open afterwards.
- The order inside the picker is fixed to the order of registration (as in the previous StarNavigator). The sort order you set on the birth data list screen is not carried over to the picker. The search box is handy when you have many records.
- If you open the Natal or another menu while nothing is selected, a transit chart for "the current date and time at your default observation location" is set up. You can also change the date, time, and place in the birth data form and create the chart from there.
Preset

- Choose the preset you want to use. Whatever type of chart you open, the preset chosen here is the one that is applied.
- You can also switch planets and aspects on the spot from the Display Settings panel on a chart screen (Plus and above). Use Overwrite or Save As New to write those changes back into a preset (see the Settings chapter).
Degree notation (Dec / DMS)

- The Dec and DMS buttons switch how degrees are written. Dec shows degrees as decimals (for example 15.50°) and DMS shows degrees and minutes (for example 15°30').
- The setting applies throughout the app — the chart wheel, the planet tables in the right panel, printing, and so on. The underlying calculation is identical either way.
Color theme

- The palette icon switches the chart colors (Standard (pastel) / Purple) on the spot. It is shared by every chart, including the Natal, Synastry, and Progression. For details see "Color theme" in the Settings chapter.
Language (Japanese / English)

- Switches the display language between 日本語 (Japanese) and English.
Announcements and quick fortune (bell / heart / dollar)

- Bell (What's New): opens the list of announcements such as new features and maintenance. A badge with a count appears on the bell when there are unread items.
- Heart (quick fortune, love) / dollar (quick fortune, money and career): for the birth data currently selected, these quickly show good times for love (heart) and good times for money and career (dollar) (Basic and above). Select the birth data first, then press the icon.
Readings

- Opens the Readings page, the hub for the quick fortunes, LISA's AI readings, and so on. For details see the Readings chapter.
Account name

- Shows the name of the account you are logged in with (you can change the display name in Settings). This is separate from the name in the birth data picker at the far left; this one identifies you, the logged-in user.
Today's Stellar Energy (star icon)

- Pressing the star icon shows Today's Stellar Energy, which appears when you log in, once more (Basic and above). If you nominate yourself under "Marking your own data" in the Clients chapter, the content is based on your own birth chart.
Plan name and credits

- Shows your current plan name (for example Max) and credit balance (for example 0 cr). Pressing the plan name takes you to plan management, and pressing cr takes you to credit purchase. For details see the Plan and Credits chapter.
The LISA guide (the LISA icon at the bottom right)
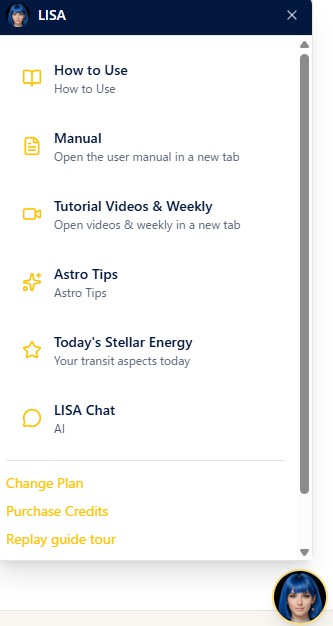
Pressing the LISA face icon, which is always shown at the bottom right of the screen, opens the guide panel. It gives you instructions and hints for the screen you are looking at. Press the icon again or use the "x" to close it.
The panel menu
- How to Use: shows the operating guide for the screen you currently have open (the content changes per screen). Features that your plan does not include are marked with a badge showing the plan they require.
- Manual: opens this user manual (this site) in a new tab.
- Tutorial Videos & Weekly: opens the tutorial videos and the back numbers of the StarNavigator Weekly on the ARI official site, in a new tab.
- Astro Tips: shows a small piece of astrological knowledge related to that screen.
- Today's Stellar Energy: shows your transits for today (Basic and above).
- LISA Chat: an AI gives you an interactive reading based on the birth data currently selected (Basic and above; credits are required). For details see the AI Report / LISA Chat chapter.
The links at the bottom of the panel
- Change Plan / Purchase Credits: open the plan change and credit purchase screens (shown when you are logged in).
- Replay guide tour: plays the operating tour that is shown the first time, once more.
- Frequently Asked Questions / Learn astrology at ARI School: each opens the corresponding page of the official site in a new tab.