StarNavigator User Manual
A guide to using StarNavigator, the horoscope charting software
August 2026 Edition
StarNavigator User Manual
This is the online manual for operating StarNavigator.
This site covers how to use StarNavigator — its screens and operations.
You can ask an AI how to use StarNavigator (trial)
An AI (NotebookLM) has been given the contents of this manual, so you can ask it how to do things in a chat.
Ask AI how to use StarNavigator (NotebookLM)
You need to be signed in with a Google account. Because the answers are generated by an AI, please treat the chapters of this manual as the authority on how things actually work.
Contents
- Header and LISA Guide — Every item in the header, and the LISA guide at the bottom right
- Astrology Basics — Reference pages on signs, houses, and aspects (ARI official site)
- Natal — Creating, viewing, editing, and printing the natal chart
- Analysis Tab — How to read each item on the Analysis tab (modality, element, essential dignity, almuten, and so on)
- Dispositors — The dispositor chart on the Analysis tab (arrows tracing the rulers)
- Synastry — Synastry, composite, and Davison charts
- Progression — The tri-wheel (natal, progressed, and transit)
- Harmonic — Harmonic charts
- Return — Solar, lunar, and other planetary return charts
- Timeline — Recording life events and matching them against configurations
- Traditional (Profections and Lots) — Profections, lots, antiscia, and the term / face rings (Max)
- Forecast — Event calculation and the time map
- AI Report / LISA Chat — AI research reports and LISA Chat
- Astro Map — Line maps showing your relationship with places
- Multi-Chart — Comparing up to five charts
- Election — Choosing a favorable date and time
- Ephemeris — Generating ephemeris PDFs
- Clients — Registering and managing birth data
- Settings — Presets, default location, and color theme
- Plan and Credits — Subscribing, changing plans, and buying credits
- Readings — The entrance to the reading services
Header and LISA Guide
About this chapter
This chapter covers, item by item, the header at the top of the screen (the birth data picker, preset, degree notation, announcements, and other icons) and the LISA guide at the bottom right (the LISA face icon). For how to register birth data see the Clients chapter, and for how to create and save presets see the Settings chapter.
The items in the header
The header appears at the top of every screen. The items are described from left to right.
Birth data picker

- Clicking the name field at the far left of the header opens the list of birth data. Choose from the list, or type a name into the search box at the top (the folder hierarchy is reflected as well — see "Managing folders" in the Clients chapter).
- Once selected, that birth data is used for every chart you open afterwards.
- The order inside the picker is fixed to the order of registration (as in the previous StarNavigator). The sort order you set on the birth data list screen is not carried over to the picker. The search box is handy when you have many records.
- If you open the Natal or another menu while nothing is selected, a transit chart for "the current date and time at your default observation location" is set up. You can also change the date, time, and place in the birth data form and create the chart from there.
Preset

- Choose the preset you want to use. Whatever type of chart you open, the preset chosen here is the one that is applied.
- You can also switch planets and aspects on the spot from the Display Settings panel on a chart screen (Plus and above). Use Overwrite or Save As New to write those changes back into a preset (see the Settings chapter).
Degree notation (Dec / DMS)

- The Dec and DMS buttons switch how degrees are written. Dec shows degrees as decimals (for example 15.50°) and DMS shows degrees and minutes (for example 15°30').
- The setting applies throughout the app — the chart wheel, the planet tables in the right panel, printing, and so on. The underlying calculation is identical either way.
Color theme

- The palette icon switches the chart colors (Standard (pastel) / Purple) on the spot. It is shared by every chart, including the Natal, Synastry, and Progression. For details see "Color theme" in the Settings chapter.
Language (Japanese / English)

- Switches the display language between 日本語 (Japanese) and English.
Announcements and quick fortune (bell / heart / dollar)

- Bell (What's New): opens the list of announcements such as new features and maintenance. A badge with a count appears on the bell when there are unread items.
- Heart (quick fortune, love) / dollar (quick fortune, money and career): for the birth data currently selected, these quickly show good times for love (heart) and good times for money and career (dollar) (Basic and above). Select the birth data first, then press the icon.
Readings

- Opens the Readings page, the hub for the quick fortunes, LISA's AI readings, and so on. For details see the Readings chapter.
Account name

- Shows the name of the account you are logged in with (you can change the display name in Settings). This is separate from the name in the birth data picker at the far left; this one identifies you, the logged-in user.
Today's Stellar Energy (star icon)

- Pressing the star icon shows Today's Stellar Energy, which appears when you log in, once more (Basic and above). If you nominate yourself under "Marking your own data" in the Clients chapter, the content is based on your own birth chart.
Plan name and credits

- Shows your current plan name (for example Max) and credit balance (for example 0 cr). Pressing the plan name takes you to plan management, and pressing cr takes you to credit purchase. For details see the Plan and Credits chapter.
The LISA guide (the LISA icon at the bottom right)
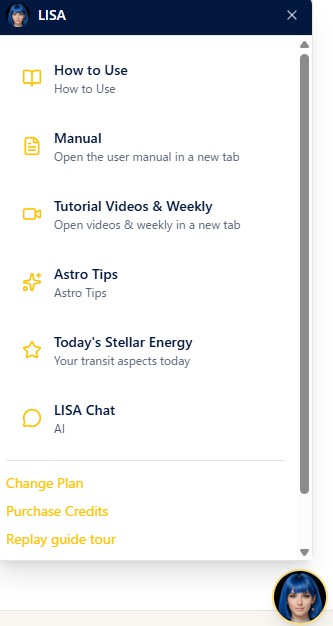
Pressing the LISA face icon, which is always shown at the bottom right of the screen, opens the guide panel. It gives you instructions and hints for the screen you are looking at. Press the icon again or use the "x" to close it.
The panel menu
- How to Use: shows the operating guide for the screen you currently have open (the content changes per screen). Features that your plan does not include are marked with a badge showing the plan they require.
- Manual: opens this user manual (this site) in a new tab.
- Tutorial Videos & Weekly: opens the tutorial videos and the back numbers of the StarNavigator Weekly on the ARI official site, in a new tab.
- Astro Tips: shows a small piece of astrological knowledge related to that screen.
- Today's Stellar Energy: shows your transits for today (Basic and above).
- LISA Chat: an AI gives you an interactive reading based on the birth data currently selected (Basic and above; credits are required). For details see the AI Report / LISA Chat chapter.
The links at the bottom of the panel
- Change Plan / Purchase Credits: open the plan change and credit purchase screens (shown when you are logged in).
- Replay guide tour: plays the operating tour that is shown the first time, once more.
- Frequently Asked Questions / Learn astrology at ARI School: each opens the corresponding page of the official site in a new tab.
Astrology Basics
This manual explains how to operate StarNavigator. For the meanings and background of astrology itself — signs, houses, aspects and so on — see the reference pages on the ARI official site.
These reference pages are in Japanese
The pages linked below are published in Japanese only.
Basics
- What Western astrology is
- The 12 signs
- Classifying the signs (qualities, elements, and more)
- Planets, asteroids, and sensitive points
- Direct and retrograde motion
- The 12 houses
- Aspects
In more depth
Reading and columns (owned media)
Columns and articles on astrology are also published on ARI's owned media.
Links from each chapter
Where a technical term appears in the other chapters, we add a link to the relevant page above.
Natal
About this chapter
This chapter covers creating, viewing, editing, and printing the single wheel (the natal chart).
Creating a natal chart
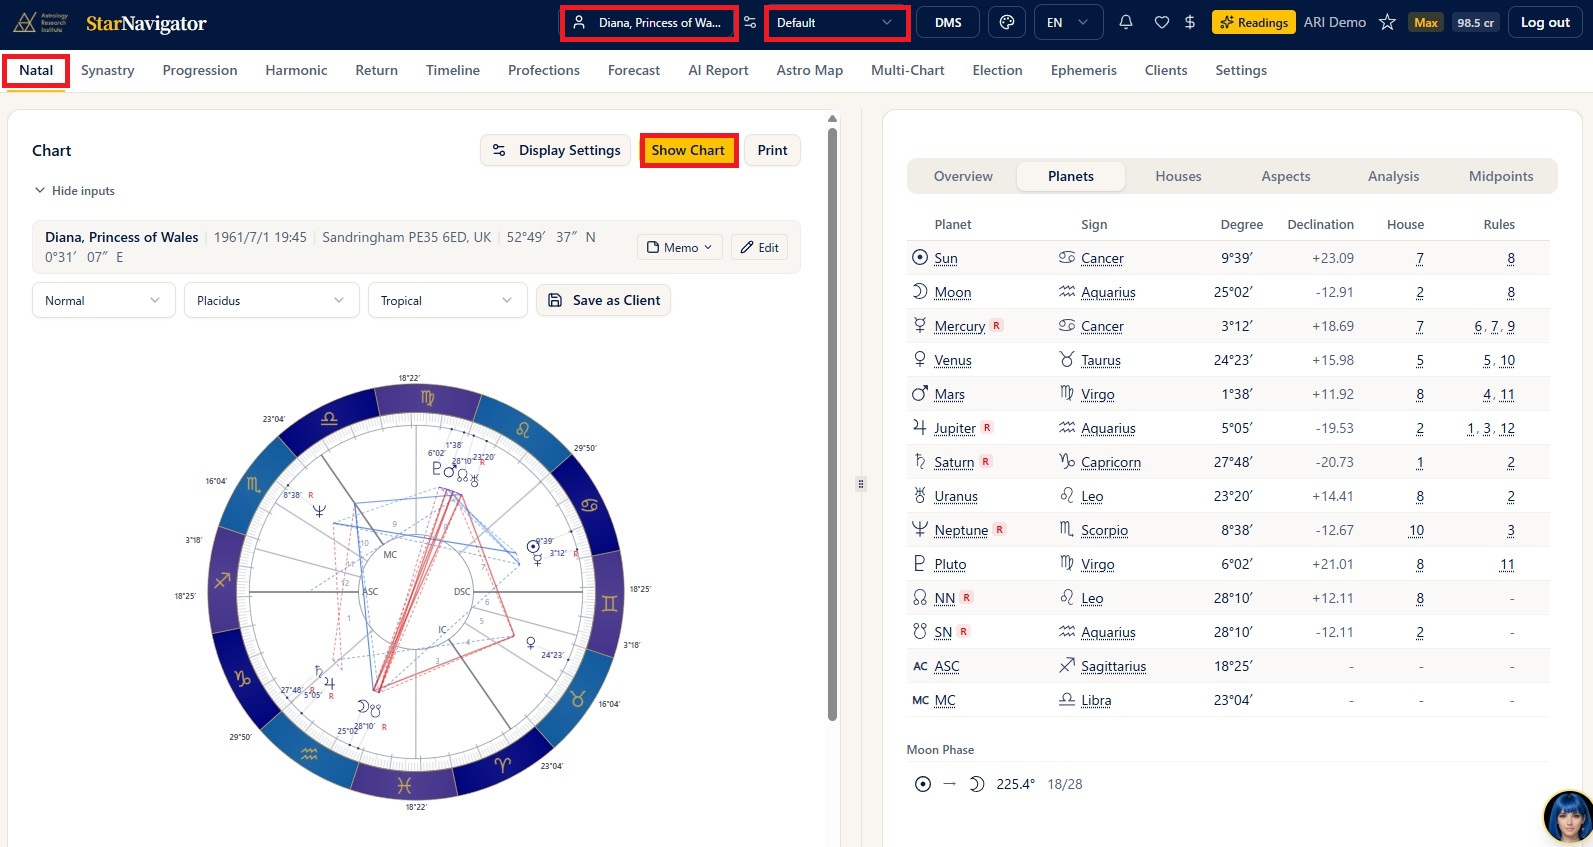
Steps
- Choose the birth data from the birth data picker in the header.
- Choose the preset you want to use in the preset picker.
- Choose Natal from the menu.
- Press Show Chart and the natal chart appears on the left with the data tabs on the right (on a PC). On a smartphone they are stacked, with the chart on top and the data tabs below.
Notes
- Degree notation can be switched between decimal and degrees-minutes in the header.
- On a PC you can drag the bar in the middle, at the boundary between the chart and the data panel, to adjust their widths.
Entering and registering birth data on the Natal screen
- Instead of choosing from the birth data picker, you can type data directly on the Natal screen and build the chart there. Just enter the date, time, and place in the birth data form at the top of the chart and press Show Chart (no registration needed). This is handy for short readings (see "Editing and saving birth data" below).
- To register the data you entered, press the Save as Client button above the chart. You can give it a name (and, depending on your plan, a folder). After registering, that record is left selected, so you can use it in the other charts right away.
Producing a transit chart for the current moment (horary and the like)
- Pressing the Natal button while the birth data picker is empty creates a transit chart for the moment you pressed it, at the default observation location you have configured. This is ready to use when you want the chart of "right now" for horary and similar work.
Producing a new moon or full moon chart
- Choosing a new or full moon from the astronomical events under Shared Data in the birth data picker and pressing Show Chart produces the new or full moon chart as a single wheel. You do not have to look the date and time up and register it yourself.
- The location used is the default observation location you have configured. To see it for a different place, change the place in the birth data form on the chart screen and press Show Chart.
- For details see "Shared data (astronomical events such as new and full moons)" in the Clients chapter. How to read a new or full moon chart overlaid on a natal chart is explained under "Overlaying a new or full moon chart on the natal chart" in the Synastry chapter.
Dragon Head and Dragon Tail charts (draconic charts)
Besides the ordinary natal chart, the single wheel can display a Dragon Head or Dragon Tail chart (Pro plan and above). The Dragon Head chart is what is generally called a draconic chart.
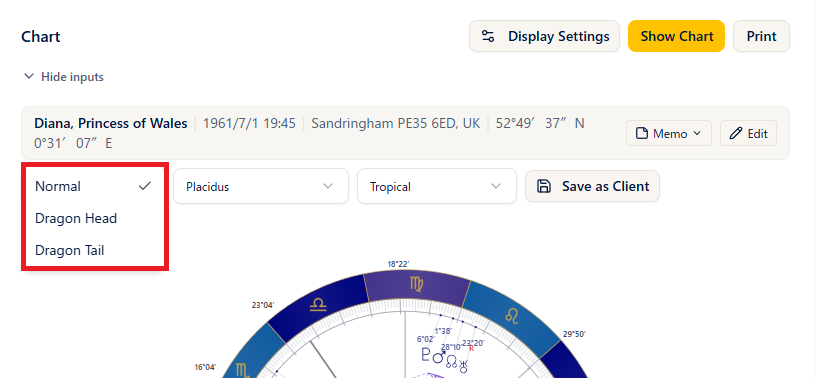
Steps
- Open the Chart Type selector above the chart (below the birth data display), which reads Normal.
- Choosing Dragon Head or Dragon Tail switches the chart and the data tabs immediately (there is no need to recalculate).
- Returning it to Normal brings back the original natal chart.
Notes
- The Dragon Head chart rotates every planet and house cusp by the same angle so that the North Node (Dragon Head) falls on 0° Aries; the Dragon Tail chart does the same so that the South Node (Dragon Tail) falls on 0° Aries.
- The house system carries over unchanged from the one selected for the ordinary single wheel.
- When you print, "Dragon Head" or "Dragon Tail" appears in the header and in the file name.
The chart display and the panels
Steps
- Press Show Chart and the chart appears on the left with the data on the right (below, on a smartphone).
- On the right, switch tabs to see the various sets of data.
Notes
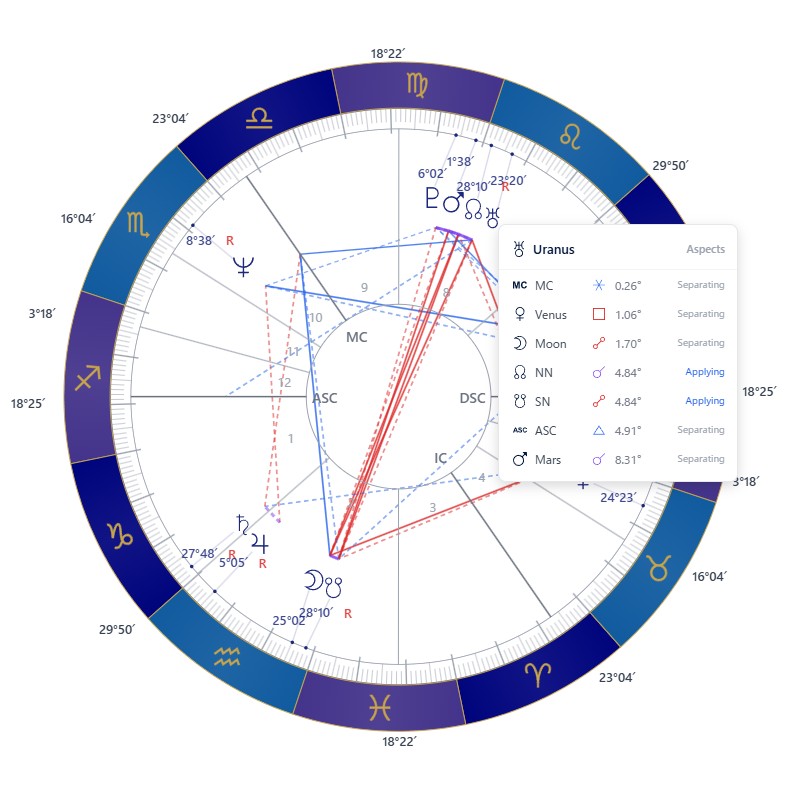
- The degrees around the outside of the chart are the degrees of the house cusps.
- Clicking a planet on the chart pops up the list of aspects to that planet. It also shows whether each aspect is applying or separating.
- The data tabs show only the items selected in the preset you have chosen. Each tab contains the following.
- Overview tab: uses the same layout as the previous StarNavigator, showing the planet and house information side by side with the aspect grid below.
- Planets tab: shows planet / sign / degree / declination / house occupied / houses ruled. Underlined items (planets, signs, houses, and so on) show their meaning when clicked. The moon phase is shown here as well.
- Houses tab: shows the sign and degree of each house cusp, the planets in the house, and its rulers.
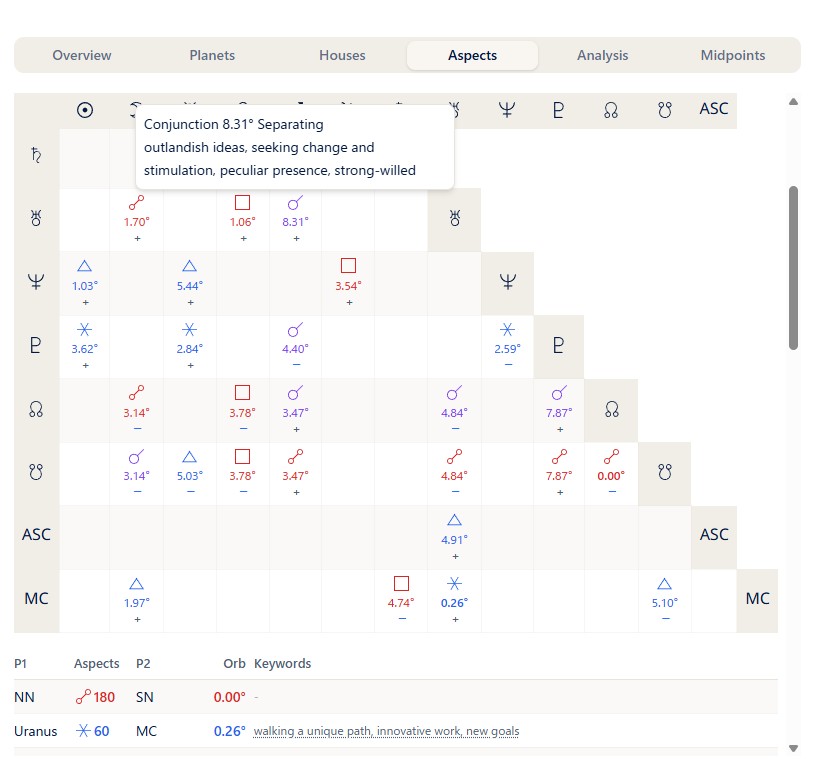
- Aspects tab: shows the aspect grid, a list of aspects in orb order, and the aspect patterns. Below the grid is a list, ordered from the tightest (smallest orb) aspect, with keywords. Below that, aspect patterns (special figures formed by several planets) are detected automatically and listed. In the aspect list and the grid, applying aspects are marked with a minus sign and separating aspects with a plus sign. At the bottom of the tab, planets with no aspect to the main planets (and planets with no major aspect) are listed when there are any.
- Analysis tab: shows the summaries (moon phase, modality, element, polarity, quadrant emphasis, Gauquelin sector planets, stellium, and critical degrees), the Dispositors chart, which overlays arrows tracing each planet's ruler on the wheel (Pro and above), and Chart Details (tight aspects, most aspected planets, angular planets, ASC ruler, essential dignity including the almuten (Pro and above), dodecatemoria, and antiscion). See the Analysis Tab chapter for each item, and the Dispositors chapter for the dispositor chart.
- Midpoints tab: shows the midpoints (half sums) (Plus and above). The controls at the top of the panel change what is displayed.
- Harmonic: choose from the H1(360) / H2(180) / H4(90) / H8(45) / H12(30) / H16(22.5) buttons. Custom lets you enter any number from 1 to 360.
- Display Mode: choose from four modes — All Axes (the list of midpoint axes), Stimulation (only the axes being stimulated by a planet, with the stimulating planet shown as well), Tree, and Graph (a dot plot; hovering over a dot shows the planet pair and the degree).
- Orb: adjustable within a range of ±0.5 to 10 degrees.
- Planets: tick the planets to include. Selecting planets under Highlight Planets colors only the midpoints that involve those planets.
- Pressing the print button prints exactly what the currently selected display mode shows.
Meanings are available on the spot
Underlined items on the chart and the data tabs — planets, signs, houses, aspects, and so on — show their meaning when clicked. There is no need to look things up in a dictionary, which helps both beginners who are learning and practitioners checking something during a reading.
The orbs for aspect patterns
The orbs used for aspect patterns are fixed by the system.
Stepping (animating the chart)
The controls below the chart let you advance the date and time little by little and watch the chart change, like an animation (Pro and above).

Steps
- Choose the Interval (1 day, for example) and the Speed (1s, for example) below the chart.
- Pressing Play advances the date and time automatically and the chart changes as it goes. Pressing 1 Step advances one frame at a time.
- Ticking Backward moves back into the past instead.
Display and printing
Steps
- The Print button prints the chart and the data (Basic and above).
- Clicking the wheel enlarges it, and from the enlarged view you can save the image with PNG (PNG saving is Basic and above).
Notes
- Degree notation (decimal or degrees-minutes) follows the degree mode in the settings.
Display Settings
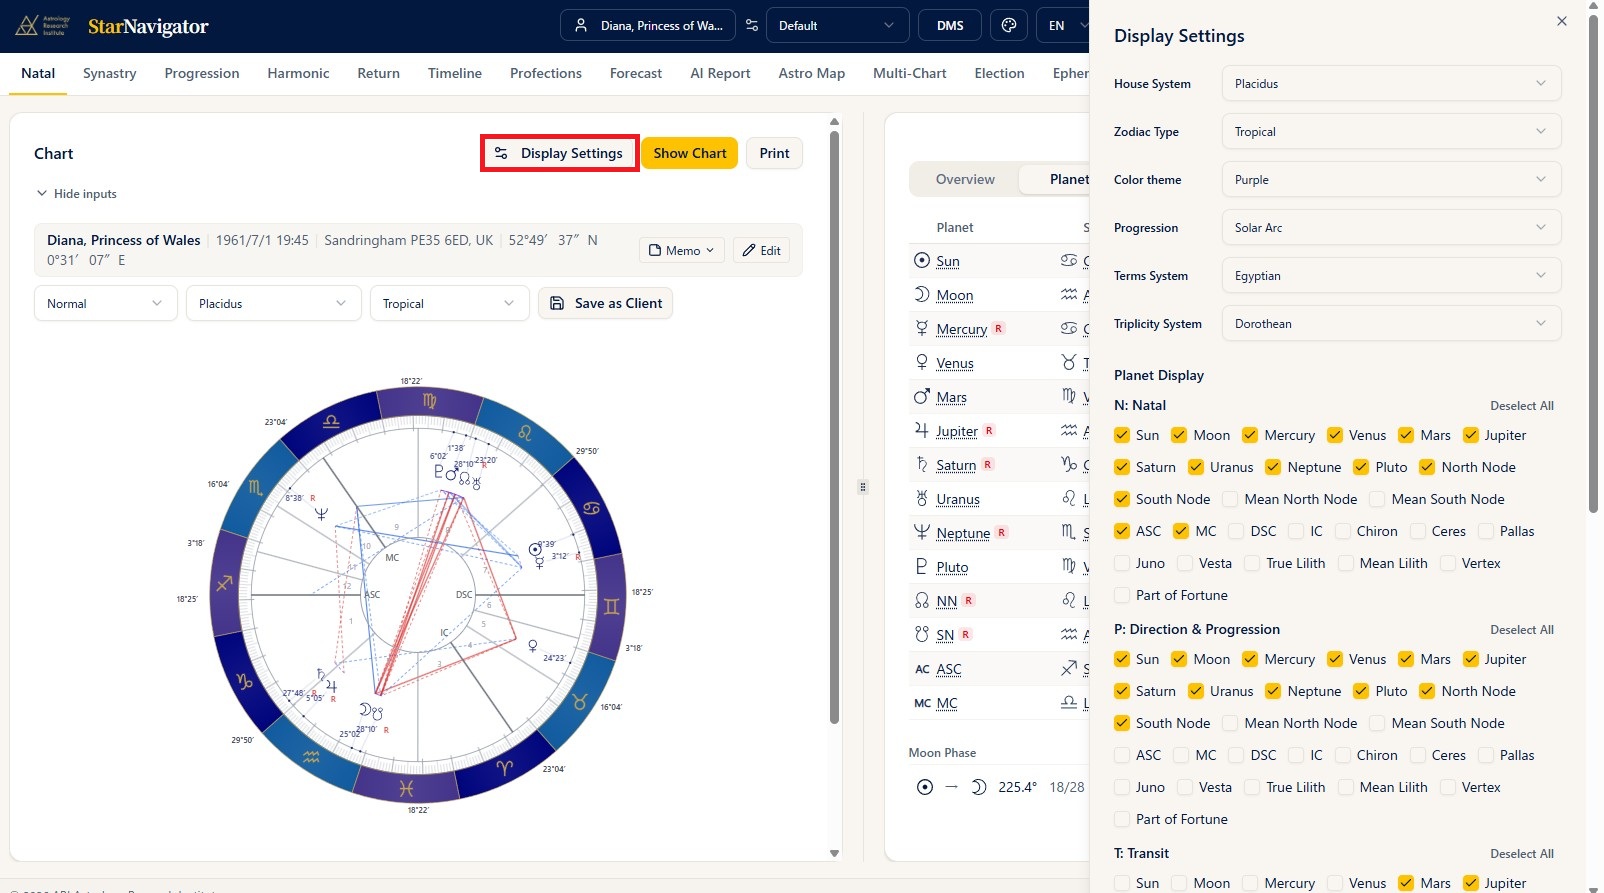
Steps
- Press the Display Settings button on the chart screen.
- Switch planets, aspects, orbs, the house system, the progression method, and so on, on the spot.
- The chart and the data in the right panel are redrawn immediately.
Notes
- To write your changes back into the current preset, press the Overwrite button.
- To keep them as a new preset, enter a preset name and press New.
- If you move to another screen without pressing either, the changes apply only to that chart and are not saved to the preset.
- On the Max plan this panel also contains the Traditional items, so you can switch the lots, antiscia, term and face rings, and the profection ring on the spot. See the Traditional (Profections and Lots) chapter for details.
About plans
Using Display Settings on a chart screen is available on the Plus plan and above.
Editing and saving birth data
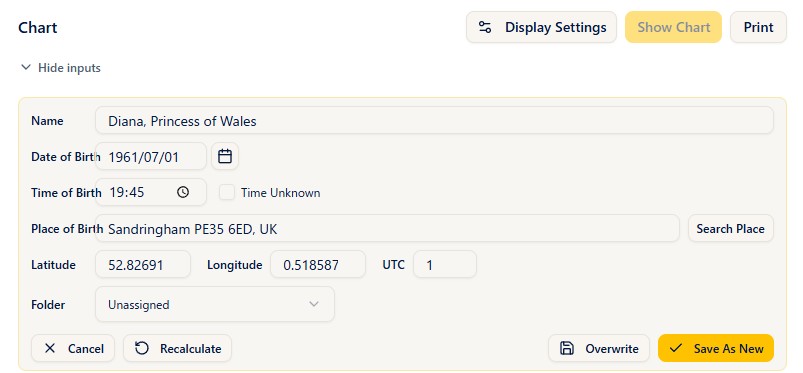
Steps
- The birth data form at the top of the chart is already open (there is no edit button to press first).
- Correct the name, date of birth, time of birth, or place of birth on the spot.
- Pressing Show Chart recalculates the chart and the data panel from whatever the form currently holds.
- To overwrite the original birth data press Overwrite; to keep it as a separate record press Save As New. Editing alone saves nothing.
- In the same way, the Memo button lets you edit and save the memo field of the birth data on the spot.
Notes
- Once the chart is drawn, the form collapses automatically. Use Show inputs to open it again.
- If you open a chart while the birth data picker is empty, a transit chart for "the current date and time at your default observation location" is set up. From that state, changing the date, time, or place in the form lets you build a chart on the spot without registering any birth data.
When the chart is dimmed
While the displayed chart no longer matches the form, the chart is dimmed and a notice appears over it. This happens when you pick a different person with the picker, or change a value in the form. Pressing Show Chart redraws the chart from the current input and the notice disappears. It is there so that the previous person's chart is never misread as the one you have just selected.
The memo field can be updated straight from the chart screen
Anything you notice during a reading can be edited and saved on the spot from the Memo button on the Natal screen. There is no need to go back to the birth data list. A saved memo stays attached to that birth data.
- When you want several versions of the same person — for rectification (estimating the birth time), for example — Save As New lets you register as many records as you like under different names.
- This mechanism of editing, memos, and overwrite / save-as-new works the same way on the other chart screens, including Progression, Synastry, and Forecast.
Analysis Tab
About this chapter
This chapter explains how to read each item on the Analysis tab in the right panel of the natal chart (single wheel). The Analysis tab consists of summaries of the whole chart (moon phase, modality, element, and so on), the Dispositors chart, and the individual lists folded under Chart Details (tight aspects, Essential Dignity, Almuten, and so on).
The same information is available for composite and Davison charts on the Synastry page and, in part, on the Progression page (see "Seeing it on other screens" at the end).
The astrological meaning of each item, and how to interpret it, is outside the scope of this manual. Please rely on what you have learned in courses and books (see also Astrology Basics).
Opening the Analysis tab
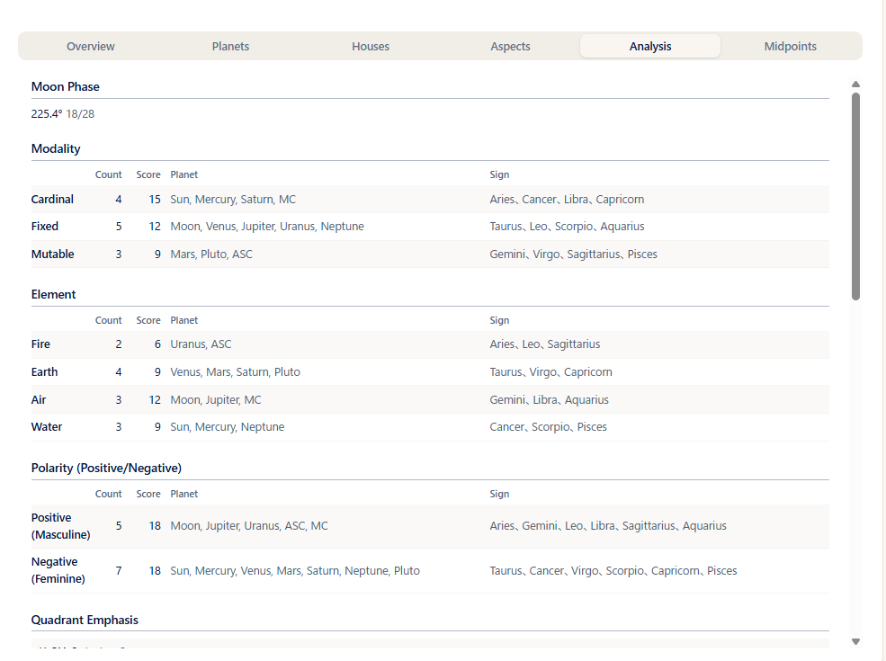
Steps
- On the Natal page, press Show Chart.
- In the data tabs on the right, open Analysis (on a phone, it appears below the chart).
- From top to bottom you will see the summary items, the Dispositors chart (Pro and above), and Chart Details. Each item under Chart Details opens and closes when you click (tap) its heading (they are closed at first).
Notes
- Items under Chart Details that have nothing to show (for example, no tight aspects to list) are not displayed.
- For birth data with an unknown birth time, items that rely on the houses or the angles (ASC and MC) are not shown (see the description of each item).
- While a draconic chart (Dragon Head / Dragon Tail) is displayed, the Analysis tab itself is not shown.
- Everything on the Analysis tab except the Gauquelin sector planets and the Dispositors chart is also included in the natal printout (Essential Dignity is Pro and above).
Reading the summaries
The upper part of the Analysis tab shows the following items.
- Moon Phase: the elongation from the Sun to the Moon (in degrees) and the lunar day counted on a 28-day cycle (for example, 13/28). The same line is shown at the bottom of the Planets tab.
- Modality / Element / Polarity (Positive/Negative): rows for Cardinal, Fixed, and Mutable / Fire, Earth, Air, and Water / Positive (Masculine) and Negative (Feminine), with the following columns.
- Count: the number of planets in that group
- Score: a weighted total, in which each planet carries its own weight
- Planet: the planets in that group
- Sign: the signs that belong to that group
- When the birth time is unknown, the ASC and MC are left out of the totals.
- Quadrant Emphasis: divides the chart into four sections (11-2H, 2-5H, 5-8H, and 8-11H) and shows the number of planets in each, with their names. Because it uses the houses, it is not shown when the birth time is unknown.
- Gauquelin Sector Planets: for each of the ASC, MC, DES, and IC, lists the planets close to that angle (in its Gauquelin sector). An angle with no planet shows "-". When no angle has a planet, the item itself is not shown. When the birth time is unknown, the message "Not available when the birth time is unknown." is shown instead.
- Stellium: shows the signs in which planets are concentrated, and the planets in each. Hovering over the sign name shows the meaning of the sign. When there is none, the item itself is not shown.
- Critical Degrees: lists the planets in the first degree (0 degree) or the last degree (29 degree) of a sign, in the form "planet - 0 degree / 29 degree (degrees)". When there is none, the item itself is not shown.
- Dispositors: the chart of arrows tracing the rulers (Pro and above). See the Dispositors chapter.
Reading Chart Details
Tight aspects and planet lists
- Conjunction/Opposition (Tight): the conjunctions and oppositions with a small orb. The columns are planet 1 / aspect symbol / angle / planet 2 / orb.
- Other Tight Aspects: aspects other than conjunctions and oppositions with a small orb. The columns are the same as above.
- Most Aspected Planets: the planet with the largest number of aspects, and that number. If several planets tie, all of them are listed.
- Angular Planets: planets close to the ASC or MC. Not shown when the birth time is unknown.
- ASC Ruler: the ruler of the sign on the ASC. Not shown when the birth time is unknown.
- The four items above (the two tight-aspect lists, Most Aspected Planets, and Angular Planets) cover only the planets displayed by the selected preset. When the birth time is unknown, aspects that involve the angles (ASC, MC, and so on) are left out of the lists.
Essential Dignity (Pro and above)
Opening Essential Dignity shows three things: the system selectors, the dignity table, and the house-cusp almuten table.
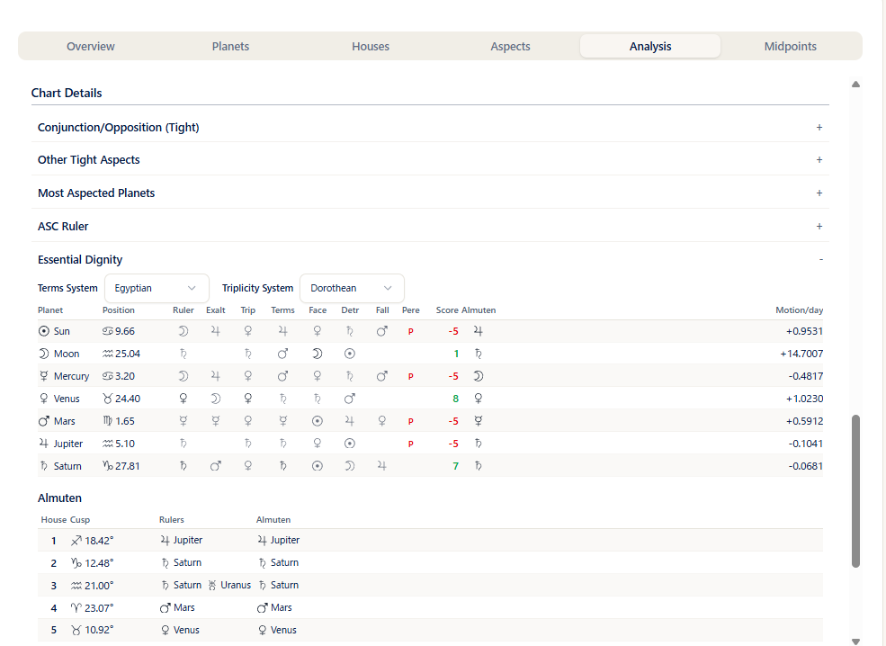
System selectors
- Above the table, Terms System (Egyptian / Ptolemy) and Triplicity System (Dorothean / Ptolemy / Lilly) let you switch the system used for the assessment. Switching recalculates the chart automatically and updates the table.
- The switch made here is temporary and is not saved to the preset. If you always want the same system, choose it under "Terms System" and "Triplicity System" in Settings and save it to the preset.
Dignity table
One row for each of the seven planets from the Sun to Saturn, with the following columns.
| Column | Contents |
|---|---|
| Planet | The planet's symbol and name |
| Position | The sign it occupies and the degree |
| Ruler / Exalt / Trip / Terms / Face | The symbol of the planet that holds the rulership / exaltation / triplicity / term / face at that position. When it is the planet of that row itself, the symbol is shown in a dark color (bold); when it is another planet, in a light color |
| Detr / Fall | The symbol of the planet in detriment / fall at that position, shown in the same way as above |
| Pere | A red "P" when the planet is peregrine (holds no dignity) |
| Score | The total of the dignities above. Positive values are shown in green and negative values in red |
| Almuten | The symbol of the almuten at that planet's position (the planet that comes out strongest at that degree when all the dignities are combined) |
| Motion/day | Daily motion in degrees. A negative value means the planet is retrograde |
- The term and triplicity assessments follow the systems selected above.
- Score values: the total of Ruler +5 / Exaltation +4 / Triplicity +3 / Terms +2 / Face +1 (all that apply are added up) and the deductions Detriment −5 / Fall −4. A peregrine planet scores −5 (the peregrine deduction is not applied on top of the Detriment / Fall deductions).
- The point values of essential dignities differ between schools and software programs, so the Score here may not match the numbers from other software or another astrologer's reading.
House-cusp almuten table
Below the dignity table, under the heading Almuten, a table for each house cusp is shown. The columns are House / Cusp (sign and degree) / Rulers / Almuten.
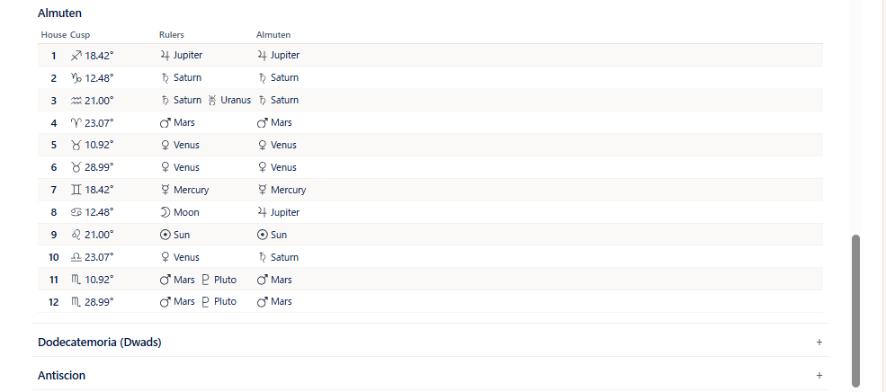
- When the birth time is unknown, the Rulers and Almuten columns are left blank (-).
- The degree notation (decimal / degrees and minutes) follows the degree mode in Settings.
Traditional lists
- Dodecatemoria (Dwads): for each planet, shows Planet / Sign / Dodecatemoria Sign.
- Antiscion: for each planet, shows Planet / Antiscion / Contra-Antiscion (each as sign and degree). This list is shown on every plan. It is a separate item from "Antiscia" in the Traditional (Profections and Lots) chapter (display on the wheel and the contact list; Max).
Seeing it on other screens
- Synastry page (composite and Davison): the Analysis tab in the right panel shows the same content as this chapter (see "Reading the right panel" in the Synastry chapter). When the birth time of either A or B is unknown, the items behave as they do for a natal chart with an unknown birth time. If you switch the Essential Dignity system selectors, press Show Chart again to apply the change. The synastry chart itself has no Analysis tab.
- Progression page: on the Natal (N), Direction (D) / Secondary (P), and Transit (T) tabs in the right panel, the Essential Dignity button at the bottom right of the planet table opens the same table as in "Essential Dignity" above in a separate window (Pro and above). The house-cusp almuten table is included only for Natal (N). The system selectors can be switched there as well.
- Return and Harmonic pages: there is no Analysis tab and no Essential Dignity table.
Dispositors
About this chapter
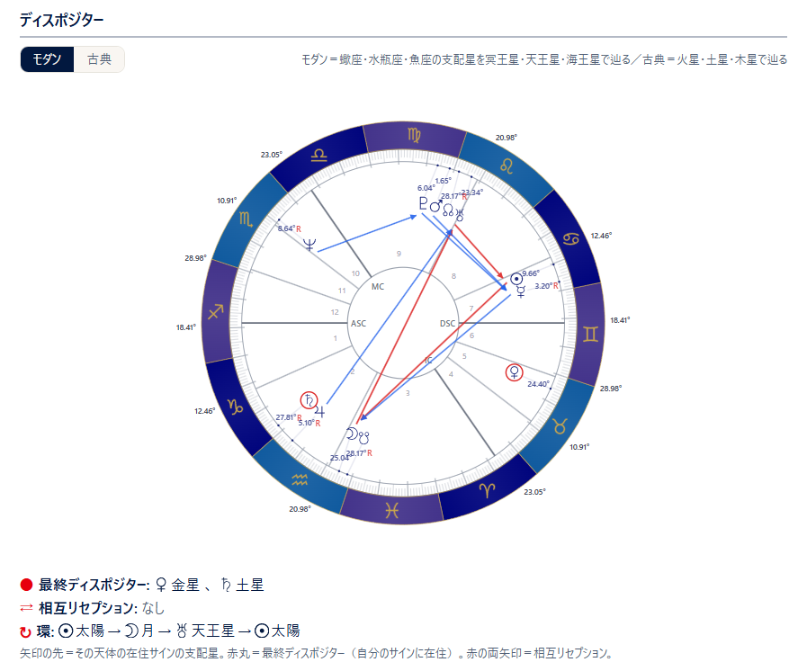
This chapter explains how to read and use the Dispositors chart shown on the Analysis tab of the natal (single wheel) screen. It draws an arrow from each planet to the ruler of the sign the planet occupies, so you can follow each chain of rulership. It is available on the Pro plan and above.
Viewing the Dispositors chart
Steps
- On the Natal screen, click Show Chart.
- Open the Analysis tab in the data panel on the right (on a phone it appears below the chart).
- The chart appears under the Dispositors heading. Use Modern / Traditional above the chart to switch the rulership system.
- Click/tap the chart to enlarge it. From the enlarged view you can save it as an image.
How to read the chart
- Arrows: An arrow runs from each planet to the ruler of the sign it occupies. The planet at the arrowhead is that planet's dispositor. Following the arrows shows where each chain of rulership ends.
- Red circle: A planet in its own sign (final dispositor) has its glyph circled in red. No arrow leaves this planet.
- Red double-headed arrow: When two planets occupy each other's signs (mutual reception), they are joined by a red double-headed arrow.
- When three or more planets rule one another in a ring, the arrows of that ring are drawn in red.
- Below the chart, the final dispositors and mutual receptions are listed. If there are none, "none" is shown.
Notes
- Modern traces Scorpio, Aquarius, and Pisces to Pluto, Uranus, and Neptune; Traditional traces them to Mars, Saturn, and Jupiter. The other signs are the same in both. Modern is the initial setting; your choice is stored in your browser and used next time.
- The planets covered are the ten from Sun to Pluto: Sun, Moon, Mercury, Venus, Mars, Jupiter, Saturn, Uranus, Neptune, and Pluto. The lunar nodes, ASC/MC, and asteroids are not connected by arrows.
- The planets drawn follow the Planet display setting (natal) on the settings screen. Planets you have hidden are not shown, and their arrows are not drawn either.
- The wheel colors and glyphs follow your selected color theme and glyph settings.
- The chart is available even when the birth time is unknown, because it depends only on the signs.
- While a draconic chart (Dragon Head / Dragon Tail) is displayed, it is not shown, just like the rest of the Analysis tab.
- The chart is shown on the natal screen only and is not included in the printout.
Synastry
About this chapter
This chapter covers the double wheel — two charts viewed together. There are three kinds: synastry, composite, and Davison.
For the astrological thinking behind synastry, see also Synastry on the ARI official site (in Japanese).
Choosing the chart type
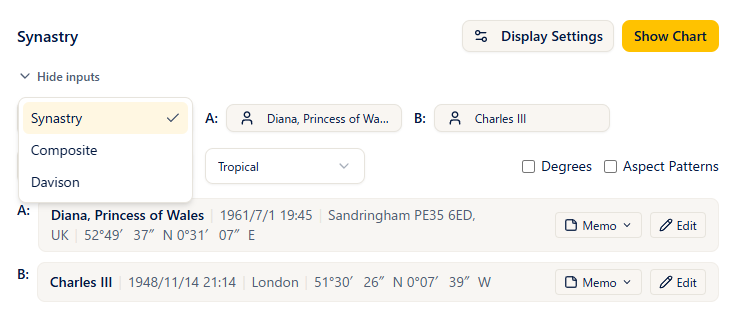
Steps
- Open Synastry from the menu.
- Choose Synastry, Composite, or Davison from the type selector at the top left.
- Switching the type recalculates automatically using the data you have already entered.
Notes
- Synastry: shows two natal charts together, one on the inner ring and one on the outer ring.
- Composite: a combined chart built from the midpoints of the two charts (shown as a single circle).
- Davison: a chart built from the average of the two birth dates, times, and places (shown as a single circle). The Mean Datetime and Mean Location are shown below the chart.
- Types your plan does not include are marked with a lock icon and cannot be selected.
Plans
Synastry = free and above / Composite = Pro and above / Davison = Max and above.
Creating a double wheel
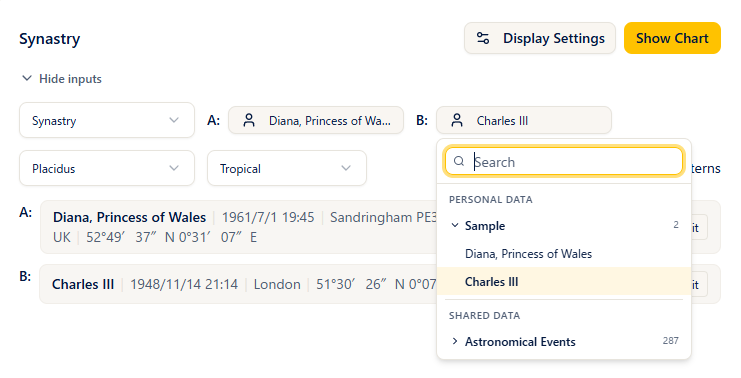
Steps
- In the input fields, choose a saved birth data record from the A (inner ring) picker and another from the B (outer ring) picker.
- To correct data on the spot, edit the values directly in each person's birth data form (press Show Chart to apply your edits).
- Choose a house system if you need to.
- Press Show Chart and the double wheel appears.
Notes
- If you leave one of the pickers empty, that slot is filled with "the current time at your default observation location". You can use this to overlay a transit chart on a natal chart and read the influence of the transits.
- Once the calculation succeeds, the input fields collapse automatically. Show inputs opens them again.
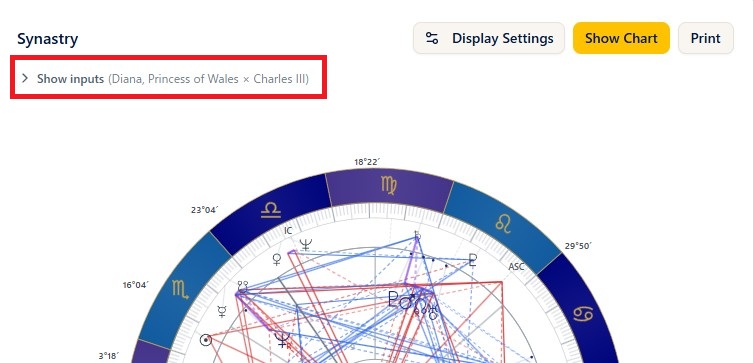
- In synastry, A is the inner ring and B the outer ring. Composite and Davison are shown as a single circle.
Overlaying a new or full moon chart on the natal chart
Steps
- Leave the chart type as Synastry and choose the birth data for A (inner ring).
- In the B (outer ring) picker, choose the new or full moon you want to overlay from the astronomical events under Shared Data.
- Press Show Chart and the double wheel appears with the new (or full) moon chart over the natal chart.
Notes
- You can read the influence of the new or full moon on the natal chart through the cross aspects.
- You do not have to register the astronomical events yourself. For details see "Shared data" in the Clients chapter.
Reading the right panel
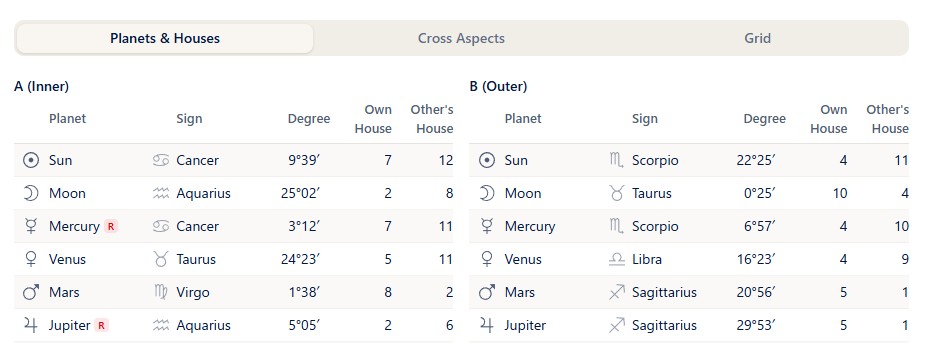
For synastry
- Planets & Houses tab: the list of planets for A and for B. Own House is the house in that person's own chart and Other's House is the house the planet falls into in the other person's chart (the headings read "A (Inner)" and "B (Outer)").
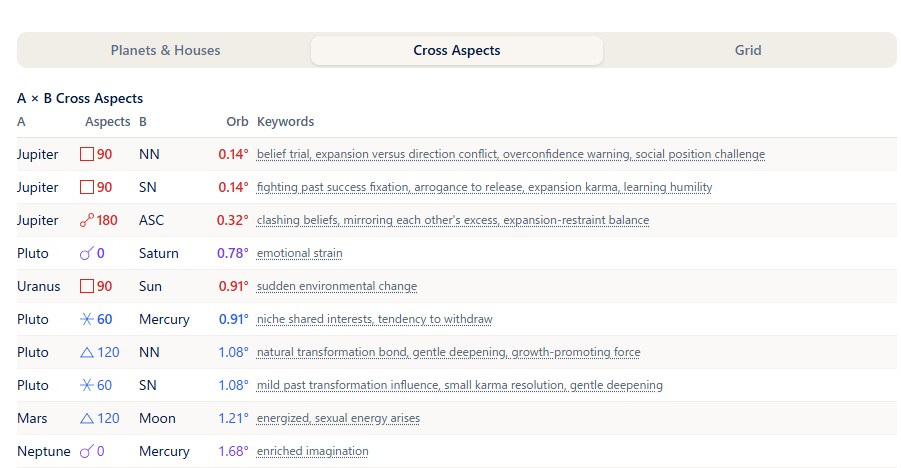
- Cross Aspects tab: shows planets, aspects, orbs, and keywords in three sections — A × B Cross Aspects, A Natal, and B Natal. The keyword column shows up to the first four; when there are more, clicking (tapping) opens the full text in a pop-up (orbs within one degree are shown in bold).
- Grid tab: shows the A × B cross grid (with the compatibility colors described in the next section) plus the natal grid for A and for B. The cross grid is oriented A down, B across.
For composite and Davison
- These are shown with four tabs — Planets / Houses / Aspects / Analysis — the same arrangement as the single wheel. See "The chart display and the panels" in the Natal chapter for the Planets, Houses, and Aspects tabs, and the Analysis Tab chapter for each item on the Analysis tab.
Compatibility colors (the coloring of the cross grid)
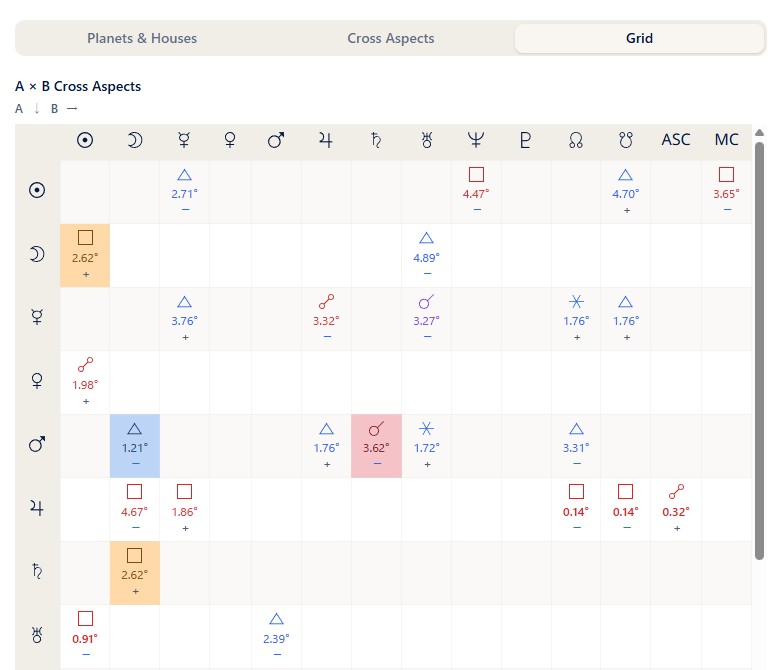
On the Grid tab for synastry, the harmonious aspects and tension aspects that matter most when looking at compatibility are colored in three colors, based on ARI's own interpretation (aspects within an orb of 5 degrees). It makes compatibility easy to read at a glance.
- Red: strong tension aspects
- Orange: challenging aspects
- Blue: harmonious aspects
This compatibility color legend is shown below the grid.
Before you use it
This coloring is one view, based on ARI's own interpretation. When you interpret a chart, your own thinking and judgment come first.
Aspects and aspect patterns
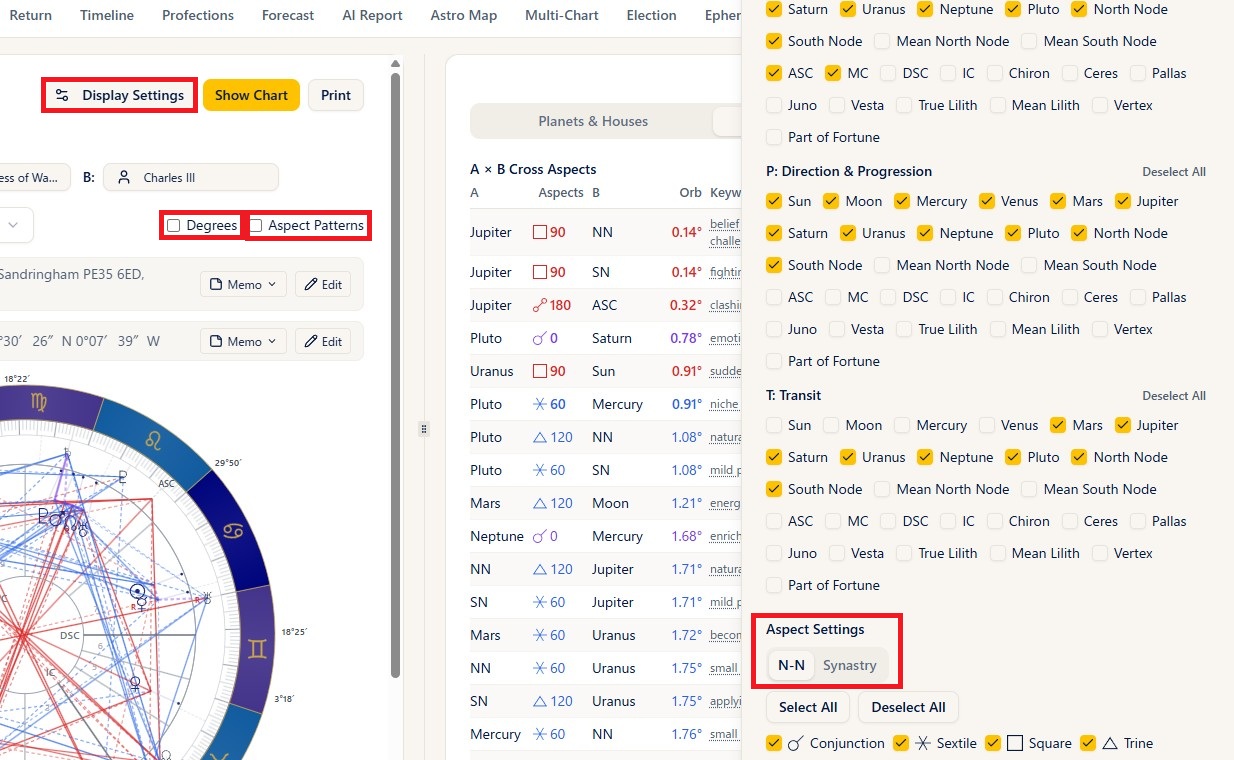
Notes
- The wheel is drawn with the A × B cross aspect lines plus the lines among A's own planets and among B's own planets (following the on/off setting and the orbs; wide orbs are drawn as dotted lines).
- Ticking Degrees shows the degree next to each planet on the wheel.
- The aspect types, orbs, and colors used for the synastry cross aspects come from the Synastry tab of the aspect settings in Settings (or the Display Settings panel). Composite and Davison are treated as a single natal chart, so they use the N-N tab.
- The Moon of a person whose birth time is unknown is excluded from the cross aspects. The Moon is calculated as of 12:00 (noon), but even so the actual birth time can shift it by 6-7 degrees. (The ASC and MC of a person whose time is unknown are excluded in the same way.)
- Aspect patterns: turning on the Aspect Patterns checkbox calculates and displays the combined A + B patterns (Basic plan and above; the calculation takes a little time, so turn it on only when you need it).
- Clicking a planet pops up the list of aspects to it, including whether each is applying or separating (badges are red for the inner ring A and blue for the outer ring B). Angles such as the ASC and MC can be clicked too.
- For the basics of aspects, see also Aspects on the ARI official site (in Japanese).
Display and printing
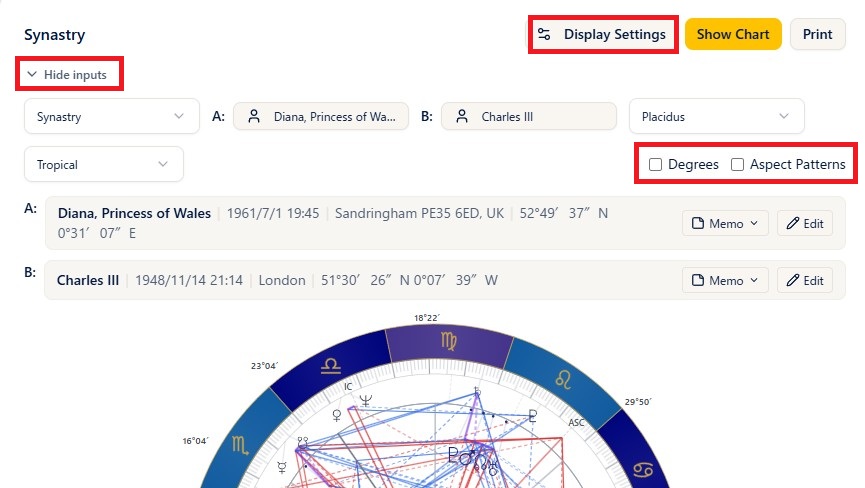
Steps
- Ticking Degrees shows the degree of each planet on the wheel.
- The Print button prints the chart and the data (Basic plan and above).
- Clicking the wheel enlarges it, and from the enlarged view you can save the image with PNG (PNG saving is Basic plan and above).
Notes
- The Display Settings button lets you adjust the planets and aspects shown on the spot (Plus plan and above).
- Show asteroids and points is a simple toggle for free and guest users (on Basic and above these are managed on the settings screen).
- Degree notation (decimal or degrees-minutes) follows the degree mode in the settings.
Progression
About this chapter
This chapter covers the tri-wheel (the progressed and transit chart). The tri-wheel layers three charts: the inner ring is the natal chart (N), the middle ring is the progressed chart, and the outer ring is the transit chart (T). The progression method can be solar arc or secondary (the day-for-a-year method).
For the basics of transits, see also Transits on the ARI official site (in Japanese).
Creating a tri-wheel
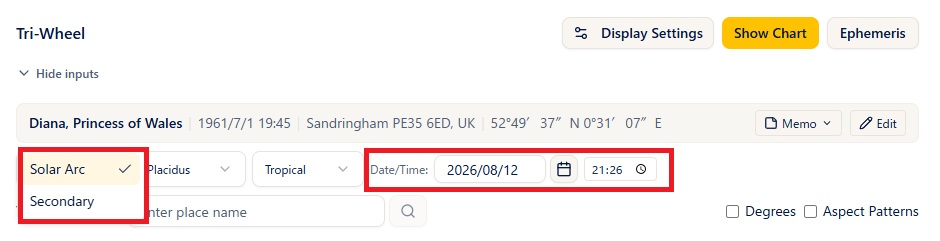
Steps
- Open Progression from the menu and choose the birth data in the header. To correct data on the spot, edit the values directly in the birth data form (press Show Chart to apply your edits).
- Choose Solar Arc or Secondary from the Direction Type selector (the default is solar arc).
- Enter the Date/Time of the transit (the default is the current date and time). The date and the time are set separately.
- Enter a place name for the Transit Location (choose from the suggestions, or search with the magnifier button = Basic and above). The default is the observation location in your settings.
- Choose a house system if you need to.
- Press Show Chart and the tri-wheel appears.
Notes
- With the Standard color theme, the three rings are, from the inside, N (natal) = black / progressed = green / T (transit) = red. The label of the middle ring changes with the progression method: D (solar arc) or P (secondary).
- The planets shown on each ring follow your settings preset. You can also change them in real time from Display Settings.
- Clicking a planet pops up the list of aspects to it (badges are black for N, green for the progressed ring, and red for T). Angles such as the ASC and MC can be clicked too.
Reading the right panel
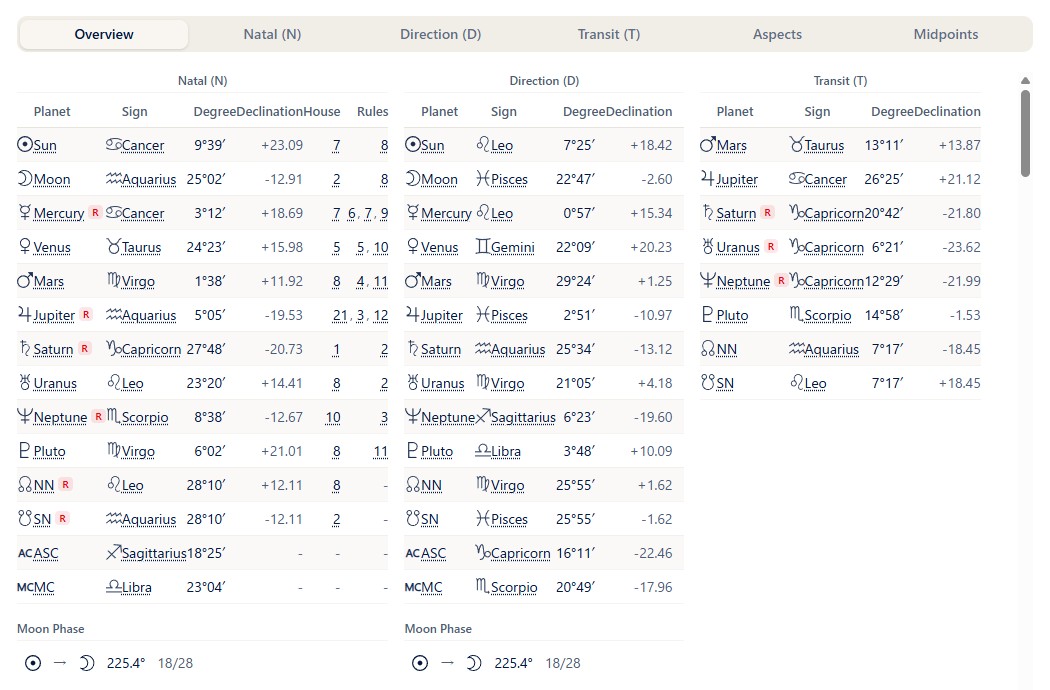
Notes
- The tabs are Overview / Natal (N) / Direction (D) (or Secondary (P) when secondary is selected) / Transit (T) / Aspects / Midpoints.
- Overview tab: lists the planets and aspects of N, the progressed chart, and T together (the same layout as the previous StarNavigator).
- N / D (P) / T tabs: the planet table for each ring (planet, sign, degree, declination; the N tab also has the house and houses-ruled columns and a list of the houses) and the moon phase. The Essential Dignity button at the bottom right of the planet table (Pro and above) opens the dignity table, including the almuten, in a separate window (see the Analysis Tab chapter; the house-cusp almuten table is included only for N).
- Aspects tab: shows an aspect grid for each of the sections N-N / N-P (N-D) / N-T / P-P (D-D) / P-T (D-T) / T-T. Each cell shows the orb and a plus sign (separating) or minus sign (applying), and clicking a cell pops up the aspect type, the orb, whether it is applying or separating, and its meaning (keywords). Below the aspect grid is the list of aspect patterns (when you calculated with the Aspect Patterns checkbox on).
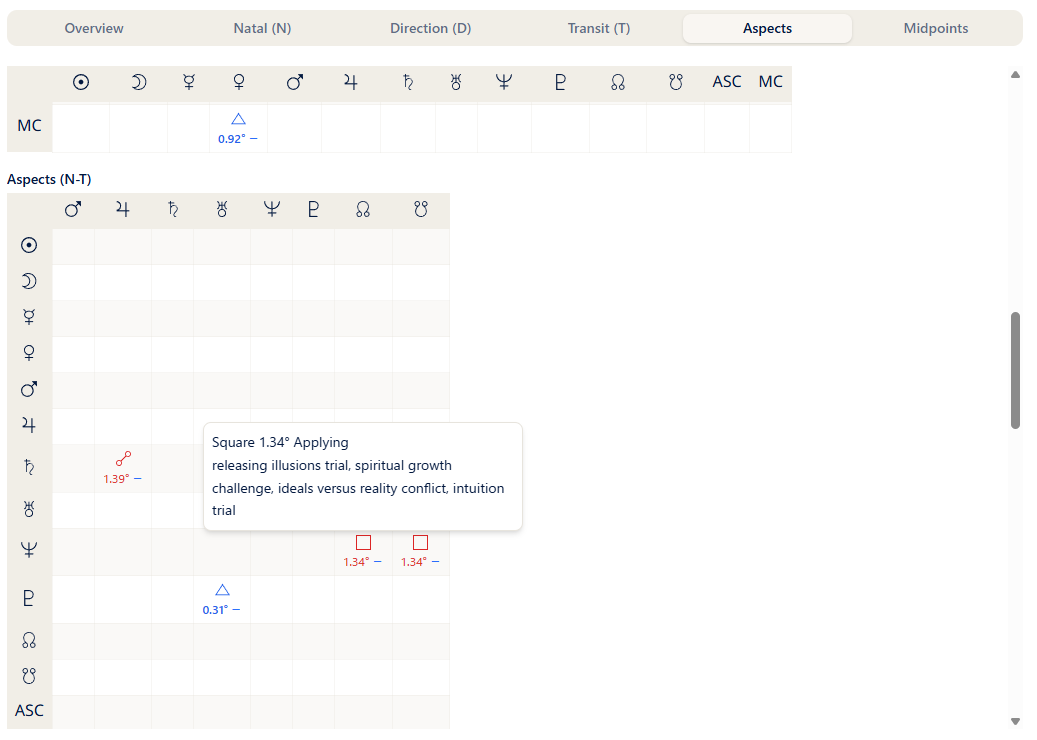
- Midpoints tab: shows the midpoints (half sums) (see the next section).
- In the tables on the Overview tab, the list of houses on the N tab, and each aspect grid, underlined items (planets, signs, houses, aspects, and so on) show their meaning when clicked (the planet tables on the N / D (P) / T tabs do not show meanings).
Midpoints (N/N, D/D, and T/T)
The Midpoints tab in the right panel lets you analyze midpoints (half sums) (Plus and above). Switching the MP Pair lets you analyze not only N/N (natal to natal) but also D/D (progressed to progressed; P/P when secondary is selected) and T/T (transit to transit) midpoints.
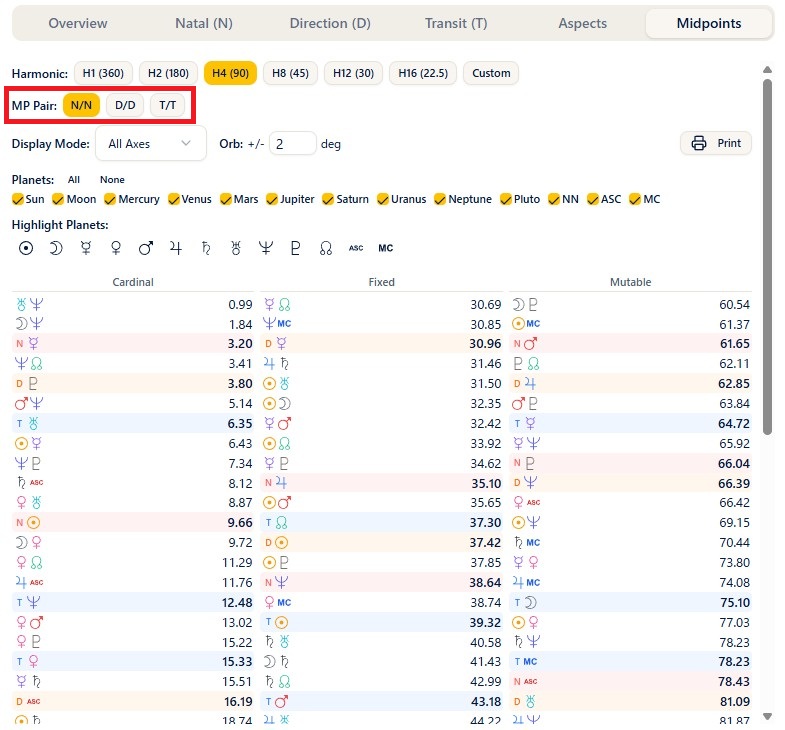
Notes
- The harmonic, display mode, orb, planet filtering, and other controls work exactly as described under "Midpoints tab" in the Natal chapter.
- For the basics of midpoints, see also Half sums on the ARI official site (in Japanese).
Stepping (animating the chart)
The controls below the chart let you advance the date and time little by little and watch the chart change, like an animation (Pro and above).
Steps
- Choose the Interval (1 day, for example) and the Speed (1s, for example) below the chart.
- Pressing Play advances the date and time automatically and the chart changes as it goes. Pressing 1 Step advances one frame at a time.
- Ticking Backward moves back into the past instead.
Ephemeris
Steps
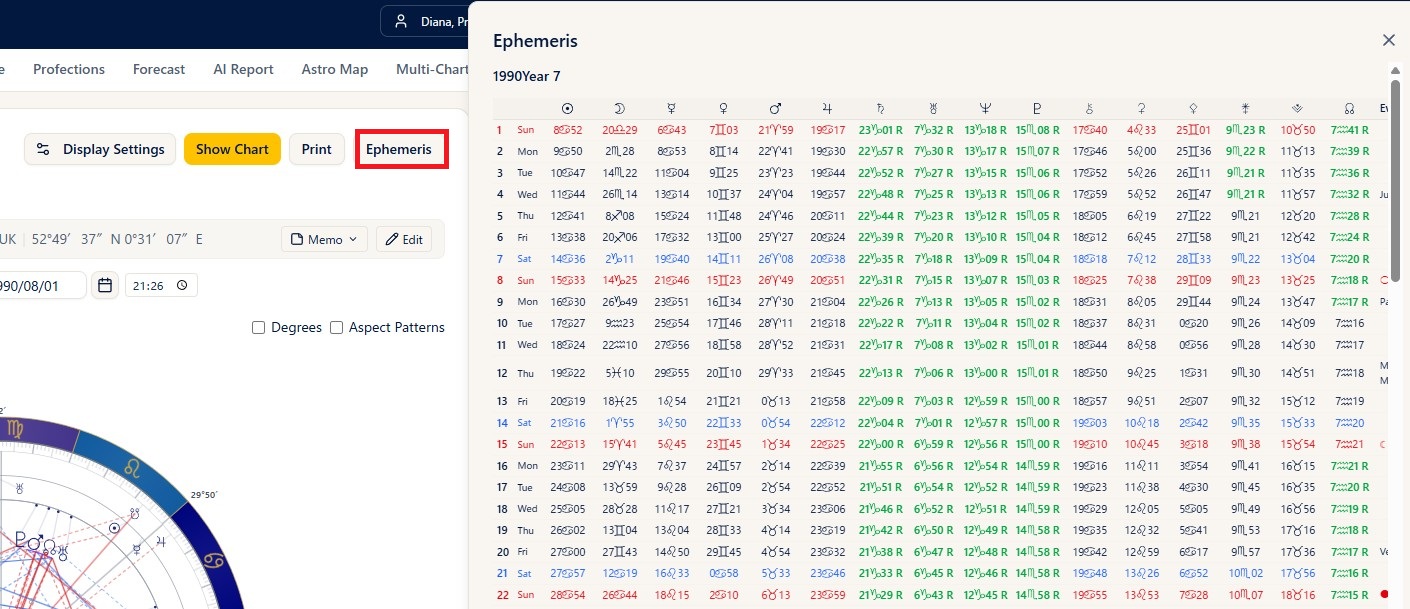
- Press the Ephemeris button in the header (Plus and above).
- A dialog opens with three months of ephemeris data, starting from the month before the transit date. You can check the movement of the planets in the ephemeris while you build the tri-wheel.
Notes
- For each day it shows the degree of each planet (sign, degree, minute, with R for retrograde), ingresses, moon phase and direct/retrograde changes, the void-of-course Moon, aspects between planets, and more.
- There is also a separate Ephemeris menu that generates PDFs (explained in the Ephemeris chapter).
Display and printing
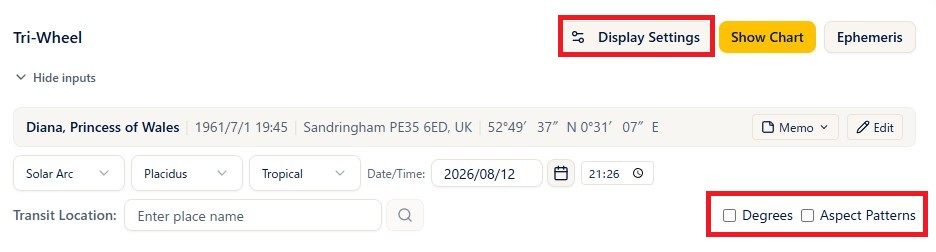
Steps
- Ticking Degrees shows the degree next to each planet.
- Ticking Aspect Patterns calculates and displays the combined patterns (Basic and above; the calculation takes a little time, so turn it on only when you need it).
- Display Settings lets you adjust planets, aspects, houses, colors, the progression method, and more on the spot (Plus and above).
- The Print button prints the tri-wheel and the data (Basic and above, portrait). The Midpoints tab prints in landscape.
- Clicking the wheel enlarges it, and you can save the image with PNG (PNG saving is Basic and above).
Notes
- Transit Mode in Display Settings can be set to the date of the Next Solar Return or the Previous Solar Return as well as Normal.
- Show asteroids and points is a simple toggle for free and guest users.
- Degree notation (decimal or degrees-minutes) follows the degree mode in the settings.
Harmonic
About this chapter
This chapter covers the harmonic chart. Harmonic charts transform the natal chart by a harmonic number you specify. You can pick a preset (1 to 12), enter a custom value, or use the age harmonic, which calculates from the subject's age.
The screen is split in two, with the harmonic wheel on the left and the right panel (Planets, Houses, Aspects, Midpoints) on the right, so you can check midpoints (half sums) on the same screen. Harmonic charts are available on the Pro plan and above.
Creating a harmonic chart
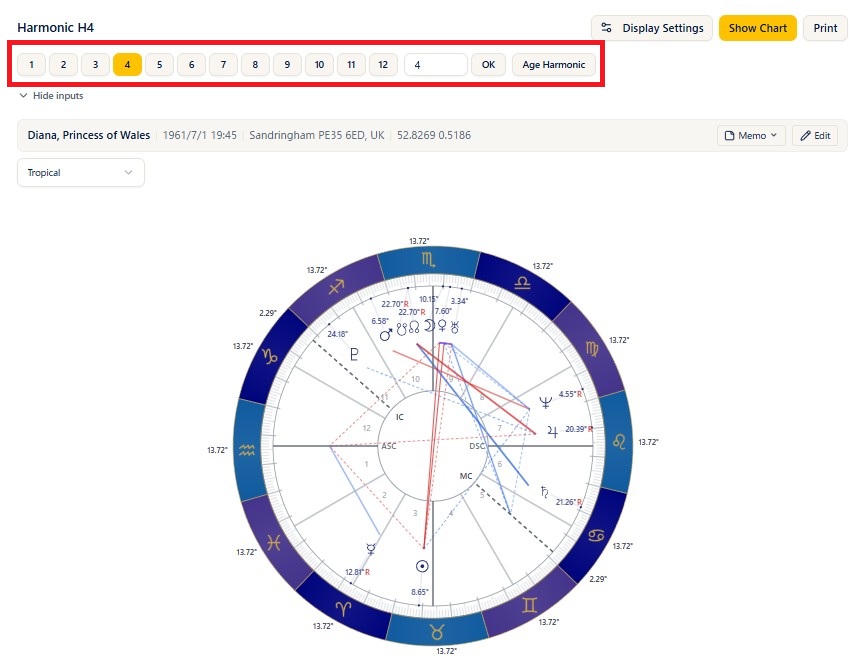
Steps
- Open Harmonic from the menu and choose the birth data in the header.
- To correct data on the spot, edit the values directly in the birth data form (press Show Chart to apply your edits).
- Choose the harmonic number you want from the preset (1-12) buttons at the top. Pressing a button calculates and displays it on the spot.
- For a number not among the presets, type a value into the field on the right and press OK (the Enter key works as well). Decimals such as 4.5 are accepted.
- When birth data is selected, the Show Chart button recalculates at the current harmonic number.
Notes
- The title above the chart shows the current harmonic number in the form Harmonic H(n).
- If you open the page without selecting birth data, the preset, custom entry, and age harmonic controls are not shown. They appear once you select birth data.
- Custom entry accepts values of 0.01 and above. Non-numeric values and values of 0 or below are ignored.
- Changing the zodiac recalculates automatically at the same harmonic number.
Age harmonic
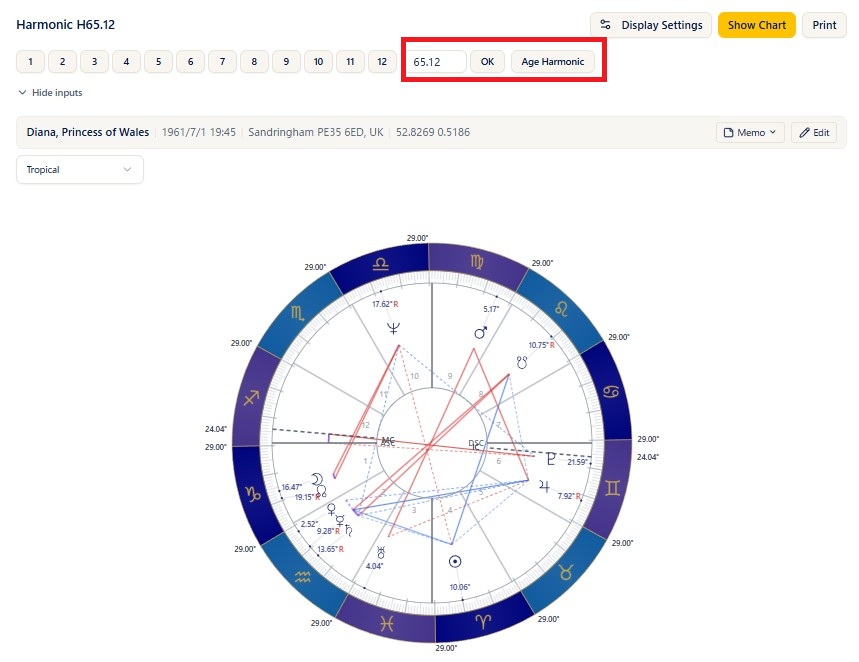
Steps
- Choose the birth data in the header (the button only appears when birth data is selected).
- Press the Age Harmonic button.
- The current age in completed years, derived from the date of birth and given to two decimal places, is used directly as the harmonic number.
Notes
- The calculated age is also placed in the custom entry field, so you can fine-tune it from there and recalculate.
Choosing the zodiac
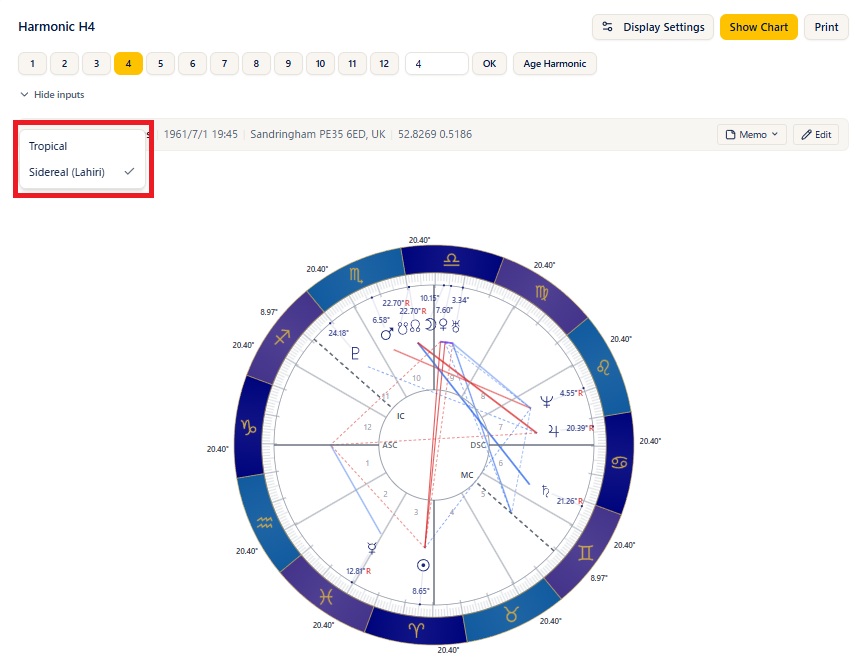
Steps
- Choose Tropical or Sidereal (Lahiri) from the Zodiac selector.
- Changing it recalculates automatically at the same harmonic number.
Notes
- The houses of a harmonic chart are always calculated as equal houses (30 degrees at a time from the ASC after the harmonic transformation), so unlike the other charts there is no house system selector.
- The MC is shown at its position after the harmonic transformation and is not tied to the house cusps (a floating MC).
Reading the right panel
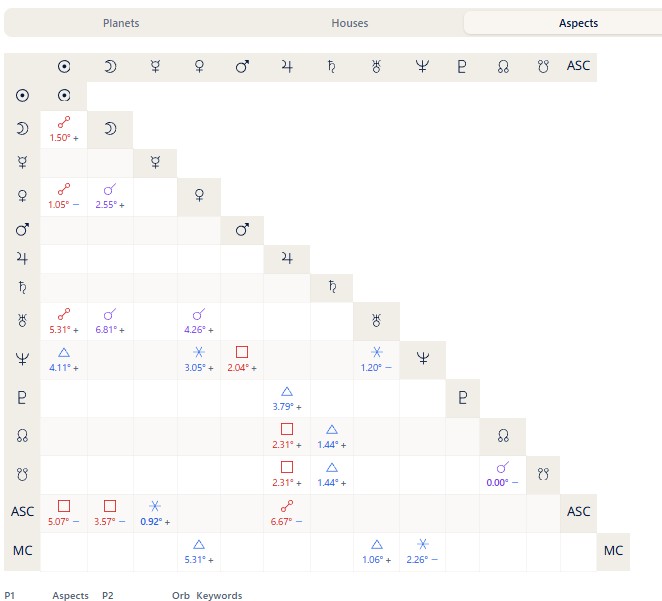
Notes
- There are four tabs: Planets / Houses / Aspects / Midpoints.
- Planets tab: lists the planets after the harmonic transformation (planet, sign, degree, declination, house, houses ruled).
- Houses tab: lists the houses (the sign and degree of each cusp, the planets in the house, and its rulers).
- Aspects tab: shows the list and grid of aspects within the harmonic chart. Aspect patterns are shown as well when there are any.
- Midpoints tab: shows the midpoints (half sums).
- Until a chart has been calculated, each tab shows "No data".
Midpoints (half sums)
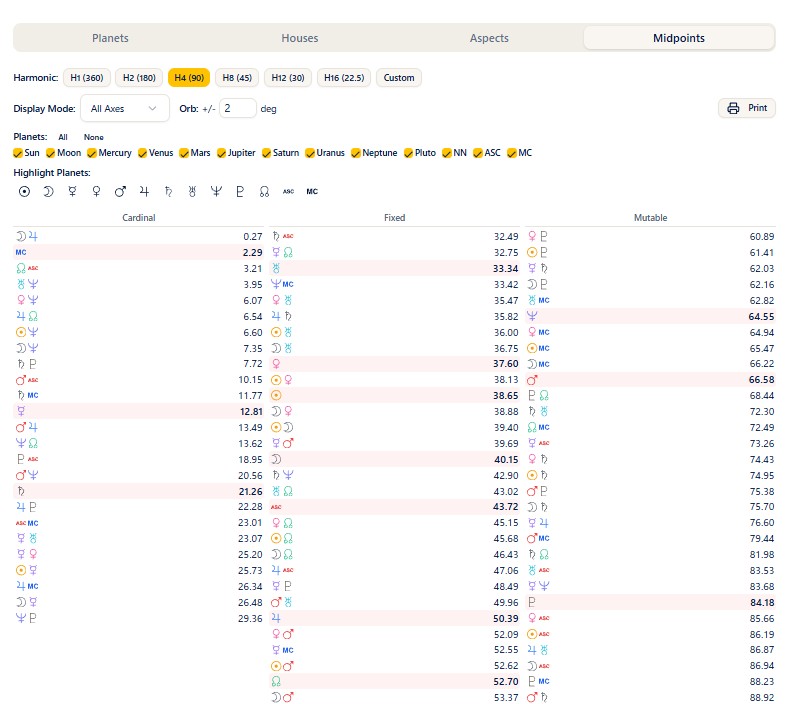
Steps
- Open the Midpoints tab in the right panel.
- Switch the Harmonic, the Display Mode (All Axes / Stimulation / Tree / Graph), the orb, and the planets to choose what you want to see.
- The print button inside the tab prints the midpoints in landscape.
Notes
- The harmonic used for the midpoints is set independently of the harmonic number of the wheel itself.
- The harmonic, display mode, orb, planet filtering, planet highlight, and other controls work exactly as described under "Midpoints tab" in the Natal chapter.
- For the basics of midpoints, see also Half sums on the ARI official site (in Japanese).
Display and printing
Steps
- The Print button prints the harmonic wheel and the data in portrait. The file name includes "Harmonic" and the harmonic number (H(n)).
- Clicking the wheel enlarges it, and from the enlarged view you can save the image with PNG.
- The Display Settings button lets you adjust the planets and aspects shown on the spot.
Notes
- The print button only appears once a chart has been calculated.
- If you print a chart drawn from unsaved edits, an Unsaved birth data note appears in the print header.
Plans
Harmonic charts require Pro and above (a lock icon on the menu means your plan cannot open it). Once you can open the page, all of the features inside it — midpoints, display settings, and the rest — are available.
Return
About this chapter
This chapter covers the return chart — the chart for the moment a planet comes back to the position it held at birth. You can build returns for every body from the Sun to Pluto, starting with the solar return and the lunar return, and switch between three displays: single wheel, bi-wheel, and tri-wheel. Return charts are available on the Plus plan and above (returns of bodies other than the Sun, Moon, and Saturn require Pro and above).
For the basics of transits, see also Transits on the ARI official site (in Japanese).
Creating a return chart
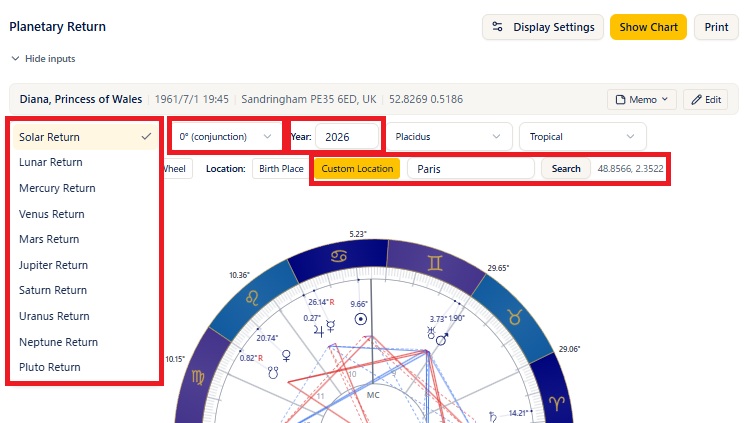
Steps
- Open Return from the menu. Choose the birth data in the header (Show Chart cannot be pressed while nothing is selected).
- To correct data on the spot, edit the values directly in the birth data form (press Show Chart to apply your edits).
- From the Return Type selector at the far left, choose Solar Return / Lunar Return / Mercury Return / Venus Return / Mars Return / Jupiter Return / Saturn Return / Uranus Return / Neptune Return / Pluto Return.
- From the phase selector next to it, choose 0° (conjunction) / 90° (square) / 180° (opposition) / 270° (square) (the default is 0°, the ordinary return).
- Enter the year you want to search in Year (the default is this year).
- Under Location, choose Birth Place or Custom Location (for how to use a custom location, see "Specifying the location" and "Using the solar return to choose a place" below).
- Choose a house system if you need to.
- Press Show Chart and the return chart appears.
Notes
- The chart is calculated for the moment the body you chose returns to the same ecliptic longitude it held at birth (a conjunction).
- Setting the phase to 90°, 180°, or 270° gives the moment the body has moved a quarter, a half, or three quarters of the way from its natal position. Use it when you want to find the periods that form a square or an opposition.
- Once calculated, the exact date and time of the return are shown below the chart.
- If there is no matching return within the Year you entered, No returns in this period is shown, and the Find previous return and Find next return buttons search the years before and after.
- Switching the house system recalculates automatically with the data already computed.
Plans
Return charts (solar, lunar, Saturn) = Plus plan and above. Returns of the other bodies (Mercury through Pluto) require the Pro plan and above.
Switching the display mode
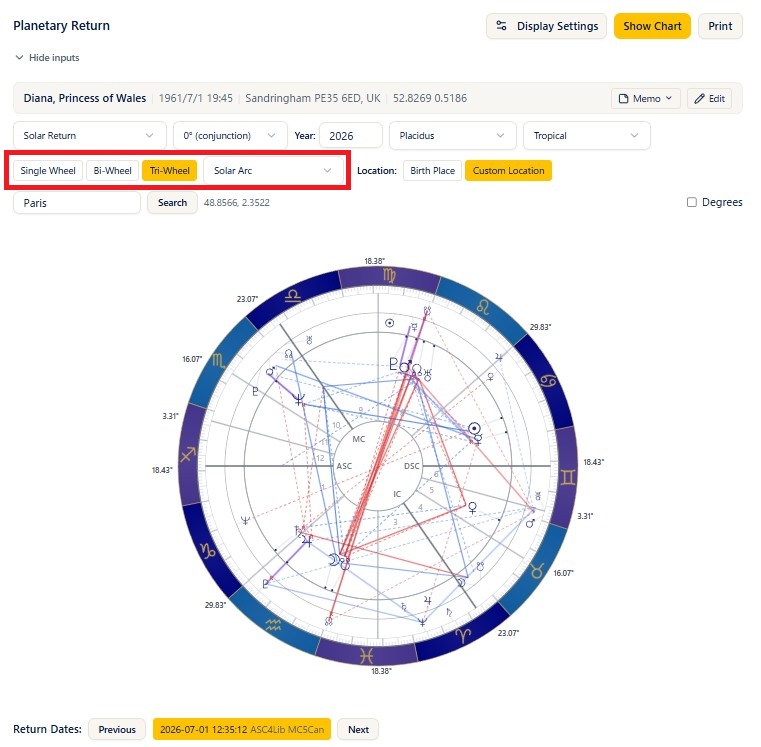
Steps
- Choose Single Wheel / Bi-Wheel / Tri-Wheel with the mode buttons (the default is the bi-wheel).
- When you choose the tri-wheel, you can also choose the progression method from the Solar Arc / Secondary selector.
- Switching the mode recalculates whatever data is needed, automatically.
Notes
- Single Wheel: shows only the return chart (R) as a single circle.
- Bi-Wheel: shows the natal chart (N) on the inner ring and the return (R) on the outer ring.
- Tri-Wheel: shows the natal chart (N) on the inner ring, the progressed chart (solar arc = D / secondary = P) on the middle ring, and the return (R) on the outer ring.
- The planets shown on each ring follow Display Settings (Planet Display).
The planets on the outer ring (the return chart) follow the transit settings
The planets shown for the return chart (R) on the outer ring of a bi-wheel or tri-wheel follow the T: Transit section of the settings (Planet Display). The transit settings often have the ASC, MC, Sun, and Moon unticked, so if you want them on the return chart, tick them under T in the settings (or in Display Settings). This is easy to forget.
Specifying the location
Steps
- Choose Birth Place or Custom Location with the Location switch (the default is the birth place).
- When you choose Custom Location, type a place name into the field (choose from the suggestions, or use the Search button = Basic and above).
- After changing the location, press Show Chart again and the return chart is computed for that place.
Notes
- Birth Place: calculates the return chart at the latitude and longitude of the birth data.
- Custom Location: calculates the return chart at the latitude and longitude of the place you entered (use this when you want to see it for where you are now, such as somewhere you have moved to). Once the latitude and longitude are resolved, the figures appear to the right of the field.
- Changing the location does not change the signs and degrees of the planets, but it does change the ASC, the MC, and the house placements.
Using the solar return to choose a place
A solar return chart is read for the place you are in at the exact moment of your birthday, so changing where you spend that period gives you a return chart with different ASC, MC, and house placements for the very same moment. You can use this to spend your birthday period somewhere that produces the placements you want.
Steps
- Choose Solar Return as the return type and specify the Year.
- Choose Custom Location under Location, type in a candidate place, and press Show Chart.
- Check the exact date and time of the return shown below the chart, along with the ASC, MC, and house placements.
- Recalculate with different candidate places, compare the placements, and consider where to go.
Notes
- Changing the location does not change the signs and degrees of the planets. What changes is the ASC, the MC, and the house placements.
- Which placements to aim for is a matter of astrological interpretation, so this manual does not cover it. Please judge on the basis of what you have learned in your courses.
Choosing a return date
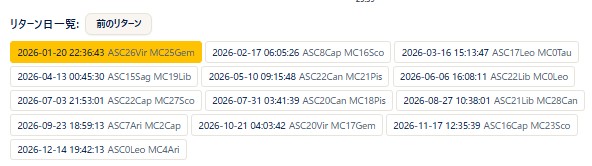
Steps
- The Return Dates list below the chart shows the return dates and times for that year. Pressing a date button switches to the return chart for that day.
- The Previous and Next buttons move to the return before or after.
- Once you reach the end of the list, those buttons switch to searching the previous or the following year.
Notes
- The return date currently on display is marked in yellow (highlighted). When you choose another date, the highlight follows the chart on display.
- Each date shows a red R for a return that is retrograde, together with the degrees of the ASC and MC for that chart.
- The solar return happens once a year, but for returns with many candidate dates, such as the lunar return, the list lets you pick the chart for the month you want.
Reading the right panel
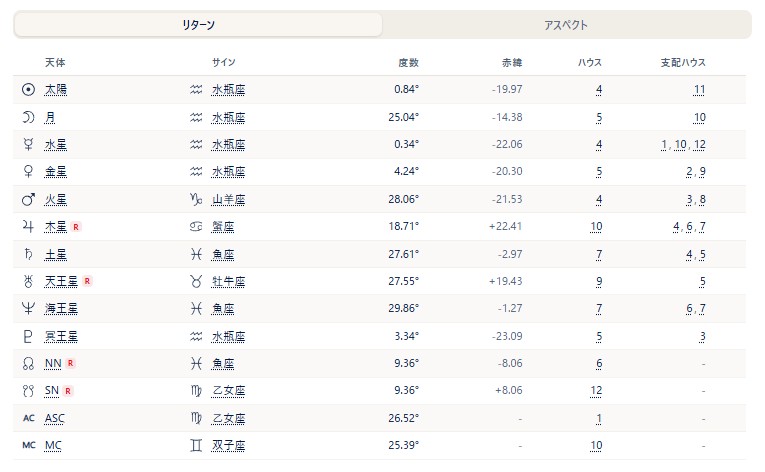
Notes
- The tabs change with the display mode: single wheel = Return (R) / Aspects, bi-wheel = Natal (N) / Return (R) / Aspects, tri-wheel = Natal (N) / Direction (D) / Return (R) / Aspects.
- Natal (N) / Direction (D) / Return (R) tabs: show the planet table for each ring (planet, sign, degree, declination, house, houses ruled). The planets listed in the right panel follow the N: Natal section of Display Settings (Planet Display) on all three tabs (unlike the outer ring of the wheel; see the warning under "Switching the display mode").
- Aspects tab: shows aspect grids divided into sections according to the display mode. The bi-wheel has the sections N-N / N-R / R-R, and the tri-wheel has N-N / N-D / N-R / D-D / D-R / R-R.
- Clicking a planet on the wheel pops up the list of aspects to it. Angles such as the ASC and MC can be clicked too.
- Returns are calculated as transits, so their relationship with the natal chart is shown as N-T (that is, N-R) aspects.
Display and printing
Steps
- On the bi-wheel and tri-wheel, ticking Degrees shows the degree of each planet on the wheel.
- The Display Settings button lets you adjust the planets and aspects shown on the spot (Plus plan and above).
- The Print button prints the return chart and the data (Basic plan and above, portrait).
- Clicking the wheel enlarges it, and from the enlarged view you can save the image with PNG (PNG saving is Basic plan and above).
Notes
- The file name for printing and PNG includes "Return" and the name from the birth data.
- Degree notation (decimal or degrees-minutes) follows the degree mode in the settings.
- If you print a chart drawn from unsaved edits, an Unsaved birth data note appears in the print header.
Plans
Return charts = Plus plan and above / place search = Basic and above / printing and PNG saving = Basic and above / Display Settings = Plus and above.
Timeline
About this chapter
This chapter covers the Timeline feature. The timeline lets you record past events in your life by year and month, and then automatically calculates and lists the main configurations for those periods (direction, transit, and the progressed Moon).
The events you record are also connected to the tri-wheel (the progressed and transit chart) for that period. The timeline is available on the Basic plan and above.
For the basics of transits, see also Transits on the ARI official site (in Japanese).
Opening the timeline (choosing the birth data)
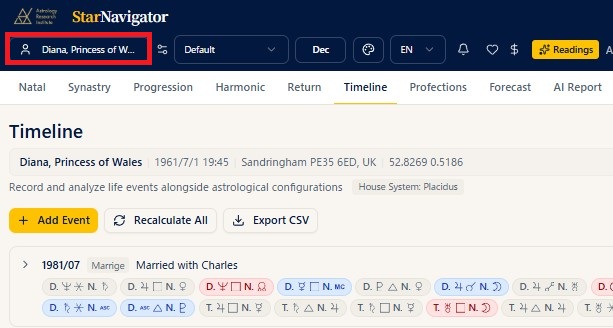
Steps
- Open Timeline from the menu.
- Choose the person you want a timeline for in the birth data picker in the header.
- Once chosen, the list of events registered for that person appears.
Notes
- While no birth data is selected, a message says there is no data and events cannot be registered. Choose a subject first.
- Besides the birth data you have registered yourself, you can choose people from the Shared Data.
- The house system used for the calculation is shown at the top of the screen (it follows the house system on the settings screen).
Registering an event
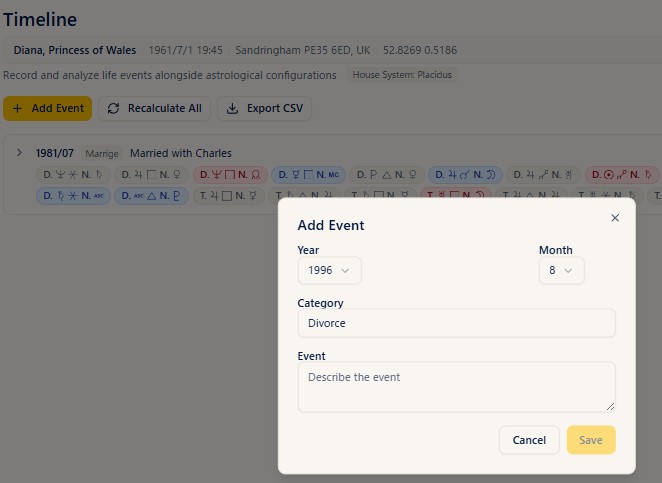
Steps
- Press the Add Event button.
- Fill in the following in the dialog that opens.
- Year: the year the event happened (1900 to 2100).
- Month: the month the event happened (1 to 12).
- Category: any classification you like (career, marriage, move, and so on).
- Event: what happened (required).
- Press the Save button and the event is registered, the configurations for that period are calculated automatically, and it is added to the list.
Notes
- The event cannot be saved while Event is empty.
- The Category field suggests category names you have entered before.
- The date is specified only by year and month (not by day).
Reading the event list
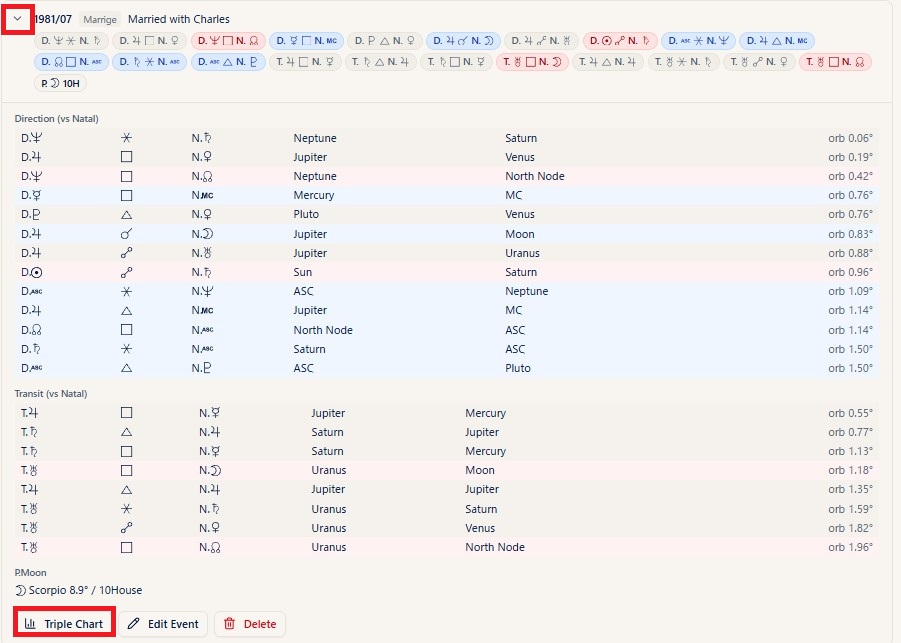
Steps
- The list shows the events you registered with their year/month, category, and description.
- Clicking an event row opens its details (clicking again closes them).
Notes
- Even while collapsed, the main aspects of that period are shown as small badges (symbols), along with the house of the progressed Moon (P.Moon (n)H).
- The badges and the aspect tables are color-coded according to their content.
- Opening the details shows the following information in tables.
- Direction (vs Natal): the aspects between directed planets and natal planets (planets, aspect, orb).
- Transit (vs Natal): the aspects between transiting planets and natal planets (planets, aspect, orb).
- P.Moon: the sign, degree, and house of the progressed Moon.
- When no configuration data has been calculated, No astro data is shown.
Viewing the tri-wheel for that period
Steps
- Click the event row in the list to open its details.
- Press the tri-wheel button inside the details.
- The tri-wheel (progressed and transit chart) screen opens, using the first day of the event's year and month as the transit date.
Notes
- The tri-wheel lets you check the direction, transit, and natal charts of that period together (for how to read the tri-wheel in detail, see the Progression chapter).
Editing and deleting an event
Steps
- Click the event row in the list to open its details.
- Pressing the Edit button opens the same dialog as when registering, where you can correct the year, month, category, and event. Updating with Save recalculates the configurations as well.
- Pressing the Delete button brings up a confirmation dialog. Check it and press Delete, and the event is removed.
Notes
- The delete confirmation dialog shows the "year/month - event" of the item concerned. Press Cancel if you want to stop.
Recalculating everything
Steps
- Press the Recalculate All button.
- The configurations of every registered event are recalculated with the current house system.
Notes
- The button cannot be pressed while no events are registered.
- Use it when you want the calculations brought back into line, such as after changing the house system in the settings.
Exporting to CSV
Steps
- Press the Export CSV button.
- The list of registered events is downloaded as a CSV file (
timeline_events.csv).
Notes
- The button cannot be pressed while no events are registered.
- It is handy when you want to look back over the timeline in a spreadsheet.
Traditional (Profections and Lots)
About this chapter
This chapter covers the features for traditional astrology: the Profections page in the menu (a year-by-year table by age) and the items you can display on the natal (single wheel) chart — lots (Arabic parts), custom lots, antiscia, term and face rings, and the profection ring. These features are available on the Max plan.
Everything you can add to the chart is OFF by default. Switch on only the items you want to use.
The Essential Dignity table (with its Score) and the Almuten are not part of this chapter — they appear on the Analysis tab of the natal chart (Pro and above). See the Analysis Tab chapter.
Switching the Traditional display on and off
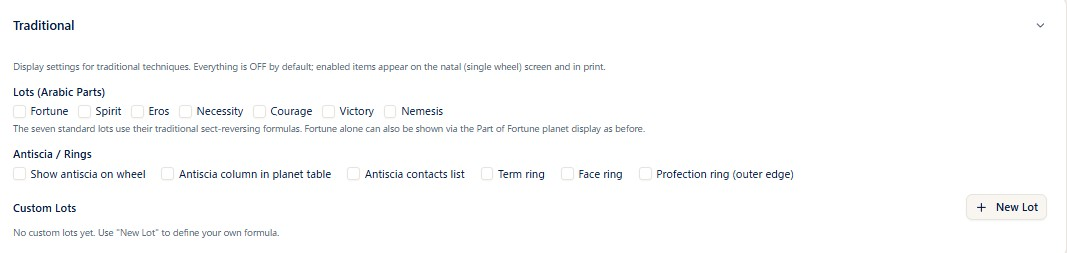
Steps
- Open Settings from the menu.
- Click/tap the Traditional card near the bottom of the screen to expand it.
- Under Lots (Arabic Parts), tick the lots you want on the chart.
- Under Antiscia / Rings, tick the items you want to display.
- Press Overwrite Preset to save them into the preset you are using.
- On the natal chart screen you can also toggle the same items from Display Settings at the top right.
Notes
- While nothing is switched on, the card stays collapsed. When some items are on, the number of them is shown next to the card heading.
- The settings are saved per preset. See "Creating a preset" in the Settings chapter.
- The items you switch on appear on the natal (single wheel) screen and in its printout. They are not shown on the synastry, progression, or other screens.
- While a Dragon Head or Dragon Tail (draconic) chart is displayed, and while you are stepping the date and time, the lots, antiscia, and profection ring are not shown.
Profections
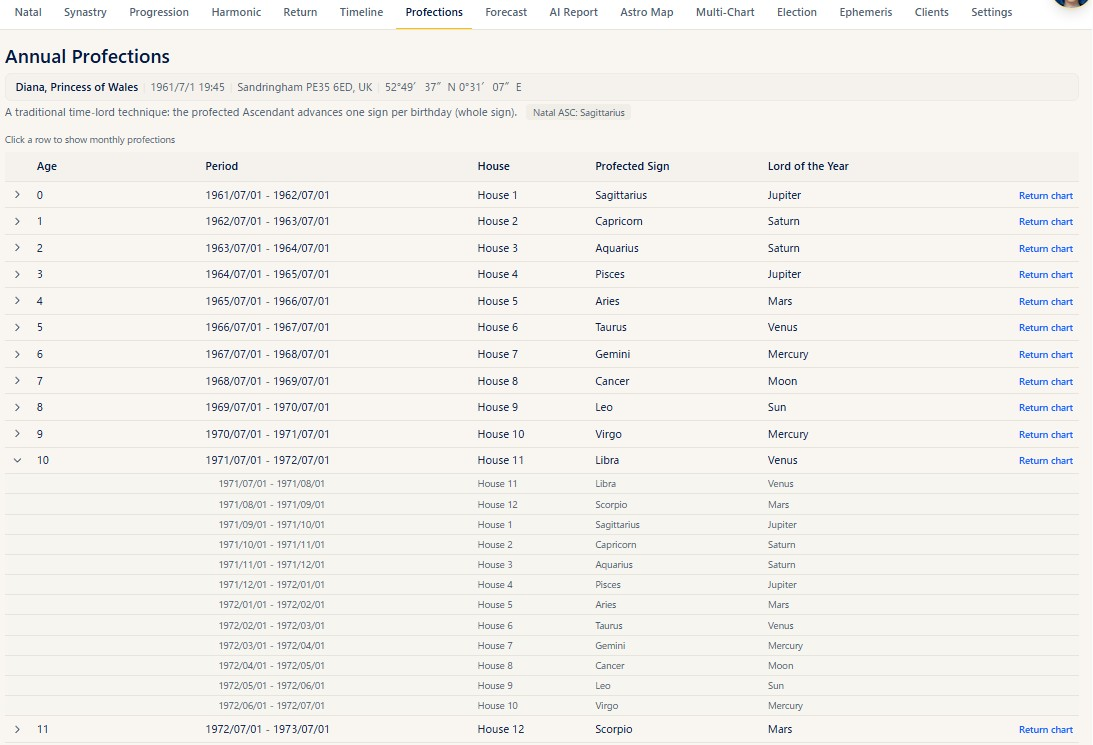
Steps
- Open Profections from the menu and choose the birth data in the header.
- A table from age 0 to age 100 appears. The row for the current age carries a This year badge, and the page scrolls to that row when you open it.
- Each row shows the age, period, house, profected sign, and Lord of the Year.
- Click/tap a row to open the monthly profections — the year divided into twelve periods — underneath it. Click/tap again to close them.
- The Return chart link at the right of each row opens the return chart screen with that year as the search year.
Notes
- A period runs from the birthday to the day before the following birthday. Each monthly period starts on the same day of the month as the birthday (or on the last day of the month when that date does not exist).
- The sign of the Natal ASC is shown at the top of the screen.
- Profections cannot be calculated for birth data with an unknown birth time; a notice is shown instead of the table.
- Pressing Return chart does not calculate anything by itself. Check the settings on the return chart screen and press Show Chart. See the Return chapter for how to use that screen.
Lots (Arabic Parts)
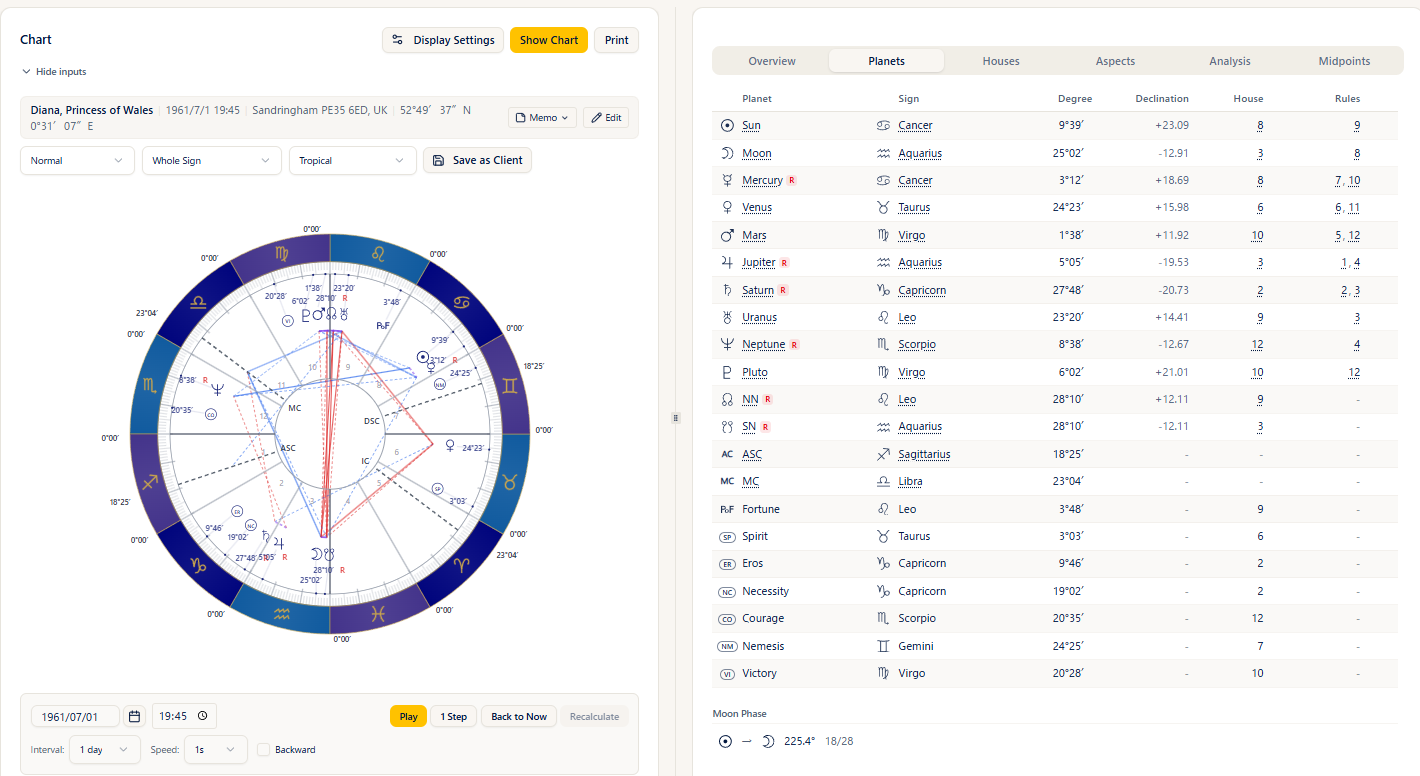
Steps
- Under Lots (Arabic Parts) in the Traditional section, tick the lots you want to display. Seven standard lots are available: Fortune, Spirit, Eros, Necessity, Courage, Victory, and Nemesis.
- Display the natal chart, and the lots you chose are placed on the wheel just like the planets.
- The Planets tab in the right panel also lists the sign, degree, and house of each lot you chose.
Notes
- Fortune uses the Part of Fortune glyph; the other lots are shown as small circles with a two-letter abbreviation (Spirit = SP, Eros = ER, Necessity = NC, Courage = CO, Victory = VI, Nemesis = NM).
- The seven standard lots use their traditional definitions, in which the formula is reversed between day and night charts.
- If you only want the Part of Fortune, you can still display it as the Part of Fortune planet as before. In that case it follows the Part of Fortune formula chosen in the settings.
- Lots are not displayed for birth data with an unknown birth time.
Custom Lots
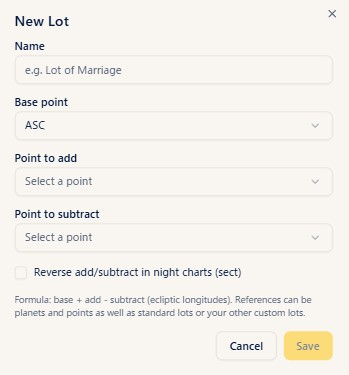
Steps
- Press New Lot under Custom Lots at the bottom of the Traditional section.
- Enter a Name.
- Choose the Base point, the Point to add, and the Point to subtract. Besides planets and points, you can also choose the standard lots and your own other custom lots.
- To swap the added and subtracted points in night charts, tick Reverse add/subtract in night charts (sect).
- Press Save and the lot is added to the list, with your choices shown next to the name as its Formula.
- Your custom lots appear alongside the standard ones under "Lots (Arabic Parts)". Tick one to show it on the chart and in the Planets tab.
Notes
- Use the pencil icon in the list to edit a lot and the bin icon to delete it. Deleting a lot also removes it from your display selection.
- Two custom lots cannot have the same name.
- You can create up to 50 custom lots.
- The lot you are editing does not appear among its own reference choices.
- On the wheel a custom lot is shown as a circle containing the first two characters of its name.
Antiscia
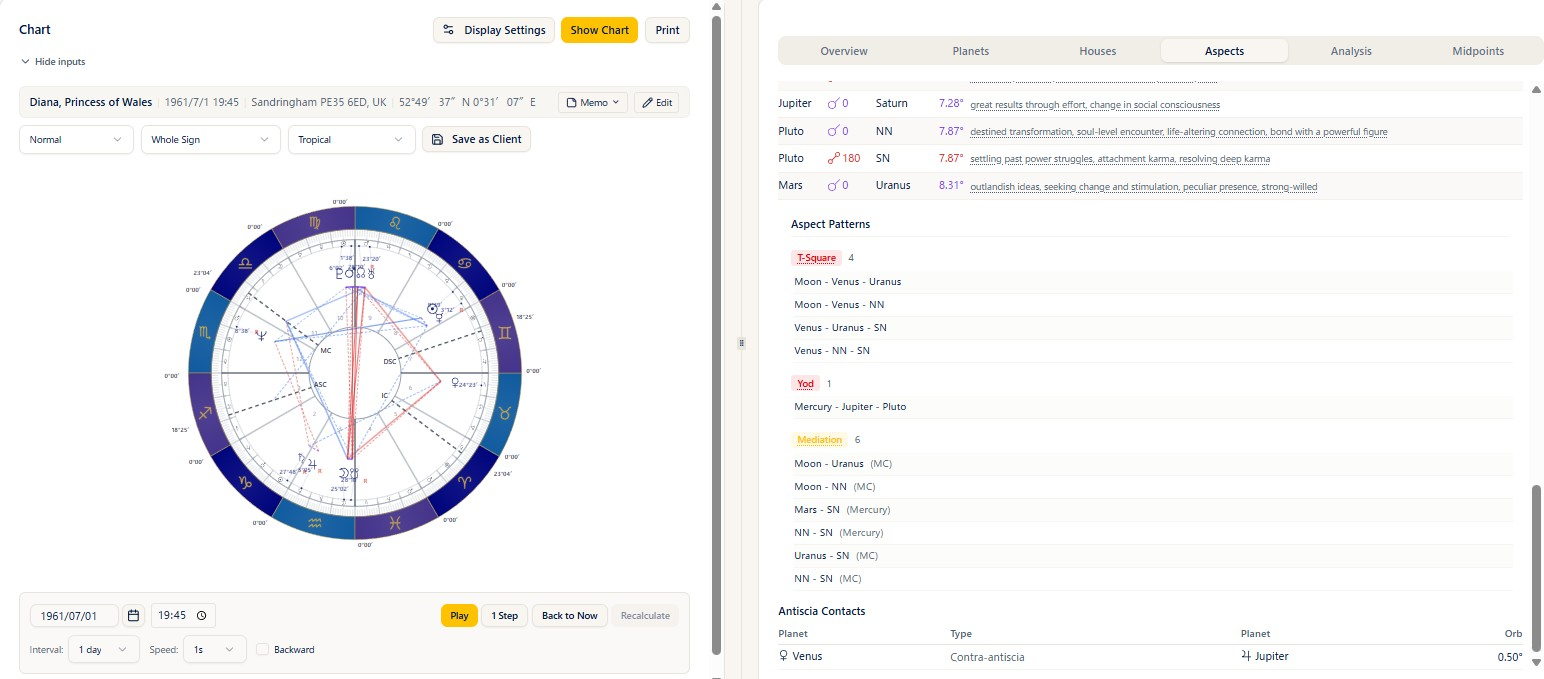
Steps
- Under Antiscia / Rings in the Traditional section, tick the items you need.
- Show antiscia on wheel: the antiscion of each planet is overlaid on the wheel in a faint symbol.
- Antiscia column in planet table: a column of antiscion positions is added to the Planets tab in the right panel.
- Antiscia contacts list: the list of contacts is shown below the Aspects tab in the right panel.
- Display the natal chart and the items you chose appear.
Notes
- In the contacts list, the Type column shows whether a contact is an antiscia or a contra-antiscia.
- When there is nothing to show, No contacts within 1° orb is displayed.
- Antiscia are for display only. They do not affect the aspect grid or the AI report.
Term and face rings
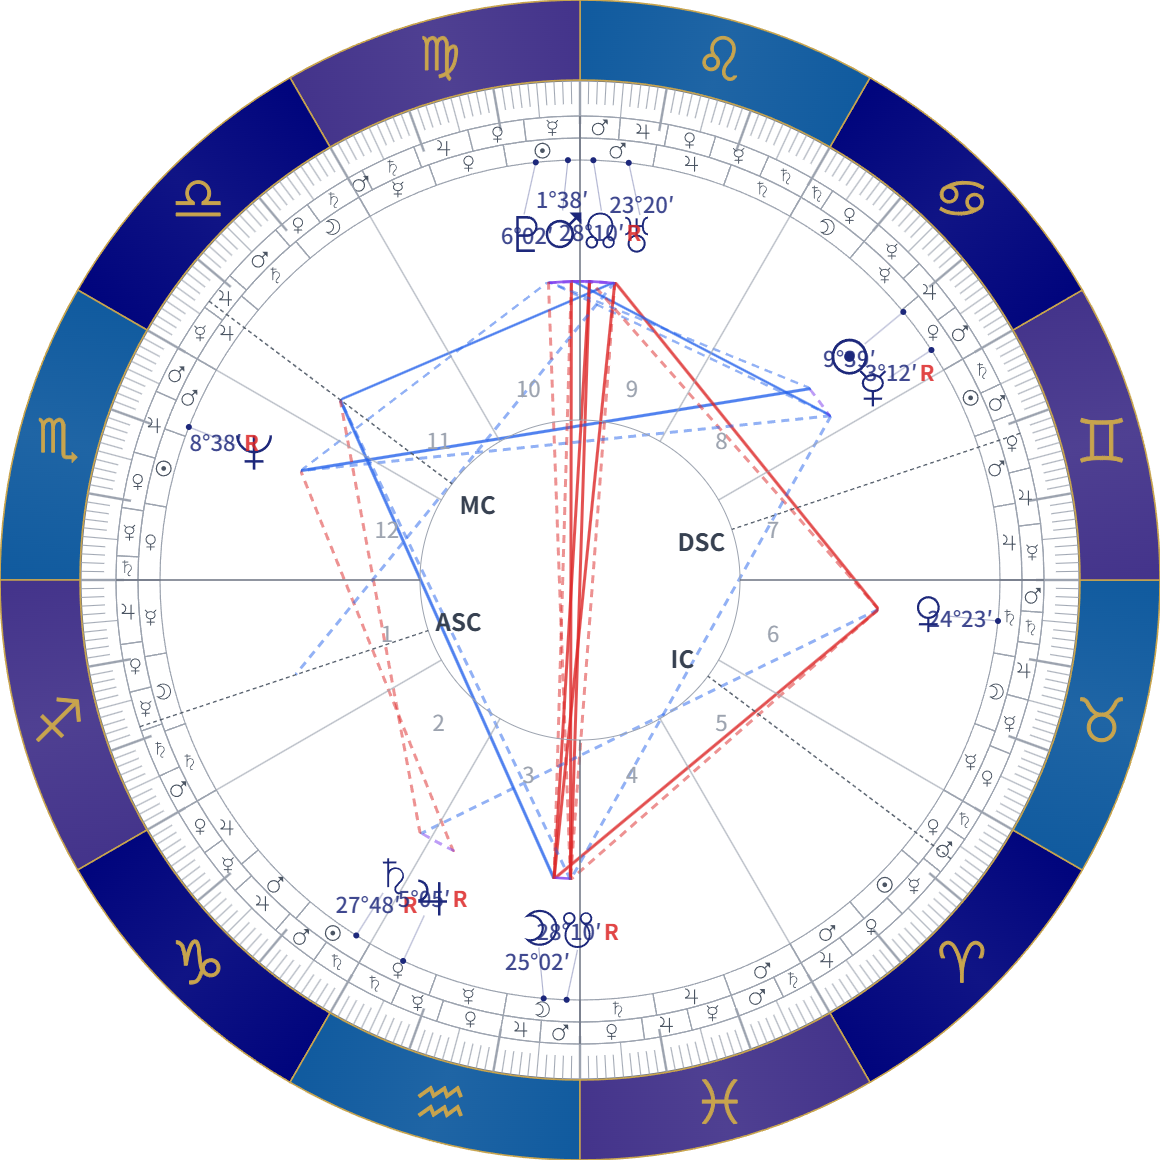
Steps
- Tick Term ring and Face ring in the Traditional section.
- Display the natal chart and the rings appear inside the sign band. The terms divide each sign into five parts and the faces into three parts of ten degrees, each marked with the glyph of its ruler.
Notes
- The term divisions follow the Terms System chosen in the settings.
- With a ring displayed, the planet glyphs and degrees move inwards by the width of the rings.
- The term ring and the face ring can be used on their own or together.
Profection ring
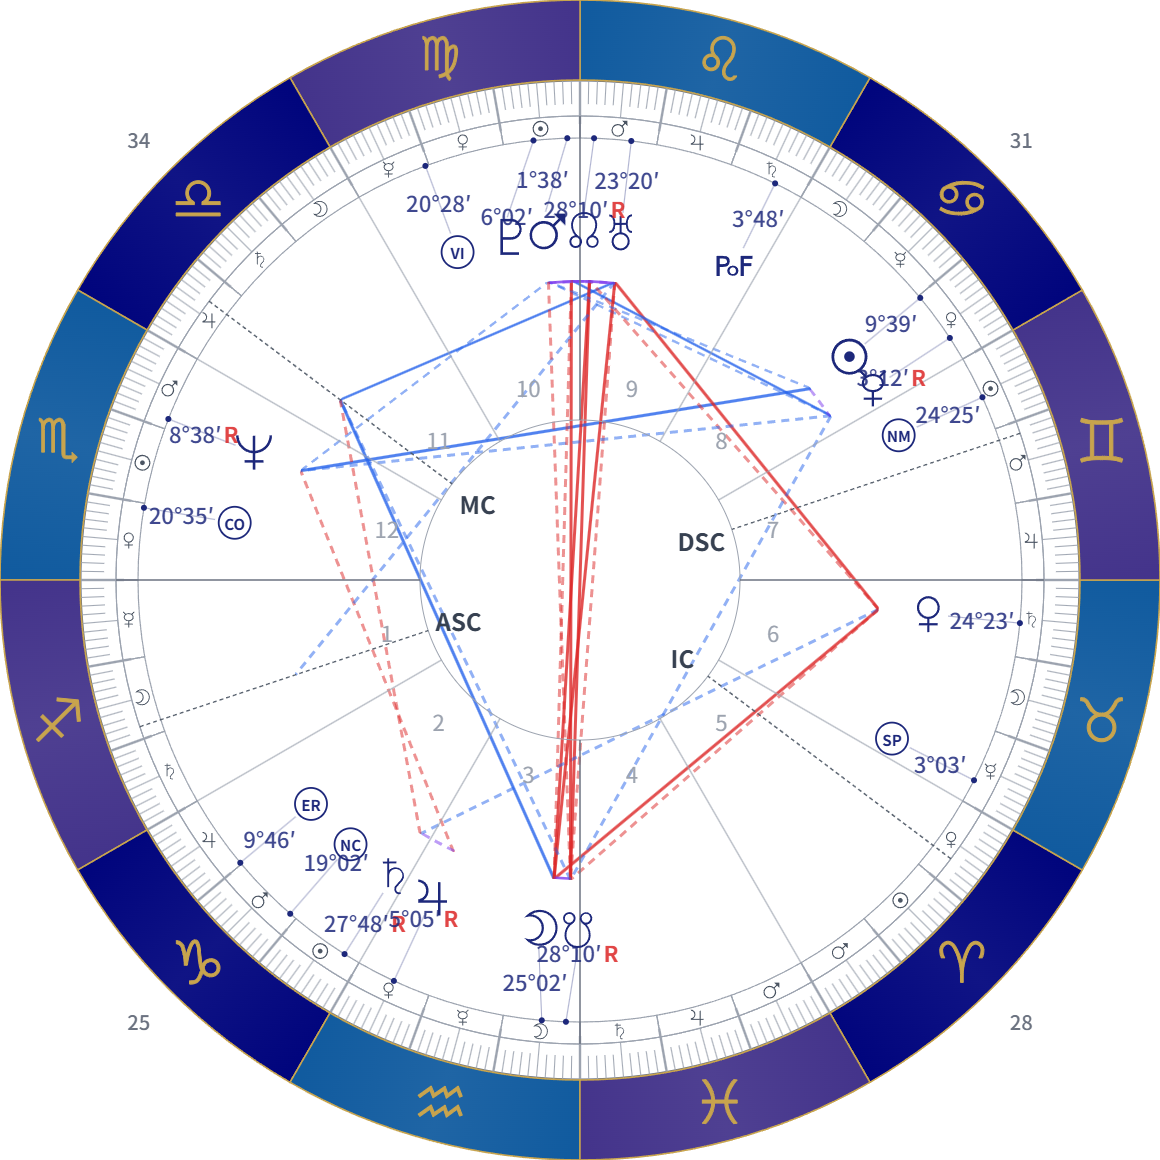
Steps
- Tick Profection ring (outer edge) in the Traditional section.
- Display the natal chart and the ages are shown around the outer edge of the wheel, one age per sign.
- Use the Profection ages ○-○ selector at the top of the chart screen to choose which twelve years are shown.
Notes
- The twelve years containing your current age are selected to begin with. The spans run in twelve-year steps from age 0.
- Only the single selected span is drawn; spans cannot be stacked.
- Switching to another person resets the span to the twelve years containing the current age.
- The ring is not shown for birth data with an unknown birth time.
Display and printing
Steps
- The traditional items you switch on are included in the natal chart printout as they appear on screen.
- For how to print, see "Display and printing" in the Natal chapter.
Notes
- The rings and lots follow the chart when you zoom in and out on screen.
- The profections table has no print button of its own. Use your browser's print function if you want a paper copy.
Forecast
About this chapter
This chapter covers the Forecast. The forecast extracts things such as the periods when an aspect forms within a range you specify. The screen has three tabs: Event Calculation / Time Map / Graphic Ephemeris. The forecast is available on the Plus plan and above (Graphic Ephemeris = Pro and above, Time Map = Max).
Event presets (the quick way)
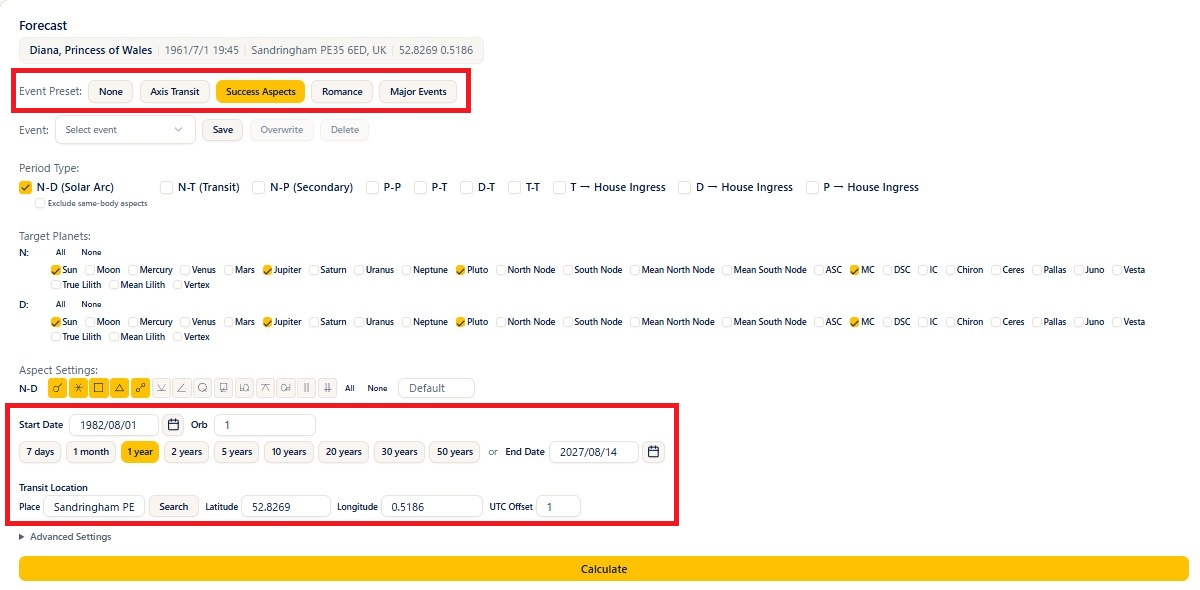
Steps
- Choose the birth data you want to forecast in the birth data picker in the header.
- Open Forecast from the menu.
- Choose Axis Transit, Success Aspects, Romance, or Major Events from Event Preset (the calculation conditions are set automatically).
- Enter the Start Date.
- Specify the period (with the 7 days / 1 month / 1 year to 50 years buttons, or freely with an End Date).
- Press Calculate and the matching periods are listed.
Notes
- Axis Transit: narrows to the periods involving the ASC and MC.
- Success Aspects: targets the Sun, Jupiter, Pluto, and MC.
- Romance: narrows to the periods involving Venus.
- Major Events: targets the major bodies, and the result rows are color-coded. Colored rows contain the bodies most likely to manifest, with red leaning hard and blue leaning soft. Accurate interpretation still requires reading the individual natal chart.
- Choosing None clears the preset.
- The bodies used by the presets are not greatly affected by the transit location, so leaving it at the birth place is fine.
Specifying detailed conditions yourself
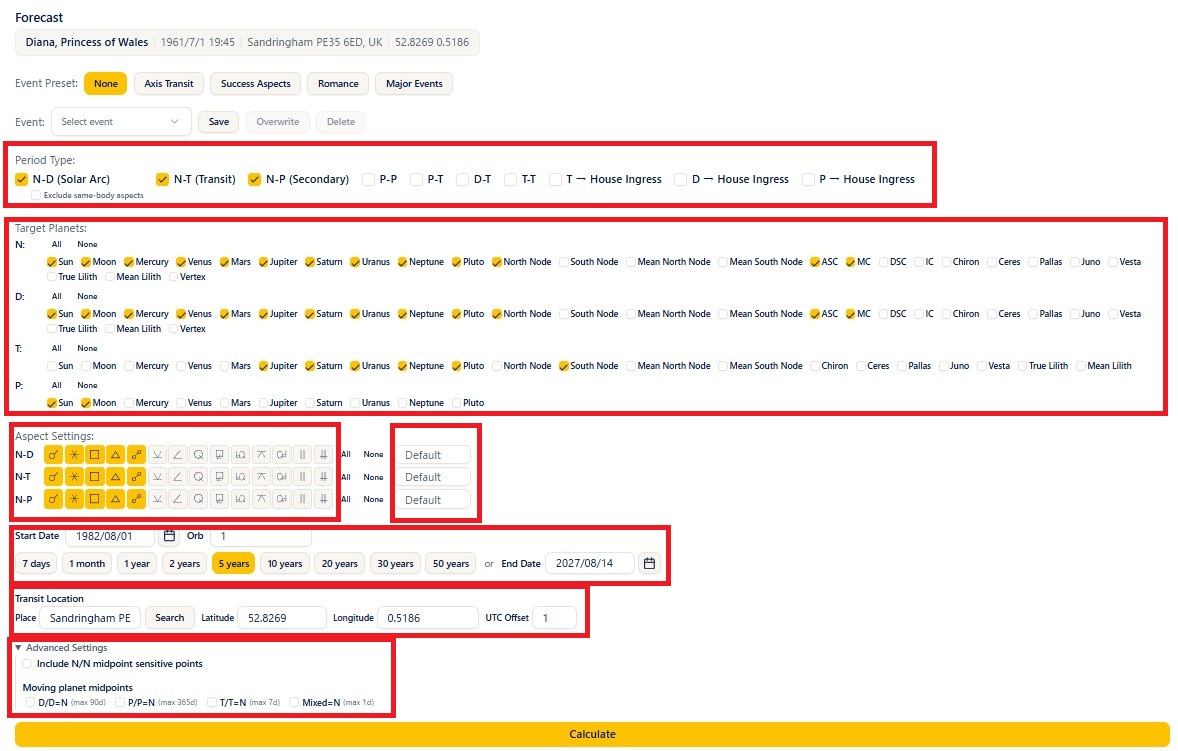
Steps
- Choose the Period Type (more than one can be selected). For example: N-D (Solar Arc) / N-T (Transit) / N-P (Secondary) / P-P / P-T / D-T / T-T / T → House Ingress.
- Choose the bodies you want under Target Planets (with All and None).
- Specify the aspect types you want and their orbs under Aspect Settings.
- Set the Start Date and the Transit Location (Search looks up the latitude and longitude from a place name). There is also an Orb field next to the start date.
- Opening Advanced Settings lets you include midpoint sensitive points and the midpoints of moving bodies.
- Press Calculate.
Notes
- There are two kinds of orb field.
- The field next to each row of Aspect Settings (N-D, N-T, N-P, and so on) is an individual orb that applies to that period type only.
- The Orb field next to the Start Date applies to every period type.
- When both are filled in, the individual orb wins. When both are empty, the calculation uses the standard orbs.
- When the transiting Moon is included, the period is limited to a maximum of one month.
- Including fast-moving bodies over a long period produces a great many rows, so a warning message is shown.
- For the basics of aspects, see also Aspects on the ARI official site (in Japanese).
Reading the results
Notes
- The columns of the Aspect Formation Periods list are Natal / Aspect / Activator / Start / End / Exact (the planets carry the prefixes N, D, T, and P).
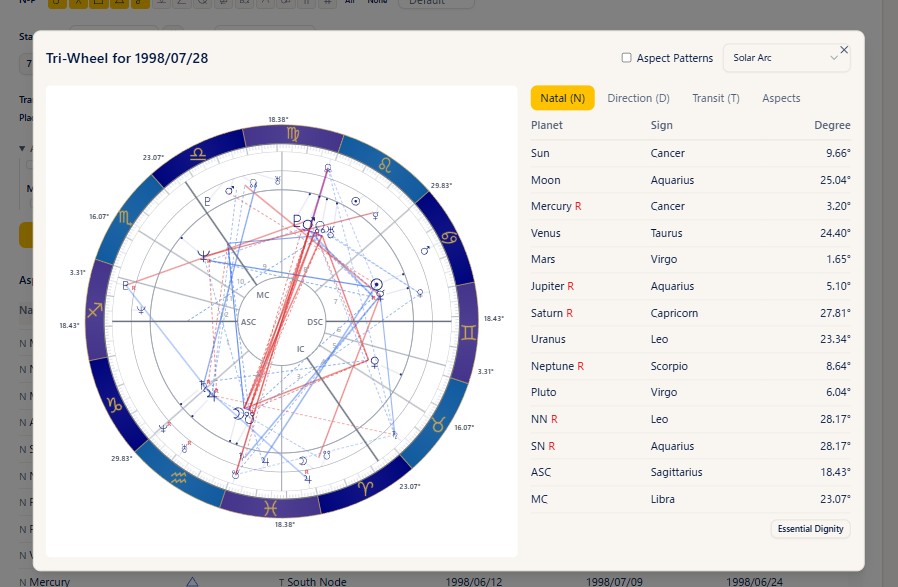
- Clicking a date opens the tri-wheel for that day in a separate window.
- The Print button prints the list.
Saving your conditions (events)
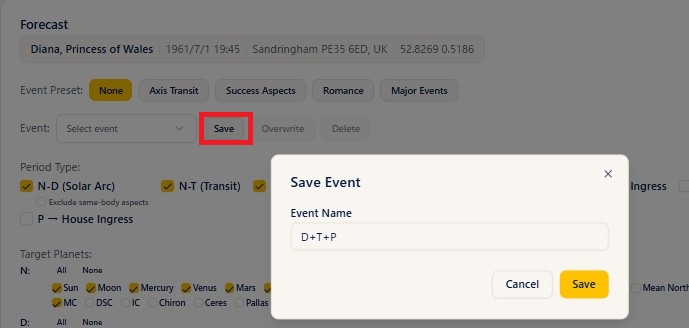
Steps
- Once you have assembled your conditions, press Save and register them under an Event Name.
- Recalling them from Select event restores the saved conditions.
- After correcting recalled conditions, press Overwrite; when you no longer need them, press Delete.
Time Map
The Time Map is available on the Max plan.
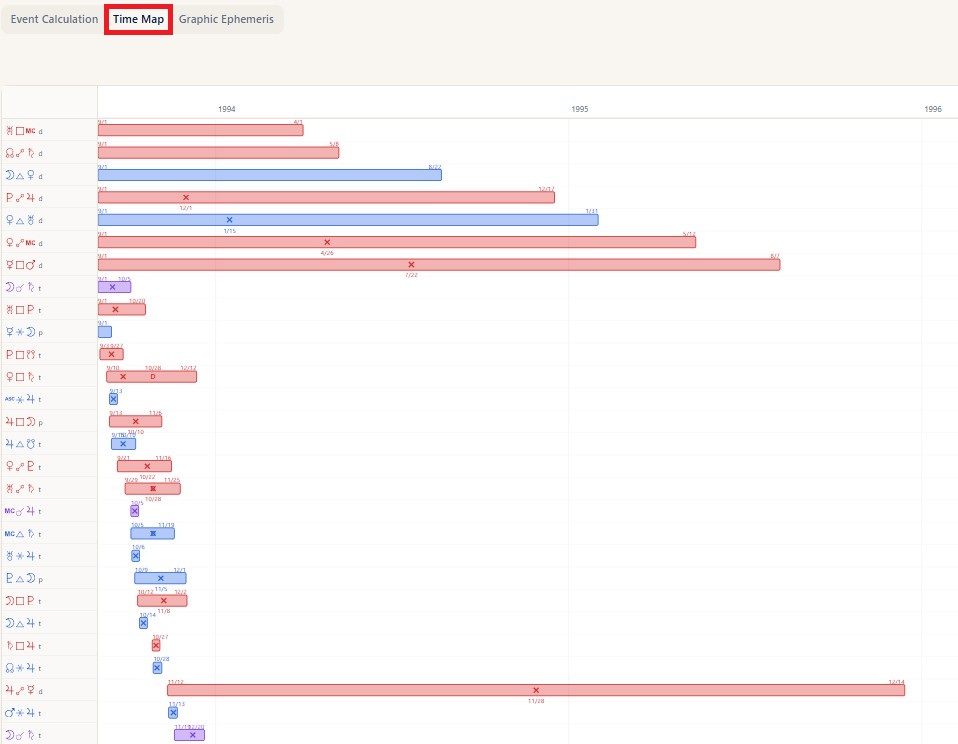
Steps
- Run Event Calculation first.
- Open the Time Map tab and the results are laid out as horizontal bars (a Gantt chart) along a timeline.
- Print prints it (A4 landscape).
Notes
- House ingresses, such as "T → House Ingress", use arrows to show direct and retrograde motion.
Graphic Ephemeris
This tab plots the motion of the bodies on a graph with time along the horizontal axis. The Graphic Ephemeris is available on the Pro plan and above.
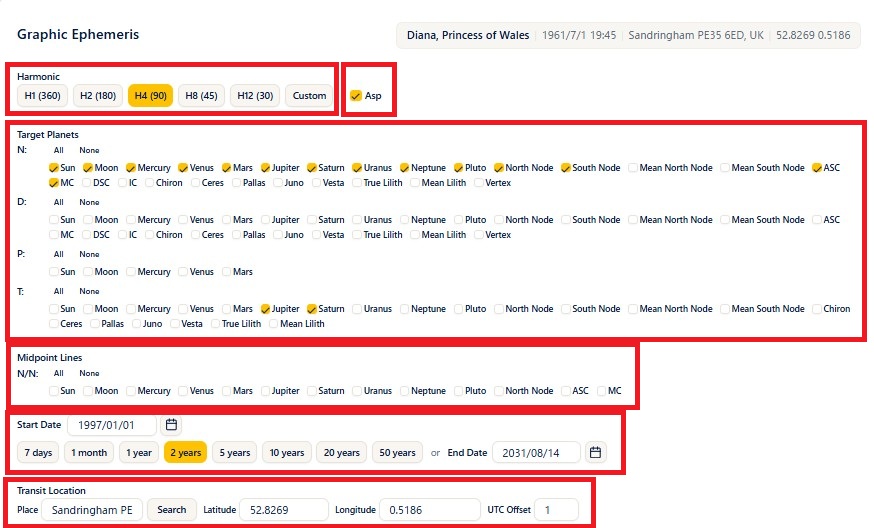
Steps
- Open the Graphic Ephemeris tab.
- Choose the Harmonic (H1(360) / H2(180) / H4(90) / H8(45) / H12(30) / Custom). With H4, for example, you can spot 90-degree and 180-degree aspects as places where the lines cross.
- Ticking Asp shows aspect markers on the graph.
- Choose the bodies for N (natal), D, P, and T under Target Planets.
- Choosing planets under Midpoint Lines adds the N/N midpoints to the graph as well.
- Set the Start Date and the period (or the end date), and the Transit Location.
- Press Draw and the graph appears.
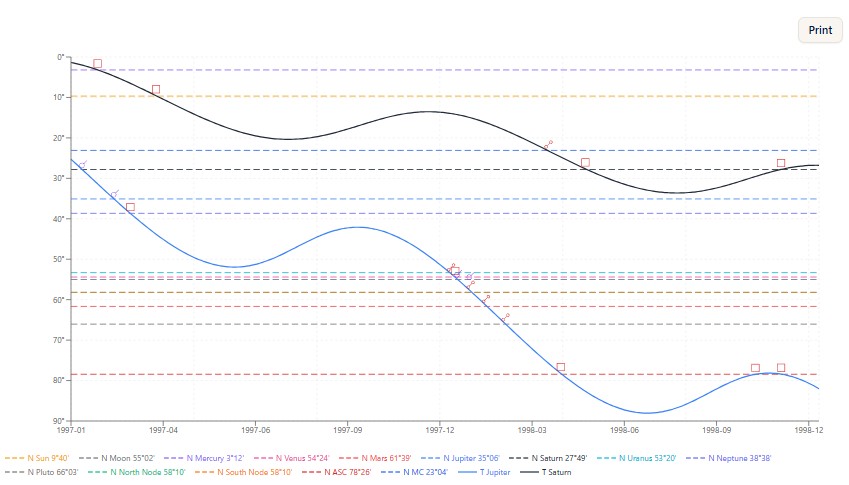
Notes
- The natal (N) bodies are drawn as horizontal dotted lines and the moving bodies (T, D, P) as curves. Where the lines cross, the aspect corresponding to the harmonic you chose is formed.
- The Print button prints the graph on display.
Plans
The Forecast page as a whole = Plus and above. Time Map = Max and above / Graphic Ephemeris = Pro and above.
AI Report / LISA Chat
About this chapter
This chapter covers StarNavigator's AI features. It explains the AI Research Report (a forecast report for a period you specify, meant as groundwork for the astrologer), reached from AI Report in the menu, and LISA Chat (an interactive reading with an AI). The AI Report menu is available on the Plus plan and above. LISA Chat is reached from the LISA button at the bottom right of the screen and is available on the Basic plan and above.
Creating an AI research report
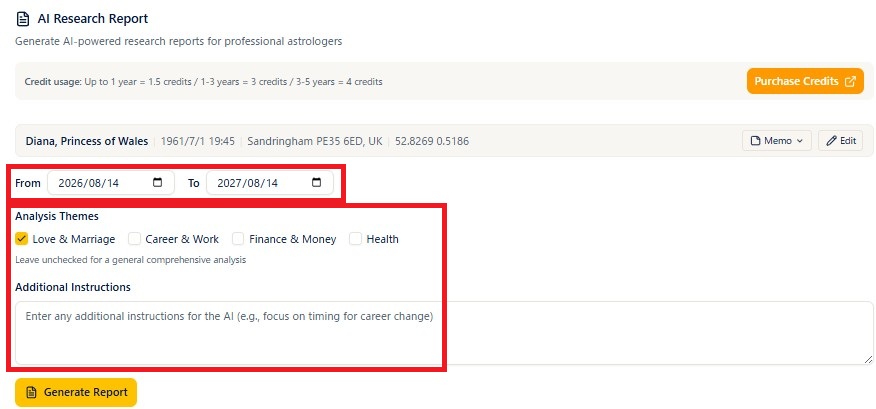
Steps
- Open AI Report from the menu.
- Choose the subject of the report in the birth data picker in the header (while nothing is selected, Please select birth data is shown).
- The birth data you chose is shown in the form inside the card. To correct it on the spot, just edit the values there (whatever the form holds when you press Generate Report is what gets used).
- Specify the forecast period with From and To (the default is from today to one year ahead).
- Press Generate Report and generation begins; the button changes to Generating report....
- When it finishes, the report appears at the bottom of the screen.
Generation takes a few minutes
Generating a report takes a few minutes. While it is running you may wonder whether it is stuck or broken, but you are welcome to move to another screen and get on with other work in the meantime. Come back to this screen afterwards and the finished report is there (you can also retrieve it from the Saved Reports list).
Notes
- The period can be at most 5 years. Specifying more shows "Maximum period is 5 years. Please split into multiple requests." An end date before or the same as the start date is also an error.
- Editing the birth data alone saves nothing. To keep your changes, press Overwrite or Save As New in the form.
- Generation consumes credits (the amount depends on the length of the period — see the Plan and Credits chapter).
- A report generated from unsaved edits carries an Unsaved birth data badge in the header when printed.
Analysis themes and additional instructions
Steps
- Under Analysis Themes, tick the ones you want from Love & Marriage / Career & Work / Finance & Money / Health (more than one can be selected; all optional).
- The Additional Instructions field takes any request you want to pass to the AI (optional).
- Once set, press Generate Report.
Notes
- If you choose no theme at all, "Leave unchecked for a general comprehensive analysis" is shown and the report is generated as a general analysis.
- The Additional Instructions field takes requests such as "focus on timing for career change".
- The AI model is selected automatically (there is no selector on the screen).
Viewing and printing the report (saving as PDF)
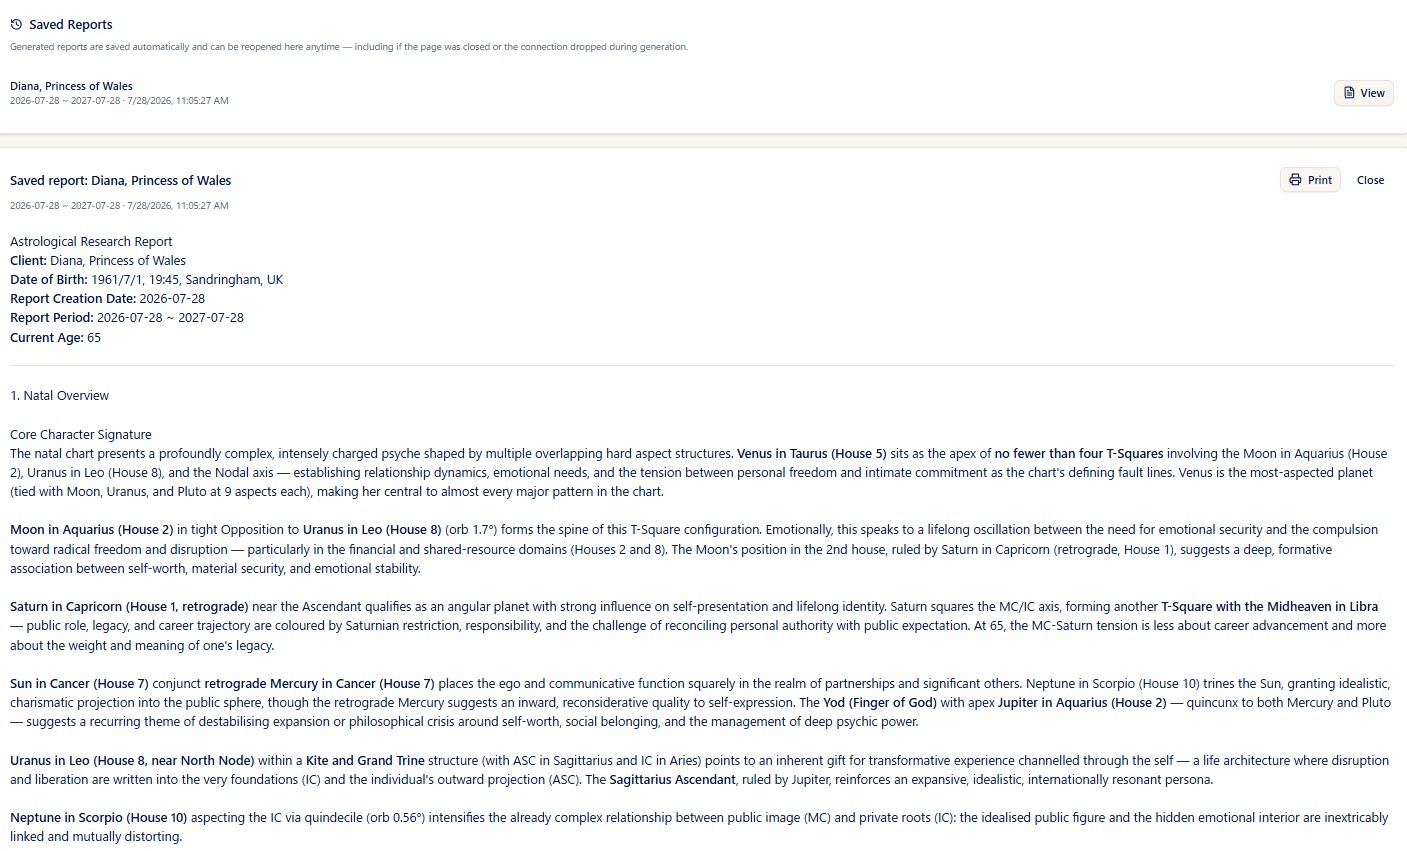
Steps
- When generation finishes, the report is shown as Report Result. The credits used and your balance are shown with it.
- While a report is on screen, a Print button is available. Pressing it opens the browser's print dialog.
- Choosing "Save as PDF" as the destination in the print dialog saves it as a PDF file.
Notes
- Printouts and PDFs carry a header with the subject's name, date and time of birth, place of birth, and the forecast period.
- The saved file is named after "AI Report - (subject's name)".
Saved reports (history)

Steps
- Reports you generate are saved automatically and listed under Saved Reports on the screen.
- Each entry shows the subject's name, the forecast period, and when it was created. Pressing View displays that report again.
- You can Print from a redisplayed report as well, and Close returns you to the list.
Notes
- Reports are stored on the server, so even if you close the screen or lose your connection during generation, you can retrieve them from this list.
- When nothing has been saved yet, "No saved reports yet." is shown.
Purchasing credits

Steps
- A guide to credit consumption is shown at the top of the screen, with a Purchase Credits button beside it.
- Pressing it opens the credit purchase screen of your ARI account page in a new tab.
- If you try to generate with insufficient credits, "Insufficient credits. Please purchase credits." is shown, and you can go to Purchase Credits from there too.
Notes
- Your credit balance is always shown in the header at the top of the StarNavigator screen. Purchasing happens on your ARI account page; the button in StarNavigator is the entrance to that screen.
LISA Chat (an AI reading)
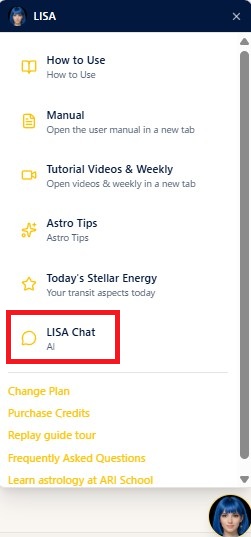
Steps
- Press the LISA (round avatar) button at the bottom right of the screen and choose LISA Chat from the menu.
- Select birth data beforehand, on a chart page for example (while nothing is selected, "Please select birth data on the chart page before starting a chat." is shown).
- Read the explanation of credit consumption, then press Agree & Continue and Start Chat to begin the session.
- Type a question into the field at the bottom and send it, and LISA answers interactively.
- To finish, press End Session and choose Save summary & end or Delete summary & end.
Notes
- Answers are based on the birth data currently selected. You can also have it refer to other people you have registered and ask about compatibility.
- Choosing Save summary & end carries a summary of that conversation into your next chat. Past conversations can be reread and printed at any time from View past chat history (the LISA Chat History page).
- Ticking This is my own data makes the answers address you in the second person.
- Starting a chat requires a balance of 2 credits or more (nothing is consumed at the start). Credits are then billed in 0.1 increments according to the volume of the conversation.
Plans and credits
- AI Research Report: Plus plan and above. Each generation consumes credits (up to 1 year = 1.5 credits / 1-3 years = 3 credits / 3-5 years = 4 credits).
- LISA Chat: Basic plan and above. Starting requires a balance of 2 credits or more (nothing is consumed at the start), and credits are billed in 0.1 increments according to the volume of the conversation. Questions involving timing fetch up to five years of data, so a single exchange can consume 1-2 credits; starting with a balance of around 5 credits is recommended so the conversation is not interrupted.
- Credits are purchased on your ARI account page, reached from the Purchase Credits button on each screen.
Astro Map
About this chapter
This chapter covers the Astro Map. The astro map draws the lines where the planets of a natal chart fall on the horizon or the meridian onto a world map, so you can see your relationship with places. The astro map is available on the Pro plan and above (the advanced features — overlaying transits, solar arc, and progressions to see timing, plus relocation and parans — require Max).
Creating an astro map
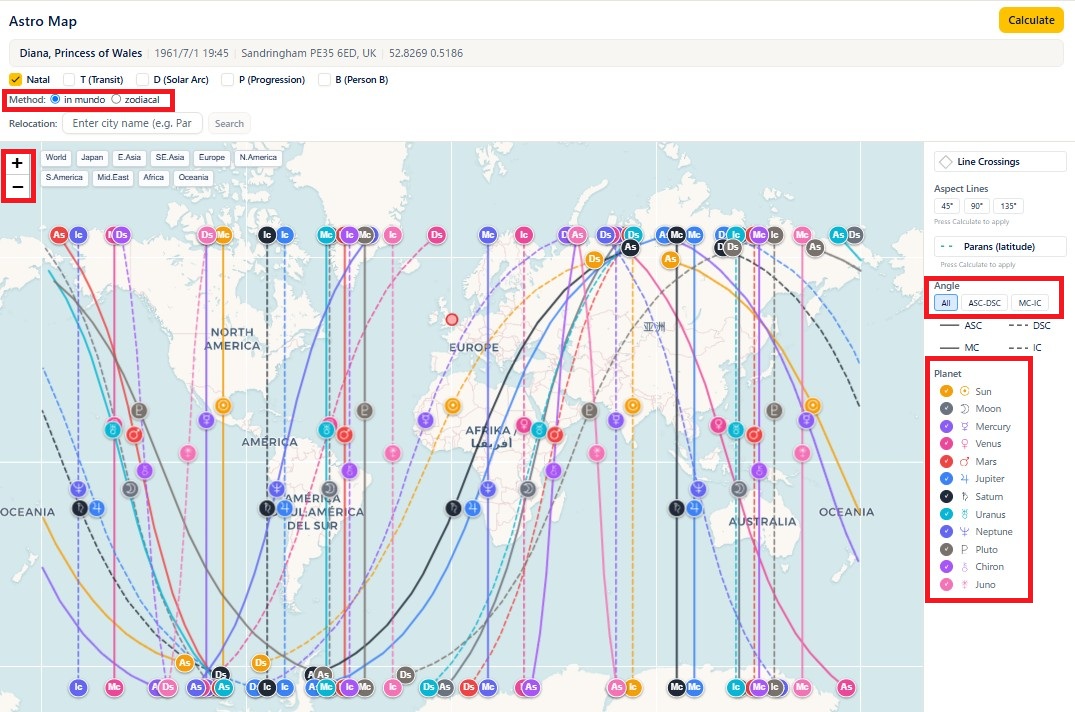
Steps
- Open Astro Map from the menu.
- Choose the Birth Data (the Birth Location is shown).
- Choose in mundo or zodiacal as the Method.
- Turn ASC / DSC / MC / IC on and off under Show Angles.
- Press Calculate and the lines are drawn on the map.
Notes
- in mundo calculates, from the actual position of the body (right ascension and declination), the points where it is rising, setting, or culminating (the default, and the same as the standard on astro.com). zodiacal is a simplified method that uses only the ecliptic longitude of the body. The two methods can put the lines tens to hundreds of kilometres apart. If you are unsure, leaving it on in mundo is fine.
- If no lines are found, No lines found is shown.
- The + and - buttons at the top left zoom the map in and out. On a smartphone you can also zoom by pinching out.
- The region presets above the map (World / Japan / E.Asia / SE.Asia / Europe / N.America / S.America / Mid.East / Africa / Oceania) zoom quickly to that region.
- The birth location is marked with a red circle on the map.
- In the Angle section on the right you can click angles individually or switch them in groups with the All / ASC-DSC / MC-IC buttons.
- The checkboxes in the Planet section on the right turn each planet's lines on and off (no recalculation needed).
- Lines are drawn solid for ASC and MC and dashed for DSC and IC. Lines from anything other than the natal chart (N) — T, D, P, B, and so on — are dotted to distinguish them.
- Each line is marked in three places: at both ends and at the latitude where the body is directly overhead. Hovering over a line shows the planet symbol and the angle name in a tooltip.
Overlaying timing (T / D / P / SR)
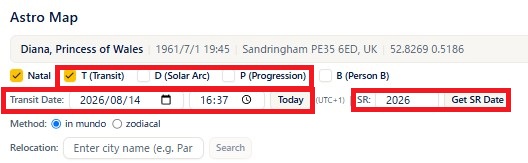
Steps
- In addition to the natal chart (N), tick T (Transit) / D (Solar Arc) / P (Progression) when you want to see timing.
- Ticking any of T, D, or P makes the Transit Date field appear. Specify the date and time (the Today button returns it to the current date and time).
- The SR field appears at the same time. To look at a solar return period, enter the year and press Get SR Date, and the solar return date and time for that year are set automatically.
Notes
- T, D, P, and SR draw lines not only from the natal bodies but also from the transiting, solar arc, progressed, and solar return positions for the date and time you specify. Because the positions change over time, overlaying them shows the timing dimension — around when your connection to which places grows stronger.
- The Transit Date and SR fields are only shown while T, D, or P is ticked.
- When you calculate several charts on top of N — T, D, P, and so on — a new Layer section appears in the legend on the right. There you can turn each calculated chart (N, T, D, P, and so on) on and off without recalculating.
- T, D, P, and SR are features of the higher plans (see the plan note below).
Overlaying another person's chart (B)
Steps
- Ticking B (Person B) brings up a field for choosing the other person's birth data.
- Choose their birth data and their lines are overlaid on the map as well.
Notes
- This is not about timing; it overlays the natal lines of a second person so you can look at the two people's relationship with places.
- B is also a feature of the higher plans (see the plan note below).
Line crossings, aspect lines, and parans
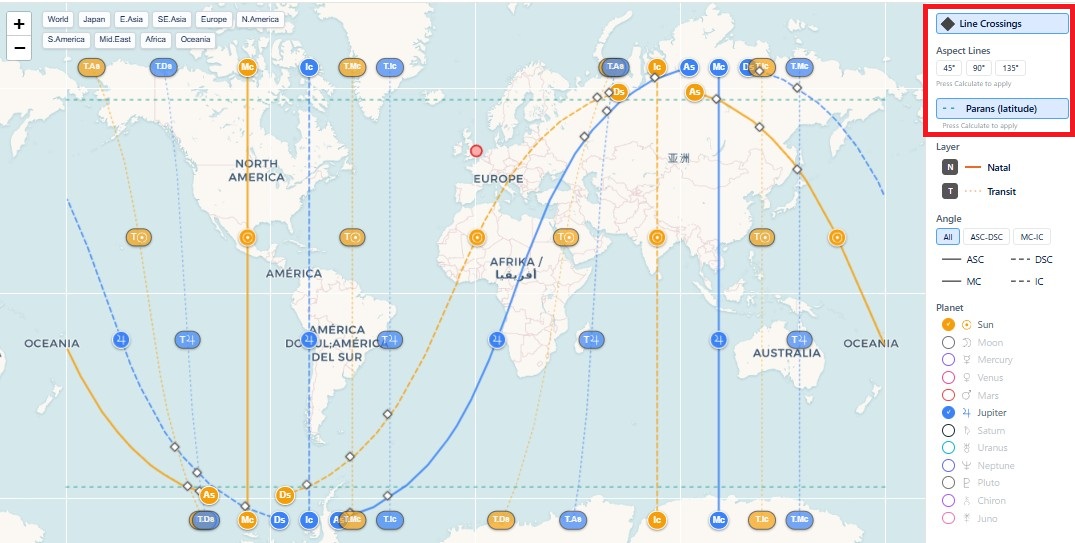
Notes
- Line Crossings: shows the points where several lines cross.
- Aspect Lines: lines where a body relates to an angle by 45, 90, or 135 degrees (dotted). They are an aid for fine, local-area work; press Calculate after selecting them to apply.
- Parans (latitude): shows the latitudes (horizontal lines) where two bodies are simultaneously on an angle. They apply to the body pairs currently visible.
- Note: advanced displays such as aspect lines and parans are features of the Max plan.
Relocation
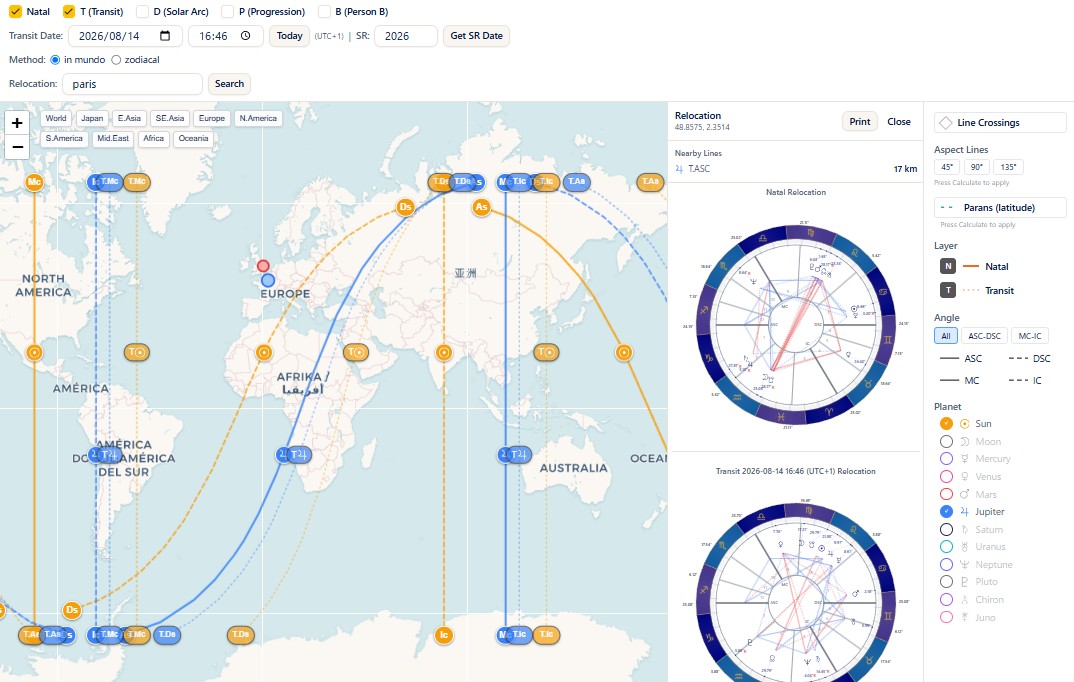
Steps
- Clicking the map shows the relocation chart for that point (the natal chart as it would be somewhere you moved to).
- Alternatively, type a city name into the Relocation field and Search.
Notes
- The relocation point you clicked (or searched for) is marked with a blue circle on the map.
- If you click a relocation point while T (Transit) or another layer is ticked, you get the relocated natal chart plus the relocated T, D, or P charts for that point and date and time.
- The relocation panel automatically lists the Nearby Lines — the lines passing close to the point you clicked — with their distance in kilometres.
- Relocation is a feature of the higher plans (see the plan note below).
Plans
Astro map (the basics, natal lines) = Pro and above. The advanced features — overlaying transits, solar arc, progressions, and SR to see timing, showing a second person's (B) lines, and relocation — = Max and above.
Multi-Chart
About this chapter
This chapter covers the Multi-Chart. It compares up to five charts on one screen, either stacked (Overlay) or side by side (Parallel). Each slot can have its own birth data and chart type. The multi-chart is available on the Max plan.
Creating a multi-chart
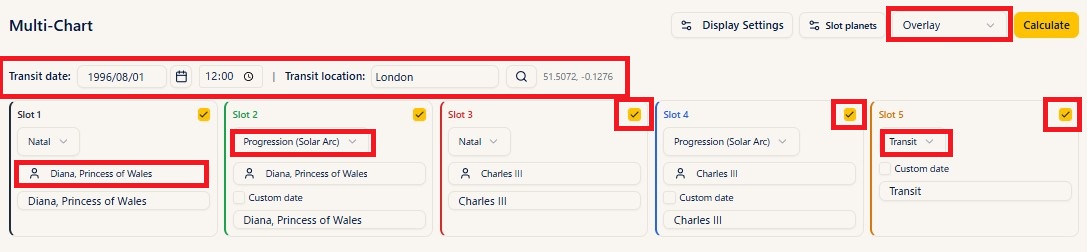
Steps
- Open Multi-Chart from the menu.
- Tick Enabled on the slots (1 to 5) you want to use.
- Choose a Chart Type for each slot (Natal / Progression (Secondary) / Progression (Solar Arc) / Transit / Return).
- Choose the subject with Select birth data (a transit chart needs no birth data). For a return chart, specify the Return planet (Sun / Moon / Jupiter / Saturn) and the Search year.
- Types that need a date, such as transit and return charts, use the Transit date and Transit location at the top. Ticking Custom date on a slot lets that slot use a different date, time, and place.
- Choose Overlay or Parallel.
- Press Calculate and the charts appear.
Notes
- Each slot has its own color. The label field on each slot changes its display name.
- A transit slot with no birth data selected is calculated with the shared date and time at the top. If that slot has a Custom date set, however, the custom date (and its location) take priority over the shared one.
Overlay and Parallel
Pressing Calculate displays the charts in the mode you chose, with the planet positions of each slot (sign and degree) listed below.
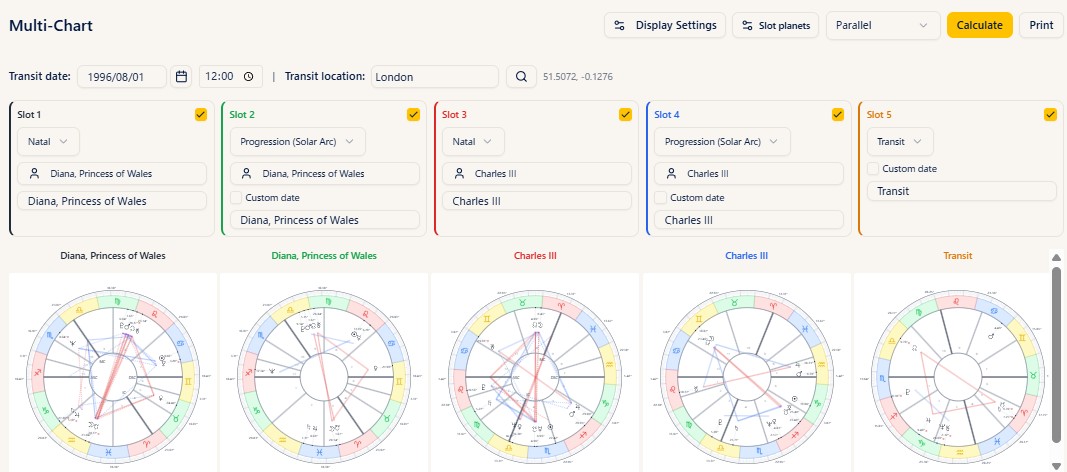
Notes
- Overlay: stacks every chart into a single circle.
- Parallel: lays the charts out side by side.
- The Overlay / Parallel dropdown in the header switches between them at any time, including after calculating.
The planet positions of each slot
After calculating, the planet positions (sign and degree) of each slot are listed below the chart. Which planets are shown can be changed with Slot planets (see below).
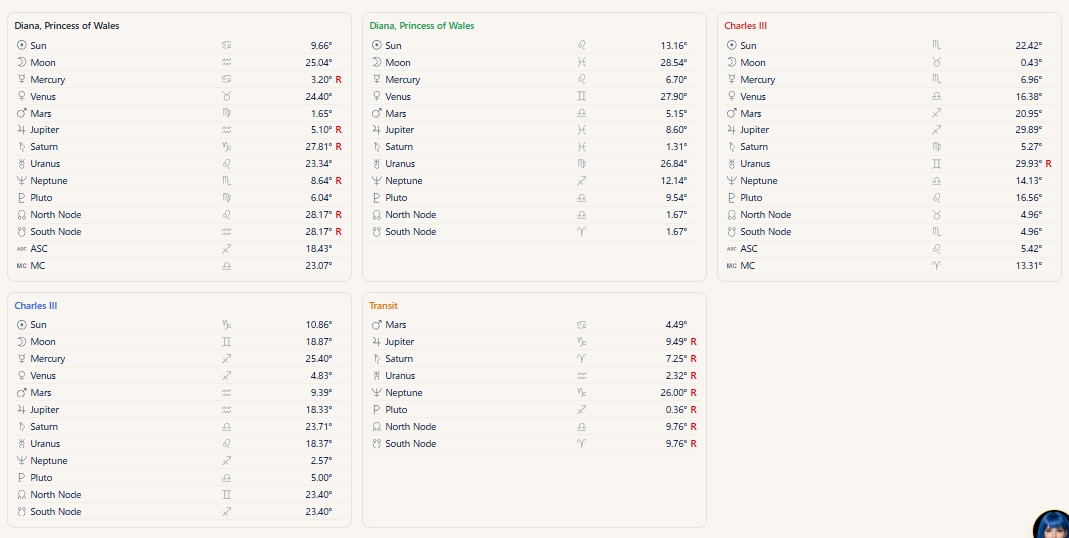
Aspects between slots (Aspect Pairs)
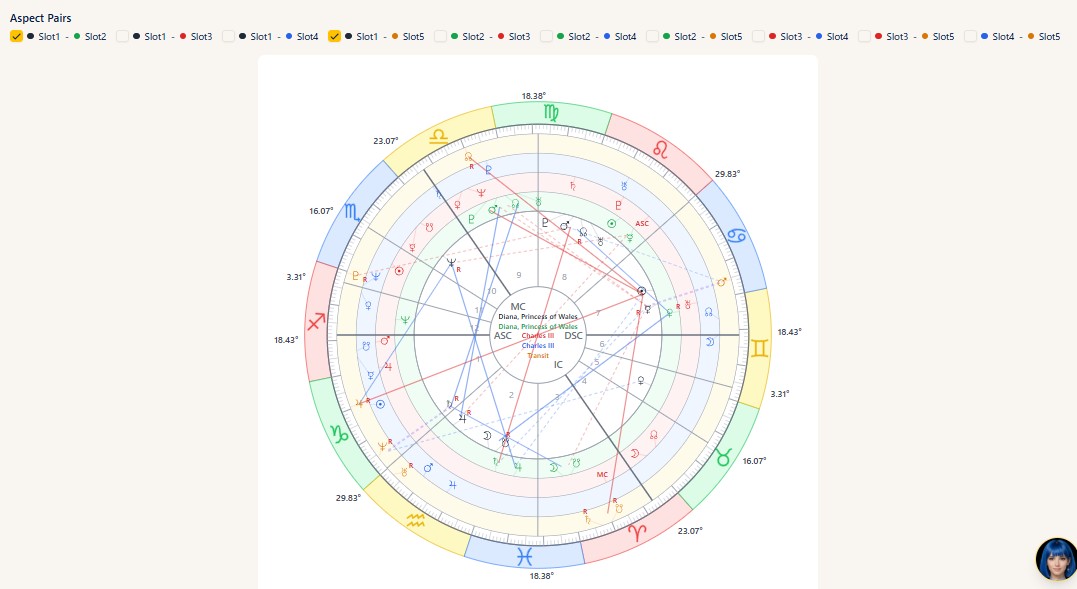
Steps
- Calculating two or more charts in Overlay mode brings up an Aspect Pairs section above the chart.
- Tick the combination you want to see (Slot 1 - Slot 2, for example) and the aspect lines between those two charts appear on the circle.
- Several combinations can be selected at once. Clearing a checkbox removes that combination's lines.
Notes
- The Aspect Pairs section is only shown in Overlay mode (it does not appear in Parallel).
- With the Standard color theme, the colored dot of each combination corresponds to the color of its ring (slot) on the circle. With Purple every ring is the same color, so you cannot tell them apart by color — identify the combination by the position of the ring instead.
- The aspect types and orbs shown follow the aspect settings of the preset in use. Each slot's chart type is classified as N (natal) / P (progressed) / T (transit), and the settings of the corresponding tab (N-N / N-P / N-T / P-P / P-T / T-T) are used. The classification is: natal chart = N, progressed chart (secondary or solar arc) = P, transit and return charts = T (see the Settings chapter).
Display and printing
Steps
- Slot planets lets you choose which planets are shown for each slot. It applies both to the chart on display and to the planet list below it.
- After calculating, the Print button prints the charts and the data.
Notes
- Display Settings adjusts aspects, house symbols, and the rest all together (Plus and above).
Plans
Multi-chart = Max and above. Display Settings = Plus and above.
Election
About this chapter
This chapter covers Election (choosing an auspicious date and time). It narrows down candidate dates and times suited to your purpose from a period and category you specify.
The narrowing proceeds in three stages — year, then month, then day (time slot) — and the chart for the moment you finally choose is shown on the right. Election is available on the Max plan.
Entering the conditions
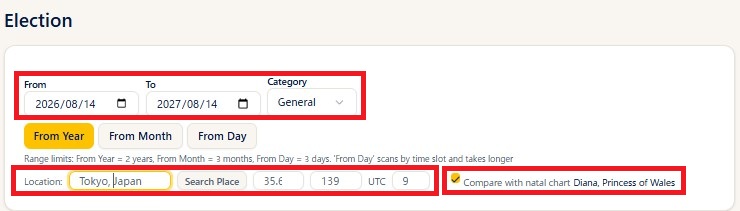
Steps
- Open Election from the menu.
- Specify the period you want to search with From and To.
- Choose a Category. The choices are General / Marriage / Business / Moving / Publishing / Trading / Litigation.
- On the lower row of the input fields, specify the Location (place name), the Lat/Lon, and the UTC offset. The default is "Tokyo, Japan (latitude 35.68 / longitude 139.65 / UTC 9)".
- Ticking Compare with natal chart narrows the results against the birth data selected in the header (while it is ticked, that person's name is shown on the right).
Notes
- The location, latitude, longitude, and UTC offset are used to calculate the houses for each date and time. Set them to the place where the election applies.
- Turning on "Compare with natal chart" makes the candidate chart a bi-wheel with the natal chart and adds a list of Natal Aspects (see "The chart for the chosen moment" below). The birth data is not used for the scores or the exclusions, which are calculated purely from the conditions of that date and time (turning the comparison on or off does not change the results).
- Select the birth data in advance, from the birth data picker in the header.
The three-stage narrowing (year, month, day)
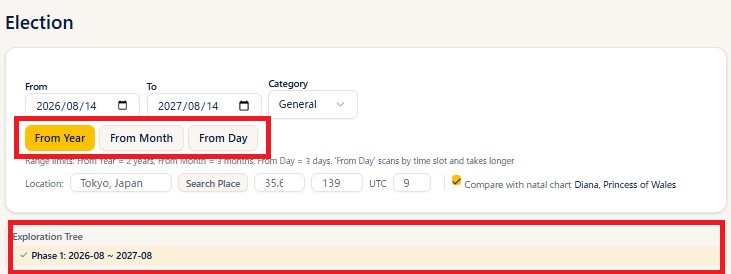
Steps
- Once the conditions are entered, start narrowing with one of the three buttons.
- From Year: when you want an overview of the whole period on a calendar first (up to 2 years).
- From Month: when the month is decided and you want to start from a day-by-day analysis of it (up to 3 months).
- From Day: when the day is decided and you want to start from the time-slot analysis (up to 3 days).
- While the analysis runs, a Cancel button is shown, which stops the process.
- When the analysis finishes, the path you took is stacked up in the Exploration Tree on the left, year to month to day.
Notes
- From Day scans time slot by time slot at 30-minute intervals, so it takes longer than the others.
- The button currently selected is highlighted (filled in).
- An error message appears if, with From Month, the end date is not after the start date, or if the range is too wide (month = up to 93 days, day = up to 3 days).
The exploration tree

Steps
- The exploration tree shows the candidates you have followed so far as a hierarchy: Phase 1 (year) to Phase 2 (month) to Phase 3 (day and time slot).
- Clicking a candidate displays its content.
- The x on each item deletes that exploration. Candidates that have not been analyzed yet have a play button, which runs their analysis (useful for running an analysis you cancelled earlier).
- Date candidates in Phase 3 (the time-slot analysis) can be marked Good (check) / Maybe / Bad. Pressing the same mark again clears it.
Notes
- The verdict marks are notes to yourself, useful for comparing several candidates later.
Phase 1: the calendar overview
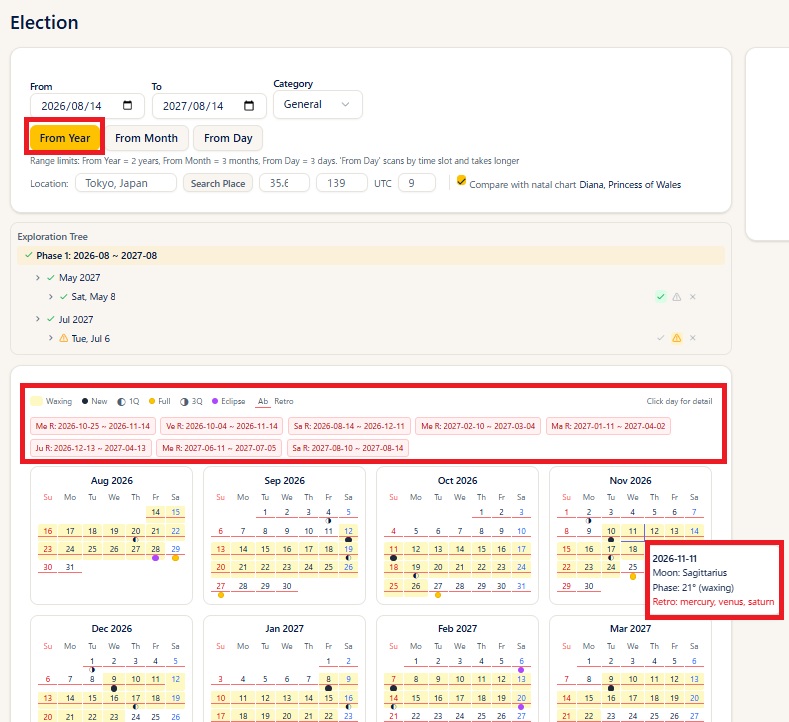
Steps
- Running From Year lays out a calendar for each month in the period.
- Each day carries marks for the moon phase and for events. Hovering over a day shows a tooltip with its moon sign, moon phase, retrogrades, eclipses, and so on.
- Clicking a day that interests you takes you to the daily analysis (Phase 2) for the month containing it (from the 1st to the last day).
Notes
- The calendar legend: waxing moon (pale yellow background) / new moon (black circle) / first quarter / full moon (yellow circle) / third quarter / eclipse (purple circle) / retrograde (a red underline below the date).
- Above the calendar, the retrograde periods of each body within the range (Mercury R, Venus R, and so on) are listed.
Phase 2: the daily analysis
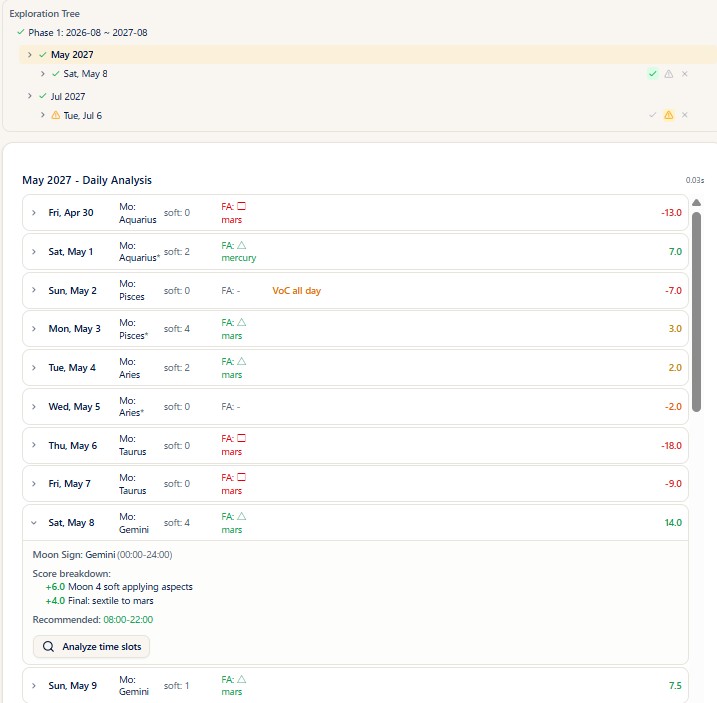
Steps
- Choosing a month on the calendar lists the days of that month. Each row shows the date, the moon sign, the number of soft aspects, the final aspect (FA), the score, and more.
- Clicking a row expands it and shows the details for that day.
- The Analyze time slots button inside the details takes you to the time-slot analysis (Phase 3).
Notes
- The expanded details show the moon sign (with its time span), VoC (void of course), Via Combusta, the score breakdown, exclusions, the recommended time slots, and so on (only the items that apply to that day).
- When the Moon changes sign during the day, an asterisk is added in the moon sign column.
- A day that is void of course all day is marked VoC all day.
Phase 3: candidates by time slot
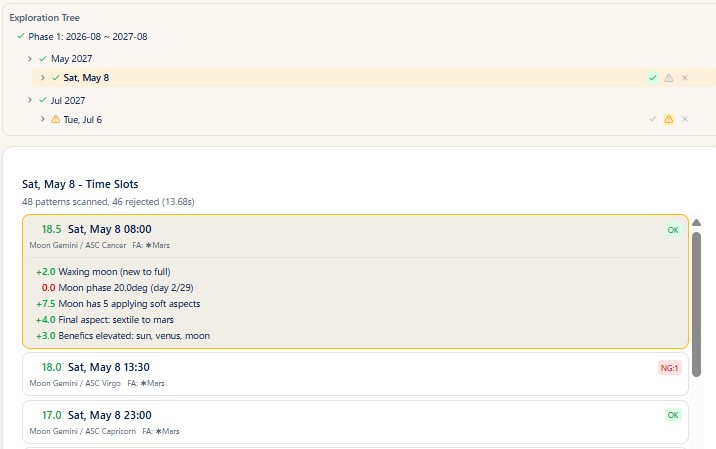
Steps
- Running "Analyze time slots" lists the candidates for that day, time slot by time slot, in descending order of score.
- Above the list, the number of patterns scanned, the number rejected, and the elapsed time are shown.
- Clicking a candidate expands it and shows the reasons for exclusion and the score breakdown. At the same time, the chart for that moment appears on the right.
Notes
- Each candidate shows its time, score (colored), moon sign, ASC sign, and final aspect (FA).
- Candidates that hit an exclusion get a red Bad badge, and those with no problems get a green Good badge.
- The POF (Part of Fortune) that appears among the score items is always calculated with the modern formula (ASC + Moon - Sun). The Part of Fortune formula you can choose under "Creating a preset" in the Settings chapter has no effect on the election judgments.
- If no candidate matches the conditions, a message says so. Try widening the period.
- Time slots are scanned at 30-minute intervals by default. To look more finely, use the step buttons under "The chart for the chosen moment" below.
The chart for the chosen moment
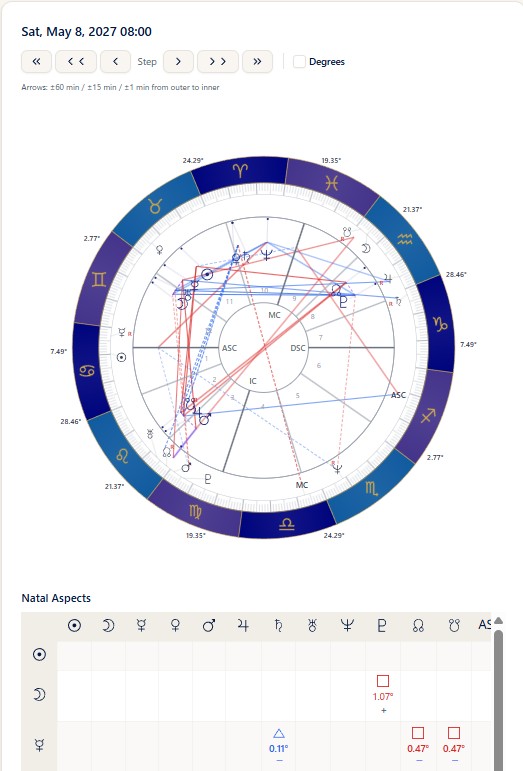
Steps
- Choosing a candidate in Phase 3 displays the chart for that moment on the right (with the date and time at the top of the panel).
- The step buttons move the time back and forth. From the left they are ±60 min / ±15 min / ±1 min.
- Ticking Degrees shows the degree of each planet on the wheel.
Notes
- While "Compare with natal chart" is on, the display is a bi-wheel with the election chart (E) on the inner ring and the natal chart (N) on the outer ring, and a Natal Aspects grid is shown below it. While it is off, the display is a single wheel for that moment alone.
- The planets shown on the chart, and on the natal chart overlaid on it, follow the natal settings of the preset in use. Note, however, that election excludes asteroids and special sensitive points, so they are not shown even when the preset includes them. To look at asteroids and sensitive points as well, use the double wheel.
- On the bi-wheel, the aspect lines among the outer ring (natal) planets are deliberately not drawn.
Plans
Election is available on the Max plan.
Ephemeris
About this chapter
This chapter covers the standalone Ephemeris page. Here you can generate and download an ephemeris for a period you specify as a PDF. The ephemeris is available on the Plus plan and above.
It is a different feature from the Ephemeris button introduced in the Progression chapter (which opens three months of ephemeris data in a dialog on the screen). This one is a standalone page that outputs a PDF file.
For the basics of retrograde motion, see also Direct and retrograde motion on the ARI official site (in Japanese).
Creating an ephemeris PDF
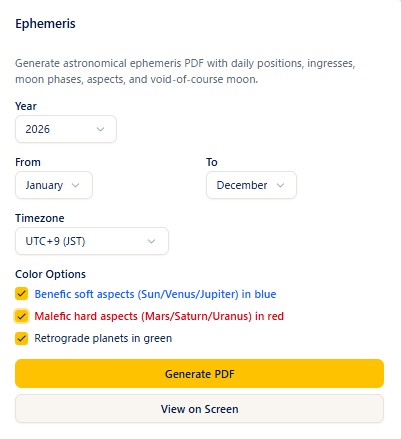
Steps
- Open Ephemeris from the menu.
- Choose the Year (from the list).
- Choose the From and To months. Choosing a To month earlier than the From month adjusts them automatically (and the same the other way around).
- Choose the Timezone (UTC+9 (JST) / UTC+0 (GMT) / UTC+1 (CET) / UTC-5 (EST) / UTC-8 (PST)). The default is UTC+9 (JST).
- Set the Color Options if you want to (see the next section).
- Press the Generate PDF button. While it runs, the button changes to Generating....
Notes
- The generated ephemeris is downloaded as a PDF file. It also opens in a new tab (it is not shown within the page).
- The PDF contains the daily positions of the bodies, ingresses, moon phases, aspects, the void-of-course Moon (VOC), and more.
- The longer the period, the longer generation takes. Specifying only the months you need makes it faster.
- Even if your browser's pop-up blocker prevents the new tab from opening, the download still happens.
Color options
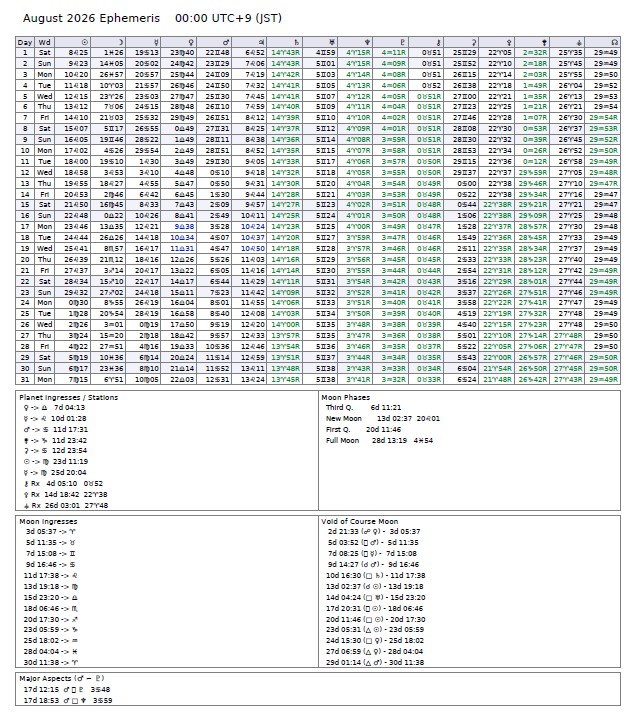
Steps
- The checkboxes under Color Options switch the coloring inside the PDF.
- Set them and then press Generate PDF, and the output uses the coloring you specified.
Notes
- Benefic soft aspects (Sun/Venus/Jupiter) in blue: shows those aspects in blue (off by default).
- Malefic hard aspects (Mars/Saturn/Uranus) in red: shows those aspects in red (off by default).
- Retrograde planets in green: shows retrograde bodies in green (on by default).
Plans
The ephemeris is available on the Plus plan and above (a lock icon on the menu means your plan cannot open it).
Clients
About this chapter
This chapter covers registering, managing, sorting, and nominating birth data, plus how to use the shared data (astronomical events).
Registering birth data
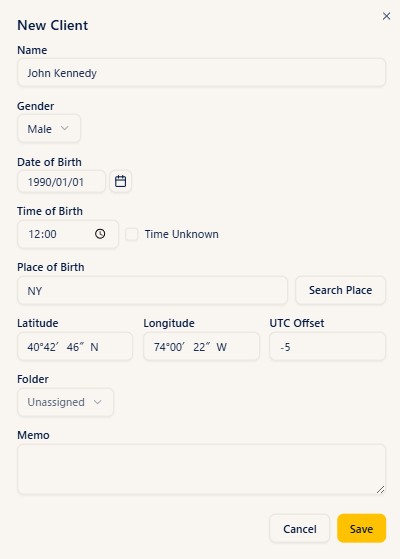
Steps
- Open Clients from the menu.
- Press the New Client button.
- Enter the Name (required), Gender (optional), Date of Birth, and Time of Birth.
- Enter the Place of Birth. As you start typing a place name suggestions appear — pick one, or press the Search Place button after typing, and the latitude, longitude, and UTC offset are filled in automatically.
- (Optional) Choose a Folder to decide where the record is filed (see Managing folders for how to create folders).
- (Optional) Use the Memo field for free-form notes (reading notes and the like).
- Press the Save button.
Notes
- If the time of birth is unknown, tick the Time Unknown checkbox. When it is ticked, the ASC (Ascendant) and MC are not shown on the chart, and the solar sign house system is used automatically. The Moon is calculated as of 12:00 (noon), but depending on the actual birth time it can be off by 6-7 degrees, so when the time is unknown the Moon's aspects are not displayed.
- For a place that Search Place cannot find (a small town abroad, for example), you can enter the latitude and longitude directly. In that case, enter the UTC offset by hand as well.
- Gender is for identification in your practice; leaving it blank has no effect on the chart calculation.
- Name is required, but it does not have to be a legal name — a nickname or initials are fine.
- To correct a record after saving, either click its name in the list to reopen it, or edit it in the birth data form on a chart screen and press Overwrite.
Deleting birth data
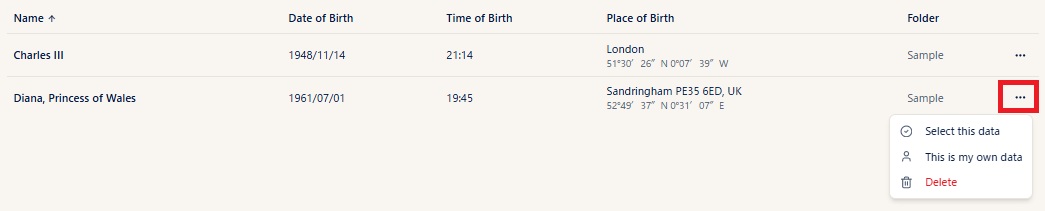
Steps
- In the birth data list, open the "..." (three-dot menu) on the row you want to delete.
- Choose Delete, the trash-can item at the bottom.
- Press Delete in the confirmation dialog and the birth data is deleted.
- Alternatively, open the birth data and press the delete button at the bottom of it.
Notes
Deletion cannot be undone
Deleted birth data cannot be restored. It disappears from the picker and from folders, and charts built from that record can no longer reference it.
- If you delete the record nominated as "This is my own data", the birth chart used for the "Today's Stellar Energy" splash is no longer referenced either. If you need it, nominate another record first (see Marking your own data).
Sorting the list
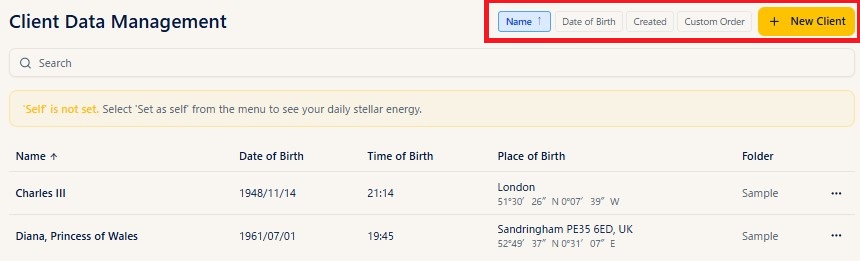
Steps
- Press one of the Name, Birth Date, or Created buttons at the top of the list screen to sort by that column.
- Pressing the same button again toggles between ascending and descending (an up or down arrow appears next to the button).
- Choosing Custom Order lets you drag rows into any order you like. The order is saved automatically.
- Typing part of a name into the search box at the top of the screen narrows the list to matching records.
Notes
- Use Custom Order when you want an order that suits you — the people you use most at the top, or related records grouped together.
- The birth data picker on the chart screens (Natal, Progression, and so on) does not reflect the order set on the list screen (including Custom Order); it always shows records in the order they were registered.
- In the picker, therefore, it is quicker to narrow down by folder or to type a name into the search box.
- The Custom Order arrangement is stored with the data, so it does not disappear when you close the screen (choose Custom Order again and your arrangement is there).
Managing folders
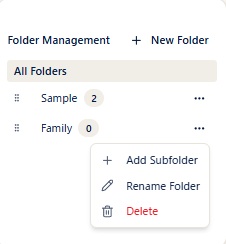
Steps
- Press New Folder on the birth data list screen to create a folder.
- Choosing Add Subfolder from the "..." (three-dot menu) on a folder row creates a child folder under it. You can nest up to three levels (folder, child folder, grandchild folder). The same menu also offers Rename Folder and Delete.
- Choosing a folder in the Folder field on the birth data creation or edit screen files that record in the folder.
- Clicking a folder name narrows the list to the records in that folder. Clicking All Folders clears the filter, and clicking Unassigned shows only the records that are not in any folder.
- You can also follow the folder hierarchy in the birth data picker to find records.
Notes
- Grouping folders by "Family", "Client company A", or an initial makes records easier to find in the picker.
- Dragging the handle at the left end of a folder row changes the order of the folders.
- Deleting a folder does not delete the birth data inside it. Subfolders move up to the parent folder, and the records directly in that folder move to Unassigned.
- To move a record to another folder, change the folder field on its edit screen and save.
- Birth data that is not in a folder is grouped under Unassigned in the picker.
- The search box on the list screen searches by name across folders. The birth data picker can search by name as well.
Marking your own data
Steps
- In the birth data list, open the "..." (three-dot menu) on the row holding your own birth data.
- Choose This is my own data.
- A gold person icon is added in the name column of the list. When you open the three-dot menu of a nominated record, an asterisk appears to the right of "This is my own data".
Notes
- When a record is nominated as your own data and you are on the Basic plan or above, the "Today's Stellar Energy" splash shown when you log in to StarNavigator is based on your own birth chart. On the free plan, and on Basic and above when no record has been nominated, the splash is an astro-dice display that shows a random planet, sign, and house.
- It is not used as the default birth data when creating charts. On each chart screen, choose the subject from the birth data picker as usual.
- To clear the nomination, choose This is my own data again in the same menu.
Shared data (astronomical events such as new and full moons)
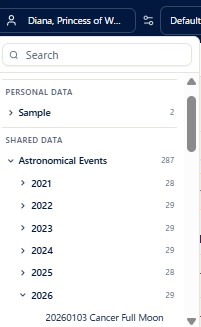
In addition to the birth data you register yourself, the birth data picker has a Shared Data section. It comes pre-loaded with the dates and times of astronomical events such as new and full moons.
Steps
- Open the birth data picker in the header.
- Open the Shared Data section below Personal Data.
- Follow the astronomical events folder down by year, or type an event name into the search box, and select the event you want.
- Calculating from there produces the horoscope for the moment of that event.
Notes
- Shared data is maintained by ARI. You cannot edit or delete it yourself. It is also not shown on the birth data list screen; it can only be selected from the picker.
- When you choose an astronomical event on the Natal or another chart, the new moon chart (or similar) is built for the default observation location registered under "Default observation location" in the Settings chapter. To use a different place, override the transit location within the chart itself. If your default observation location is abroad, the date and time of the event are converted automatically to local time at that location.
- Overlaying a natal chart and a new moon chart in the Synastry screen lets you read the influence of the new moon on the natal chart. Select the astronomical event for the outer ring.
Settings
About this chapter
This chapter explains the general settings — presets, color theme, display name, default observation location, and hints. The settings screen is available on the Basic plan and above.
Creating a preset
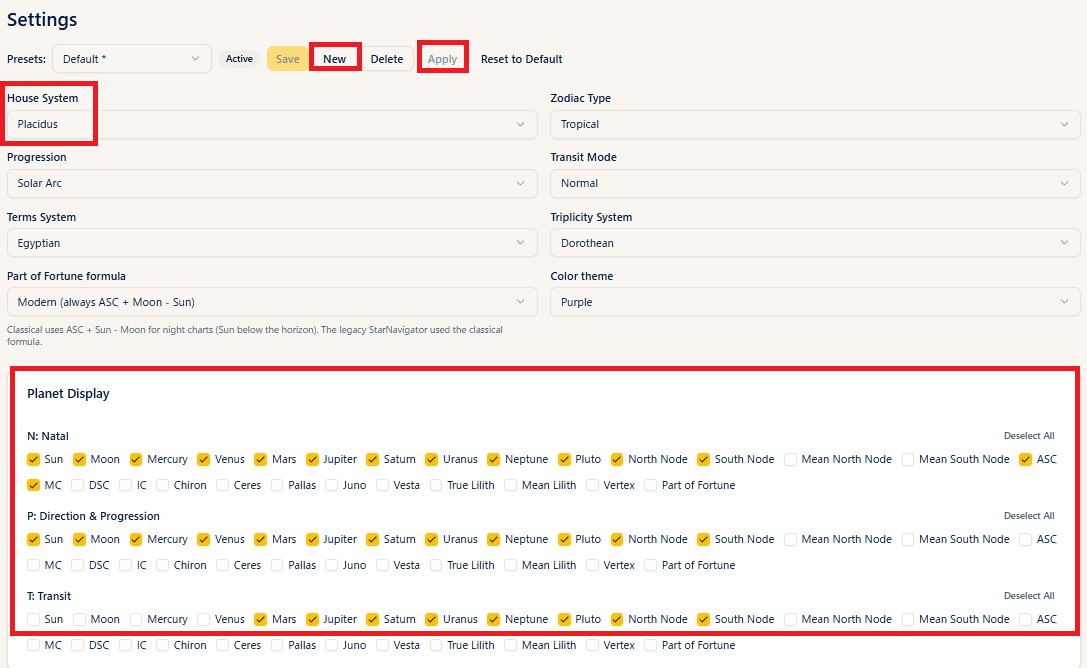
Steps
- Open the settings screen from Settings in the header.
- Under Planet Display, tick the planets to show on each ring in the N: Natal / P: Direction & Progression / T: Transit sections (P covers both solar arc and secondary progression — both use the setting here).
- Aspect Settings are arranged in tabs. For each of N-N / N-P / N-T / P-P / P-T / T-T / Synastry, tick the aspects you want shown and enter a Tight Orb and a Wide Orb (aspects within the tight orb are drawn as solid lines, those within the wide orb as dotted lines).
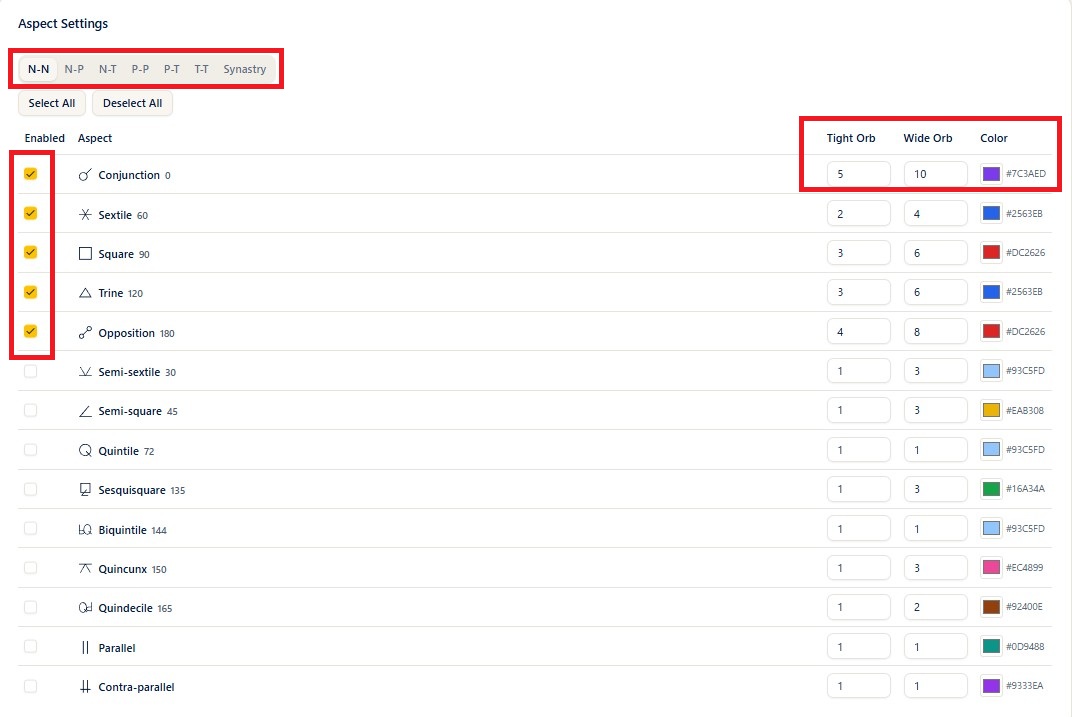
- The color of each aspect can be chosen freely from the color picker.
- Enter a preset name, then press New and Save.
- Pressing Apply puts an asterisk next to the preset name and reflects it in the preset picker in the header.
- Choosing a House System here as well makes it the default on every chart screen (you can still switch it per chart).
Notes
- Besides planets and aspects, a preset also contains the house system, zodiac, progression method (solar arc / secondary), transit mode, terms system, triplicity system, Part of Fortune formula, and color theme. You can save your favorite combinations as a set. Unless you have a particular reason, the zodiac, transit mode, terms system, triplicity system, and Part of Fortune formula work perfectly well left at their defaults.
- The Part of Fortune formula can be Modern (always ASC + Moon - Sun) or Classical (sect-reversed), which uses ASC + Sun - Moon for a night chart (the Sun below the horizon). The legacy StarNavigator used the classical formula.
- The preset picker in the header switches the preset used for the charts you are about to create. The preset selected there is applied to charts you open from then on.
- You can also select an existing preset, edit it, and then use Overwrite Preset to update it or Save As New to store it as a new preset.
- On a chart screen you can change planets, aspects, and orbs on the spot from the Display Settings panel (Plus plan and above). Those changes can be written back into a preset with either Overwrite or Save As New.
- Creating and saving presets themselves is available on the Basic plan and above.
- On the Max plan, a Traditional section appears near the bottom of this screen. It is where you switch on the lots (Arabic parts), antiscia, term and face rings, and the profection ring. See the Traditional (Profections and Lots) chapter for details.
Color theme (switching the color scheme)
Color theme
You can switch the chart color scheme (the color theme). In addition to the familiar Standard (pastel), you can choose Purple.
Steps
- Open the settings screen from Settings in the header.
- In the Color theme field at the top of the settings screen (alongside the house system and the rest), choose Standard or Purple.
- The scheme you chose is applied to the charts you open from then on.
Notes
- The color theme is saved as part of the preset. You can keep, for example, a Standard preset and a Purple preset and switch between them.
- The color switch button in the header also changes the scheme on the spot with a single tap (shared by every chart — Natal, Synastry, Progression, and the rest).

- The same switch is available from the button at the top right of the single wheel in Beginner.
Changing the display name (the name shown in the header)
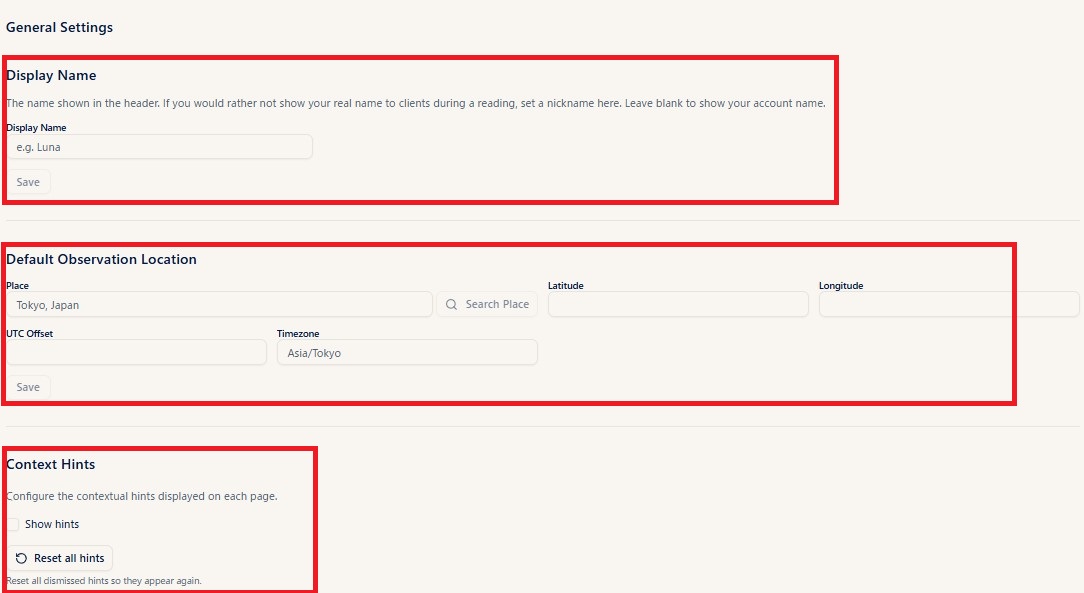
Steps
- Open the settings screen from Settings in the header and scroll down to General Settings.
- Enter the name you want in the header in the Display Name field.
- Press Save.
Notes
- The name you set here is shown in the StarNavigator header. If you would rather not show your legal name to clients during a reading, a nickname or a business name is a safe choice.
- If you save the field empty, the name registered on your account is shown.
Default observation location
Steps
- Open the Default Observation Location field under General Settings at the bottom of the settings screen (see the image above).
- Type a place name into the place field and press Search Place, then pick from the suggestions (latitude, longitude, UTC offset, and timezone are set automatically).
- Press Save.
Notes
- Once a default observation location is registered, it is used as the initial transit location when you build a transit chart (Progression) or a Forecast. You can still change it to another place on each chart screen.
- It is also filled in automatically when you choose a record with no location set from the Shared Data (astronomical events such as new and full moons) in the birth data picker (see "Shared data" in the Clients chapter).
Context hints (showing, hiding, and resetting the pop-up guidance)
Steps
- Open the Context Hints field under General Settings at the bottom of the settings screen (see the image above).
- Ticking Show hints displays the operating hints (pop-up guidance) on each page. Clearing it hides them all at once.
- Pressing the Reset all hints button resets even the hints you closed with the "x" so that they appear from the beginning again.
Notes
- Operating hints are pop-ups that explain how to use each screen on the spot. Once you are comfortable, you can turn them off for a cleaner screen and bring them back when you return to a feature you have not used for a while.
- Closing an individual hint with the "x" only suppresses that one hint. Use Reset all hints when you want them all back.
Plan and Credits
About this chapter
This chapter covers checking, subscribing to, changing, and purchasing plans and credits. Some of it — subscribing, payment, buying credits, receipts — happens on your ARI account page (the official site).
Checking and subscribing to a plan
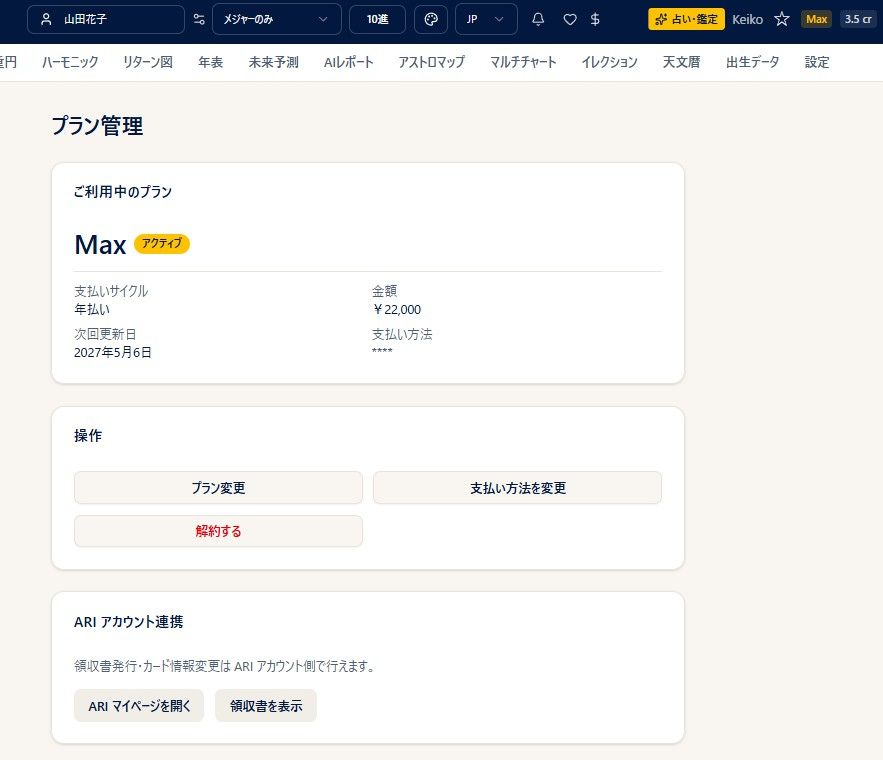
Steps
- Pressing the plan name button at the right of the header (Basic, for example) opens the Plan Management screen. On the free plan the button reads Subscribe, and when you are not logged in it reads Log in.
- Plan Management shows your current plan, billing cycle (monthly or yearly), amount, next billing date, and payment method.
- To subscribe for the first time, go to Subscribe, choose a plan and a monthly or yearly cycle, choose a payment method (saved card / new card / bank transfer [yearly only]), agree to the terms, and press the apply button.
Notes
- A 30-day free trial is available for new subscriptions to Basic on the monthly cycle only.
- Card payments are processed by Omise, and card numbers are not stored in StarNavigator.
- Logging in, registering, and the details of payment are handled on the ARI official site.
Pricing
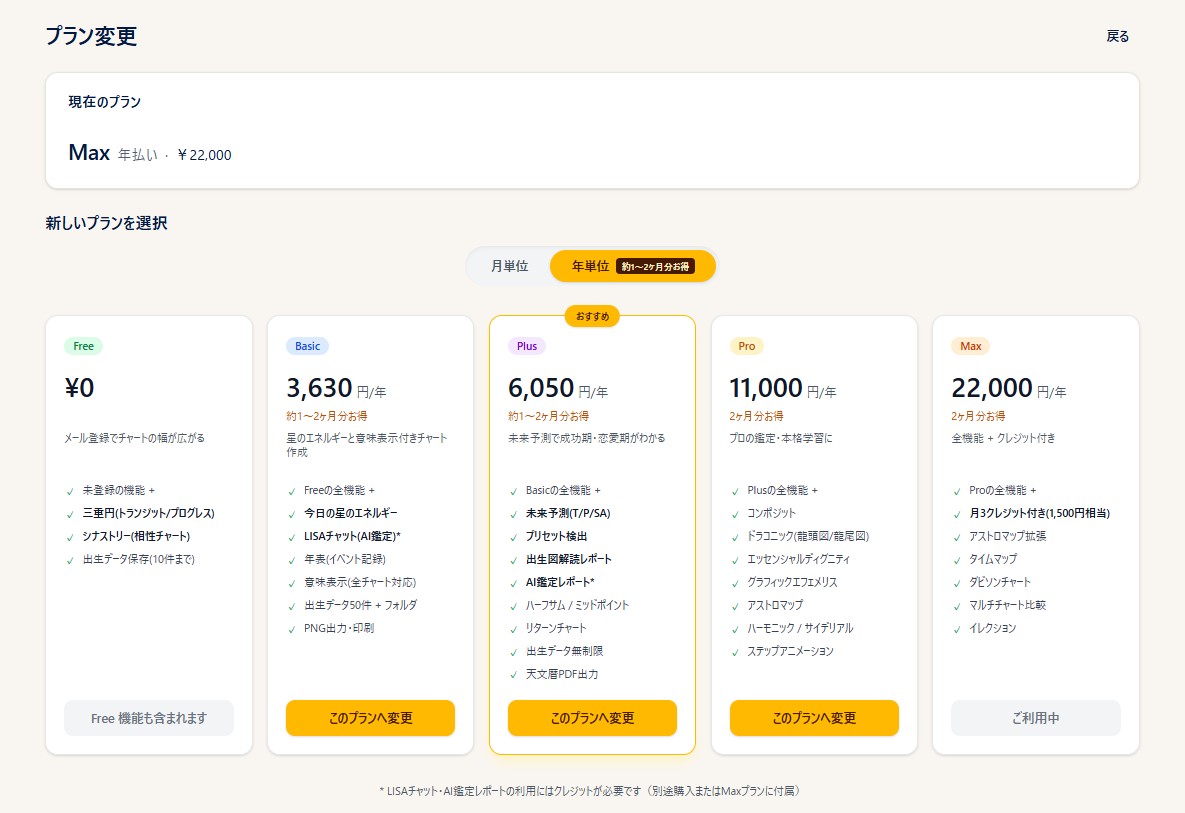
| Plan | Monthly (tax incl.) | Yearly (tax incl.) |
|---|---|---|
| Basic | JPY 330 | JPY 3,630 |
| Plus | JPY 550 | JPY 6,050 |
| Pro | JPY 1,100 | JPY 11,000 |
| Max | JPY 2,200 | JPY 22,000 |
- The yearly cycle is about one to two months cheaper than monthly. Bank transfer is available on the yearly cycle only.
- The Max plan includes 3 credits every month (worth JPY 1,500). For anyone using the AI features (LISA Chat, AI research reports, and so on) it is effectively better value than Pro.
- For what each plan can do (the feature details), see the pricing and feature comparison page. The plan comparison table on the subscribe and change screens shows it as well.
Changing and cancelling a plan
The Change Plan and Cancel Subscription buttons are in the Actions section of the Plan Management screen above. Pressing Change Plan opens the plan selection screen shown under "Pricing".
Steps
- Plan Management then Change Plan upgrades or downgrades your plan.
- Upgrade: takes effect immediately (you are charged the difference after the remaining period is deducted).
- Downgrade: your current plan continues to the end of the period and switches at the next renewal.
- Cancel Subscription schedules cancellation at the end of the period (there is no refund for cancelling mid-period).
- Once scheduled, Undo Cancellation and Undo Scheduled Change reverse it.
Notes
- Upgrading from yearly to monthly can forfeit part of your remaining balance, and a warning is shown.
- Within one month of cancelling, your data can be restored if you resume.
Credits

Steps
- The (n) cr button in the header shows your credit balance.
- Credits are purchased from that button (or from Purchase Credits in each feature), on your ARI account page (in a new tab).
Notes
- Credits are consumed by LISA Chat (AI readings), AI research reports, and generating the Forecast Calendar, among others.
- The Max plan includes 3 credits every month (worth JPY 1,500).
- Purchasing credits, issuing receipts, and changing card details are all handled on your ARI account page.
Readings
About this chapter
This chapter covers the Readings page — the hub for the reading services — which opens from the Readings button in the header.
The readings hub
Steps
- Once you are logged in, a gold Readings button appears in the header. Pressing it opens the Readings screen.

- Choose the service you want from the product cards.
Notes
- LISA AI Reading: Open LISA opens a reading by LISA, the AI astrologer (an external service, in a new tab).
- The Readings button is shown to logged-in members.