Astro Map
About this chapter
This chapter covers the Astro Map. The astro map draws the lines where the planets of a natal chart fall on the horizon or the meridian onto a world map, so you can see your relationship with places. The astro map is available on the Pro plan and above (the advanced features — overlaying transits, solar arc, and progressions to see timing, plus relocation and parans — require Max).
Creating an astro map
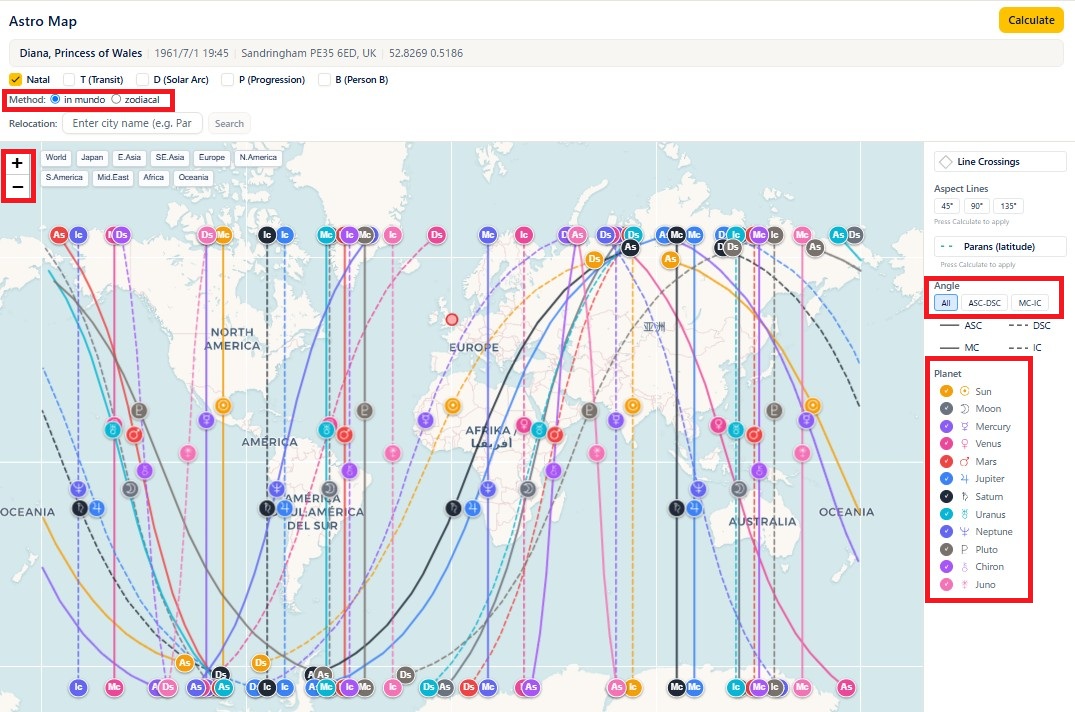
Steps
- Open Astro Map from the menu.
- Choose the Birth Data (the Birth Location is shown).
- Choose in mundo or zodiacal as the Method.
- Turn ASC / DSC / MC / IC on and off under Show Angles.
- Press Calculate and the lines are drawn on the map.
Notes
- in mundo calculates, from the actual position of the body (right ascension and declination), the points where it is rising, setting, or culminating (the default, and the same as the standard on astro.com). zodiacal is a simplified method that uses only the ecliptic longitude of the body. The two methods can put the lines tens to hundreds of kilometres apart. If you are unsure, leaving it on in mundo is fine.
- If no lines are found, No lines found is shown.
- The + and - buttons at the top left zoom the map in and out. On a smartphone you can also zoom by pinching out.
- The region presets above the map (World / Japan / E.Asia / SE.Asia / Europe / N.America / S.America / Mid.East / Africa / Oceania) zoom quickly to that region.
- The birth location is marked with a red circle on the map.
- In the Angle section on the right you can click angles individually or switch them in groups with the All / ASC-DSC / MC-IC buttons.
- The checkboxes in the Planet section on the right turn each planet's lines on and off (no recalculation needed).
- Lines are drawn solid for ASC and MC and dashed for DSC and IC. Lines from anything other than the natal chart (N) — T, D, P, B, and so on — are dotted to distinguish them.
- Each line is marked in three places: at both ends and at the latitude where the body is directly overhead. Hovering over a line shows the planet symbol and the angle name in a tooltip.
Overlaying timing (T / D / P / SR)
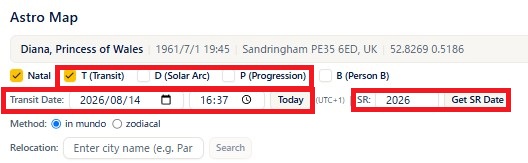
Steps
- In addition to the natal chart (N), tick T (Transit) / D (Solar Arc) / P (Progression) when you want to see timing.
- Ticking any of T, D, or P makes the Transit Date field appear. Specify the date and time (the Today button returns it to the current date and time).
- The SR field appears at the same time. To look at a solar return period, enter the year and press Get SR Date, and the solar return date and time for that year are set automatically.
Notes
- T, D, P, and SR draw lines not only from the natal bodies but also from the transiting, solar arc, progressed, and solar return positions for the date and time you specify. Because the positions change over time, overlaying them shows the timing dimension — around when your connection to which places grows stronger.
- The Transit Date and SR fields are only shown while T, D, or P is ticked.
- When you calculate several charts on top of N — T, D, P, and so on — a new Layer section appears in the legend on the right. There you can turn each calculated chart (N, T, D, P, and so on) on and off without recalculating.
- T, D, P, and SR are features of the higher plans (see the plan note below).
Overlaying another person's chart (B)
Steps
- Ticking B (Person B) brings up a field for choosing the other person's birth data.
- Choose their birth data and their lines are overlaid on the map as well.
Notes
- This is not about timing; it overlays the natal lines of a second person so you can look at the two people's relationship with places.
- B is also a feature of the higher plans (see the plan note below).
Line crossings, aspect lines, and parans
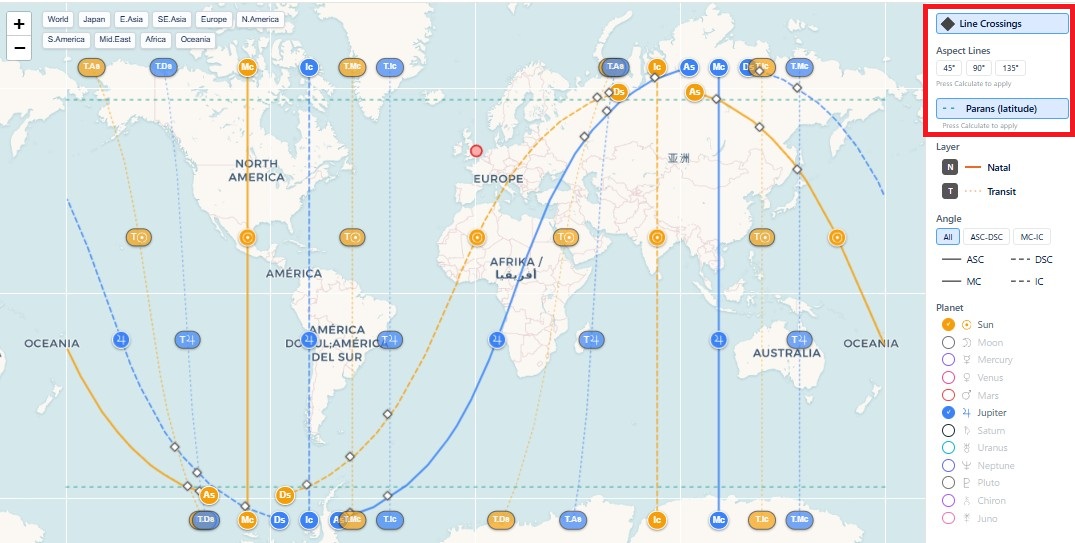
Notes
- Line Crossings: shows the points where several lines cross.
- Aspect Lines: lines where a body relates to an angle by 45, 90, or 135 degrees (dotted). They are an aid for fine, local-area work; press Calculate after selecting them to apply.
- Parans (latitude): shows the latitudes (horizontal lines) where two bodies are simultaneously on an angle. They apply to the body pairs currently visible.
- Note: advanced displays such as aspect lines and parans are features of the Max plan.
Relocation
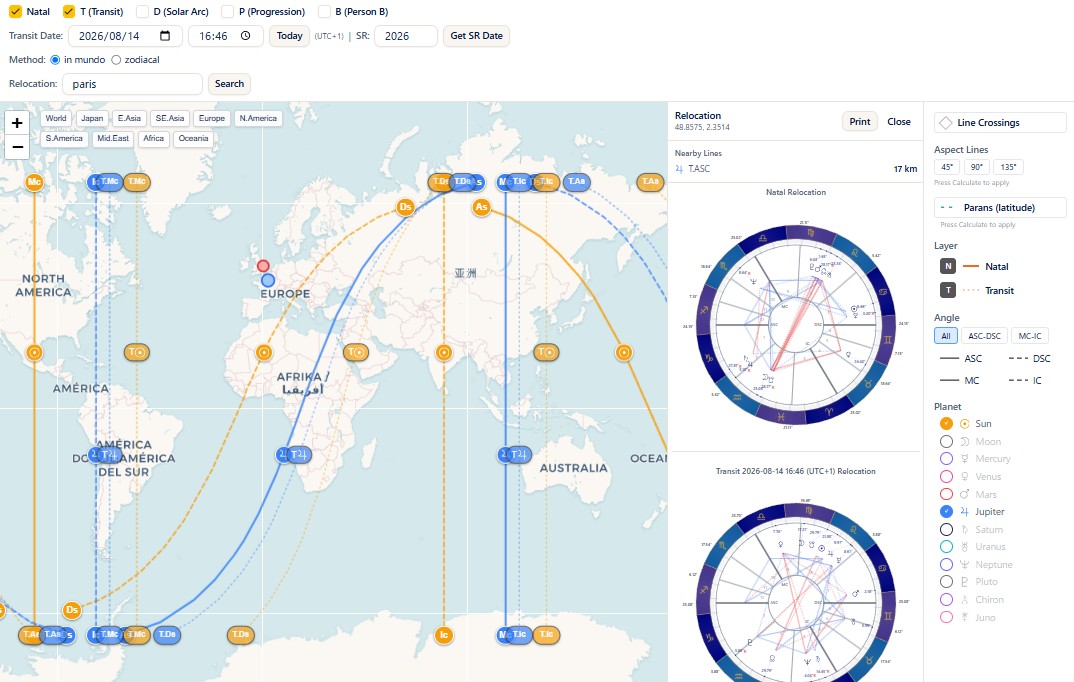
Steps
- Clicking the map shows the relocation chart for that point (the natal chart as it would be somewhere you moved to).
- Alternatively, type a city name into the Relocation field and Search.
Notes
- The relocation point you clicked (or searched for) is marked with a blue circle on the map.
- If you click a relocation point while T (Transit) or another layer is ticked, you get the relocated natal chart plus the relocated T, D, or P charts for that point and date and time.
- The relocation panel automatically lists the Nearby Lines — the lines passing close to the point you clicked — with their distance in kilometres.
- Relocation is a feature of the higher plans (see the plan note below).
Plans
Astro map (the basics, natal lines) = Pro and above. The advanced features — overlaying transits, solar arc, progressions, and SR to see timing, showing a second person's (B) lines, and relocation — = Max and above.